

Tile lippage isn't just a minor installation error; it's a predictable physical reaction to mortar shrinkage that can ruin even the most expensive materials. You've likely felt the frustration of seeing "shadowing" across a new floor when the site lighting changes, or worse, dealing with the liability of a trip hazard on a commercial project. Mastering how to prevent tile lippage requires moving beyond basic trowel techniques and embracing mechanical stabilization that counters the natural bowing of modern porcelain.
You understand that a perfectly flat floor is the hallmark of a true professional, yet achieving it on uneven substrates is a constant challenge. This guide provides the technical roadmap to achieving a lippage-free finish that meets strict ANSI A108.02 standards. We'll examine the critical role of substrate flatness, the necessity of Large and Heavy Tile (LHT) mortars, and why a Ceramic Tile Leveling System has become the industry standard for large-format installations. By the end of this professional guide, you'll have the practical knowledge to eliminate aesthetic shadowing and reduce installation times while ensuring every edge stays within the 1/32 inch tolerance required for a high-performance build.
Key Takeaways
- Understand the ANSI A108.02 standards that define professional tolerances, including the 1/32 inch limit for narrow grout joints.
- Identify the critical difference between level and flat substrates to meet the 1/8 inch in 10 feet requirement for large-format tile.
- Master how to prevent tile lippage by implementing a mechanical Ceramic Tile Leveling System that stabilizes tiles against mortar shrinkage.
- Apply professional troweling techniques and select the correct Large and Heavy Tile (LHT) mortars to ensure maximum coverage and bond strength.
- Learn the 24-hour rule and parallel striking techniques for safely removing leveling clips without compromising the final finish.
Understanding Tile Lippage: Standards and Root Causes
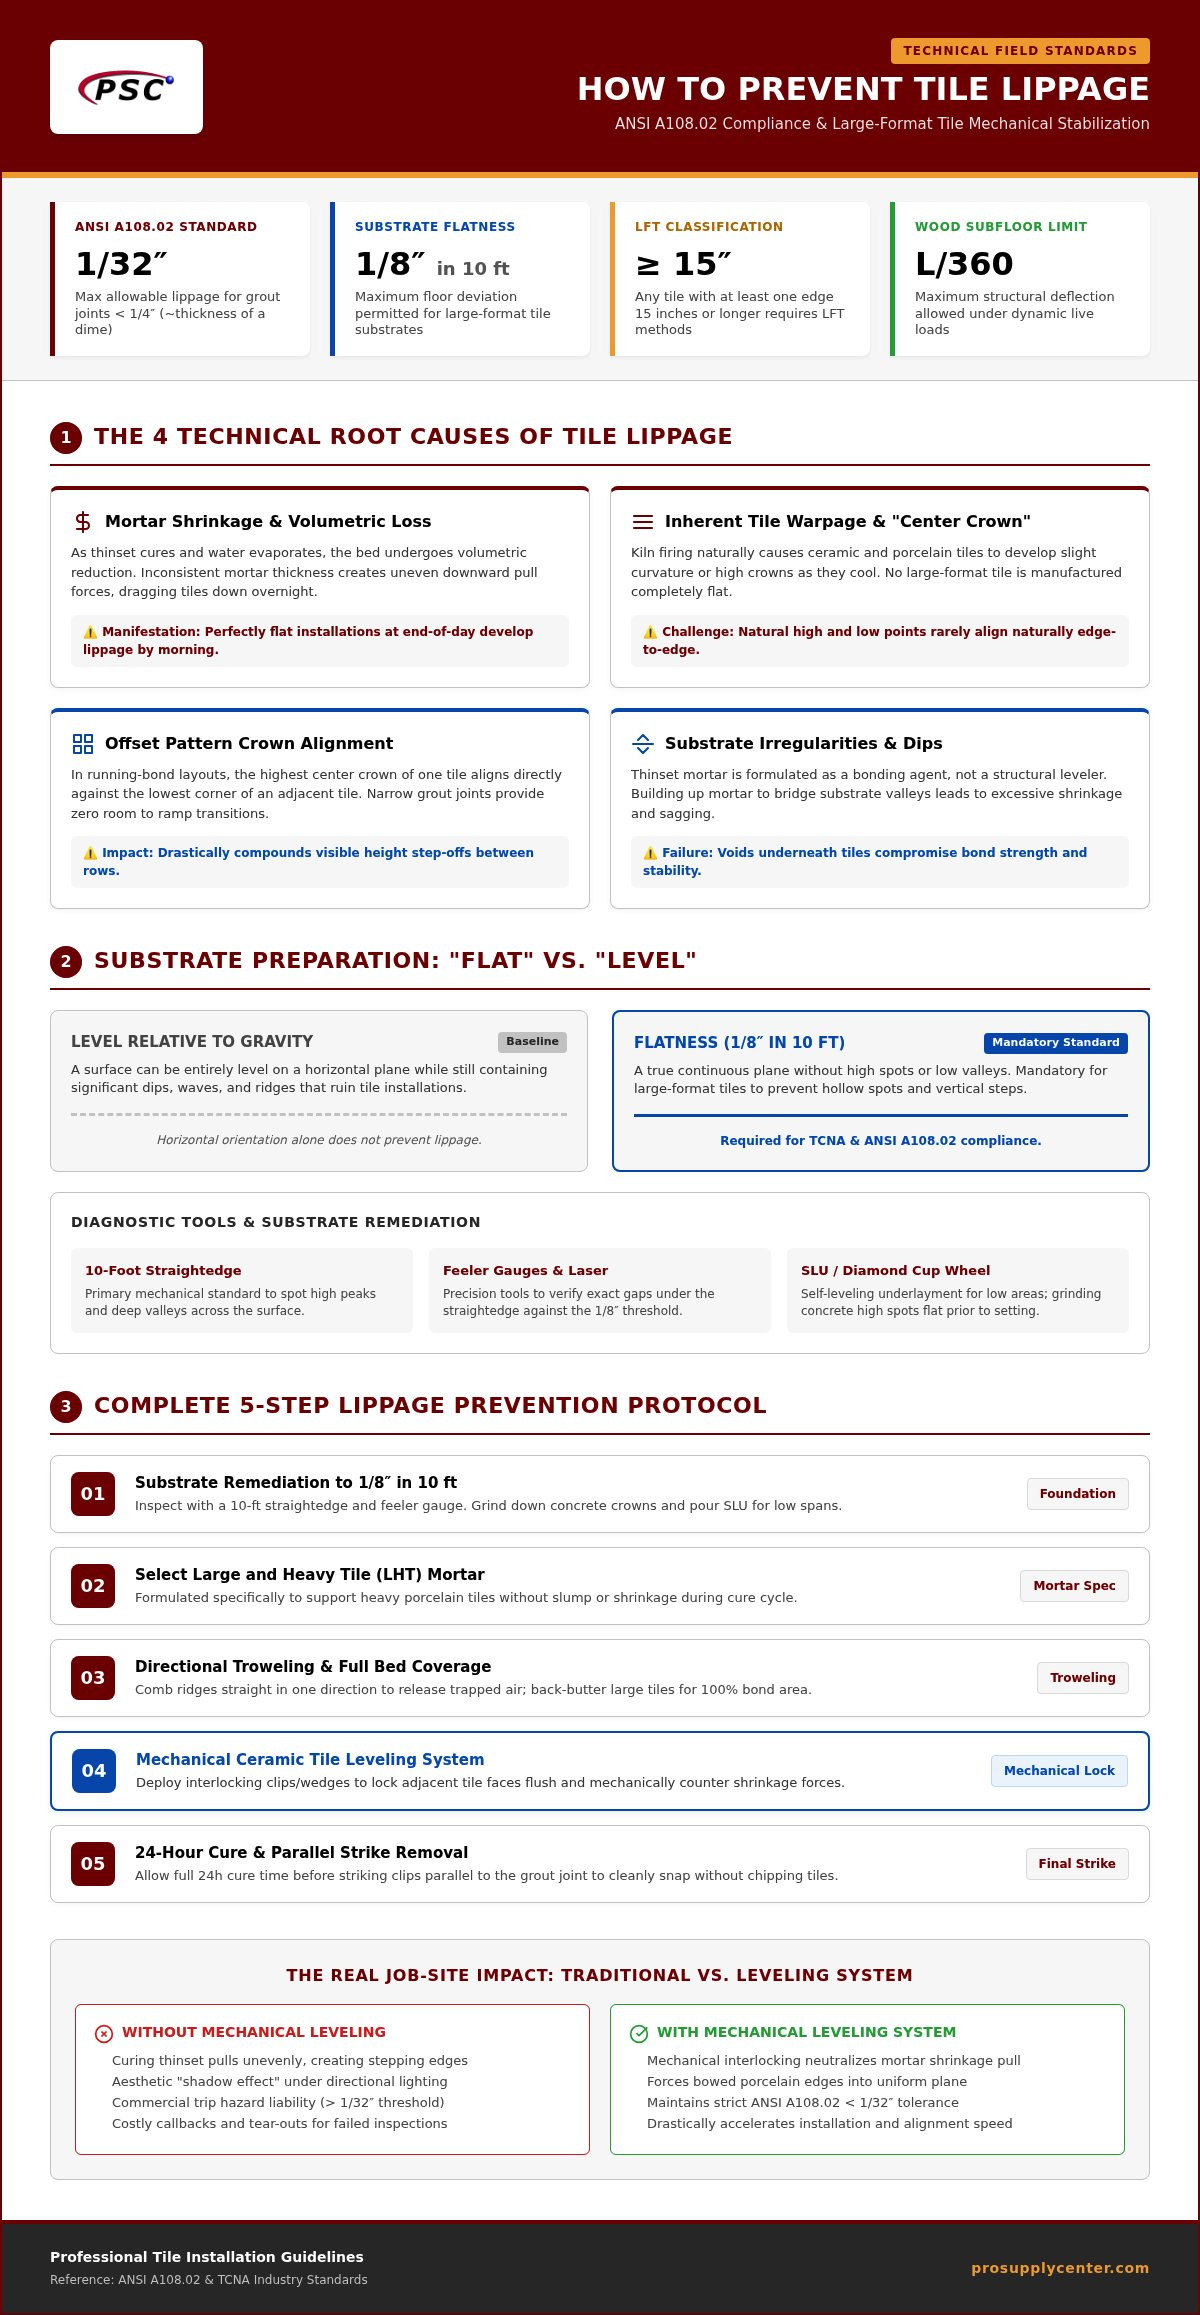
Tile lippage is defined as the vertical displacement between the edges of adjacent tiles. It is a technical failure that transforms a smooth surface into a series of jagged steps. Beyond the obvious trip hazard, lippage causes the "shadow effect," where overhead or wall-wash lighting hits the raised edges and casts long, dark shadows across the floor. This visual distortion often makes a project look amateurish even if the tiles are high-quality. Professionals rely on ANSI A108.02 standards to determine acceptable limits. For grout joints narrower than 1/4 inch, the allowable lippage is just 1/32 inch, which is approximately the thickness of a dime. Anything beyond this requires correction to ensure the integrity of the installation.
Manufacturing processes also play a role. Ceramic and porcelain tiles are kiln-fired products that naturally develop a slight bow or "warpage" as they cool. This inherent curvature means that no tile is perfectly flat. When these slightly bowed tiles are placed side-by-side, the high and low points rarely align perfectly. Understanding these physical limitations is the first step in learning how to prevent tile lippage on a professional job site.
Why Mortar Shrinkage is Your Biggest Enemy
The curing process is a frequent cause of unexpected lippage. A deep understanding of thinset mortar composition and bonding reveals that as water evaporates, the mortar bed undergoes a slight volumetric reduction. This shrinkage creates a downward force that can pull the tile into the bed. If the mortar is applied with inconsistent thickness or if the substrate has deep depressions, the tile will sink unevenly. Without mechanical stabilization, a floor that looked perfectly flat when you left the job site can develop significant lippage by the next morning as the mortar dries and contracts.
The Impact of Large Format Tiles (LFT)
The risk of uneven edges increases significantly with Large Format Tiles (LFT), which are defined as any tile with at least one edge 15 inches or longer. These tiles typically feature a "center hump" or crown due to the cooling process in the factory. When using a running bond or offset pattern, the center of one tile often sits adjacent to the corner of another. This puts the highest point of the first tile next to the lowest point of the second. Narrow grout joints, while aesthetically popular, leave zero room for error. Because there is less space to "ramp" the transition between tiles, even minor displacement becomes a glaring defect. This is why knowing how to prevent tile lippage through mechanical help is critical for LFT projects.
Substrate Preparation: The Foundation of Flatness
A common mistake in the trade is confusing a level floor with a flat substrate. A floor can be perfectly level relative to gravity but still possess waves, dips, or ridges that make it impossible to avoid uneven edges. To meet professional standards, the substrate must be flat to within 1/8 inch in 10 feet for large-format tiles. This tolerance is critical because thinset mortar is designed as a bonding agent, not a leveling compound. Attempting to "build up" mortar to fix a deep dip often leads to excessive shrinkage and edge displacement as the material cures.
Checking for these variances requires specific tools to identify problem areas before the first tile is set:
- 10-foot Straightedge: The most reliable tool for finding "valleys" and "peaks" across the floor.
- Laser Level: Useful for establishing a benchmark height across large rooms or multiple spaces.
- Feeler Gauges: Used to measure the exact distance between the straightedge and the substrate to ensure compliance.
Reviewing the TCNA lippage standards and allowable tolerances confirms that substrate flatness is the primary factor in a successful installation. If the foundation isn't right, even the best mechanical leveling tools will struggle to compensate for the underlying void. Mastering how to prevent tile lippage starts with a meticulous inspection of the surface beneath the tile.
Correcting Substrate Irregularities
When the floor deviates significantly from the 1/8 inch rule, a self-leveling underlayment (SLU) is often the most efficient solution for large areas. For smaller imperfections, use a high-strength patching compound to fill divots or a diamond cup wheel to grind down concrete high spots. For wood subfloors, you must ensure the structure meets the L/360 deflection standard. This means the floor should not bend more than the span length divided by 360 under a standard load. Excessive flex causes the tile to move independently of the mortar, leading to bond failure and edge displacement over time.
Waterproofing and Flatness
Modern installations often include uncoupling membranes or waterproofing layers that add thickness to the floor profile. You must account for these layers when planning transitions or integrating shower drains and niches. If the waterproofing isn't applied uniformly, it can create subtle ridges that throw off the tile plane. The PSC Pro Gen II Waterproofing System provides a predictable, uniform surface for tiling that minimizes substrate-induced installation errors. This system ensures your waterproofing layer doesn't become the source of the very lippage you are trying to avoid. For those looking to build a resilient foundation, choosing professional-grade waterproofing supplies is a logical first step in learning how to prevent tile lippage from the ground up.
The Mechanical Solution: Ceramic Tiles Leveling System
Traditional spacers are designed to maintain grout joint width, but they provide no vertical control. This is why many installers struggle with how to prevent tile lippage despite careful placement. A professional Ceramic Tiles Leveling System acts as a mechanical bridge, physically locking adjacent tiles into a single plane. This system counters the "pull" of curing mortar, ensuring that the tiles stay flush while the bond sets. By creating a rigid connection between the tiles, the system forces the higher edges down and pulls the lower edges up until the surface is uniform.
The mechanics of the system rely on two distinct components working in tandem. The clip serves as a fixed anchor point that sets the grout joint width and provides base tension beneath the tile. The wedge is then driven through the clip, applying consistent downward pressure across the joint. Unlike manual adjustment, this mechanical lock prevents tiles from shifting or "slumping" as moisture evaporates from the thinset. Without this stabilization, the natural shrinkage of the mortar bed during the 24-hour curing phase can easily pull a perfectly set tile out of alignment.
Choosing Between Cap/Strap and Wedge/Clip Systems
Wedge-and-clip systems are the industry standard for Large Format Tile (LFT) because they handle the high tension required to flatten crowned porcelain. Using specialized installation pliers is essential for technical consistency. These tools allow you to apply the same amount of pressure across every joint, which is impossible to replicate by hand. Most professionals utilize a floor tile leveling kit that combines disposable clips with heavy-duty reusable wedges to balance job site costs with high-performance results. While cap and strap systems exist, they often lack the sheer clamping force needed for heavy, 24x48 inch slabs.
Proper Placement of Leveling Clips
Proper placement is non-negotiable for a lippage-free finish. Clips should be positioned approximately two inches from each corner to provide maximum leverage where the tile is most likely to dip or lift. For heavy porcelain planks, additional clips are often required every 8 to 12 inches along the long edges to counteract center bowing. It's critical to ensure full mortar contact around the clip base during installation. If a clip is placed over a dry spot or a hollow void, the mechanical tension can actually lift the tile edge away from the substrate, compromising the bond. Mastering these placement nuances is a fundamental part of how to prevent tile lippage on high-end residential and commercial floors where expectations for flatness are absolute.
Mastering Mortar and Trowel Techniques
Mechanical leveling systems are only as effective as the mortar bed supporting them. Learning how to prevent tile lippage requires moving beyond basic application and mastering directional troweling. Many installers still use swirling or "fan" patterns, but this technique traps air pockets beneath the tile. Trapped air prevents the mortar ridges from collapsing, which leads to hollow spots and eventual tile slump. By troweling in straight lines parallel to the short side of the tile, you create channels that allow air to escape easily when the tile is bedded. This ensures the ridges collapse completely, creating a solid, uniform support layer.
Proper coverage is the goal for any professional project. For interior wet areas or large-format installations, you must achieve at least 95 percent mortar contact. This is impossible without selecting the correct trowel notch size. Large Format Tiles (LFT) generally require a 1/2 inch by 1/2 inch square notch or a specialized Euro-notch. These larger notches provide the necessary depth to accommodate the inherent warpage of the tile while ensuring the ridges are tall enough to collapse and create a continuous bond. If the mortar ridges don't fully collapse, the tile remains elevated on thin points of contact, making it prone to shifting even if clips are in place.
The Necessity of Back-Buttering
Back-buttering is a non-negotiable step for high-performance tiling. Start by applying a thin "skim coat" of mortar to the back of the tile using the flat side of the trowel. This process fills the pores of the tile and creates a mechanical bond that a standard mortar bed cannot achieve alone. Once the back is skimmed, the tile is ready to be set into the combed ridges on the substrate. Back-buttering is the only way to guarantee full contact on warped tiles where the center or corners might otherwise bridge over the mortar bed. To achieve these high-coverage results, ensure you are using professional-grade tiling supplies on every installation.
Managing Mortar Consistency
The mix of your mortar directly impacts how well it resists shrinkage. Mortar that is too "soupy" or wet will lose volume as the water evaporates, pulling the tile downward and creating lippage overnight. The standard is a "peanut butter" consistency, where the mortar holds a sharp ridge without sagging or slumping. For LFT projects, always select a slump-resistant mortar classified under ANSI A118.15. These high-performance thin-sets are engineered with improved polymers that support the weight of heavy porcelain, preventing the tile from sinking into the bed while the mortar cures. Understanding the chemistry of your materials is a critical component of how to prevent tile lippage in demanding environments.
Job Site Efficiency and Final Finishing
The final phase of a tiling project is where job site efficiency meets long-term durability. Even with the best mechanical systems, the process of how to prevent tile lippage isn't complete until the clips are removed and the surface is inspected. You must adhere to the 24-hour rule for mortar curing before attempting to strike off the leveling components. Removing clips too early can lead to "tile creep," where the bond hasn't fully hardened and the tile shifts slightly under tension. This shift creates a permanent edge displacement that is impossible to fix without tearing out the tile.
Efficiency also depends on maintaining your tools. While clips are disposable, the wedges in your Ceramic Tiles Leveling System are designed for multiple uses. Clean them immediately after removal to ensure no dried mortar interferes with the tensioning pliers on your next project. For the clips themselves, the removal technique is specific: always strike the clip parallel to the grout joint. This ensures a clean break at the pre-determined snap point below the tile surface. If a clip breaks improperly and leaves a plastic stem protruding, it will show through the grout and ruin the aesthetic of the floor.
Removing the Leveling System
A frequent pitfall is rushing the removal process and breaking clips above the tile surface. This usually happens when the mortar has squeezed up into the joint and hardened around the clip's break point. To avoid this, clear excess mortar from around the clips while it is still wet. If you encounter a stubborn clip, don't pry it. Use a sharp chisel to carefully remove the protruding plastic without damaging the tile edge. Consistency in removal protects your reputation and ensures the floor remains compliant with ANSI standards.
Final Inspection and Grouting
Before you begin grouting, perform a final inspection using a lippage gauge or the "dime test" to verify that no edge exceeds the 1/32 inch tolerance. If you find minor sharpness at the edges, professional grade abrasives can be used to lightly hone the porcelain and create a smoother transition. Grout color also plays a strategic role; high-contrast grout will highlight even the smallest variations, while matching grout helps minor imperfections blend into the background. For projects involving complex layouts, refer to the Professional Shower Hardware Guide to ensure your drains and niches integrate seamlessly with the finished tile plane. This attention to detail is the last critical step in how to prevent tile lippage and delivering a professional-grade result.
Achieving a Precision Finish on Every Project
Achieving a perfectly flat floor requires more than just a good eye; it demands a systematic approach to substrate preparation and mortar management. You've learned that meeting the 1/8 inch in 10 feet flatness rule and utilizing directional troweling are foundational steps. These techniques ensure that your materials work with you rather than against you during the critical curing phase. By focusing on these technical details, you eliminate the shadowing and trip hazards that compromise a professional build.
Mastering how to prevent tile lippage ultimately comes down to using the right mechanical tools to counter natural tile warpage and mortar shrinkage. Integrating a system with a high-tension wedge design into your workflow allows you to maintain ANSI compliance while significantly reducing re-work and installation time. We focus on providing contractor-grade durability and offer national shipping on all tiling accessories to keep your job site running efficiently. With the right preparation and professional-grade stabilization, you can deliver a flawless, high-performance surface that stands up to the closest inspection.
Shop our professional Ceramic Tile Leveling Systems for a lippage-free finish and take the guesswork out of your next large-format installation.
Frequently Asked Questions
Is tile lippage always the installer's fault?
Tile lippage is not always the result of poor workmanship; inherent tile warpage and substrate irregularities are major contributors. Kiln-fired tiles often have a natural crown or bow from the manufacturing process. While the installer doesn't create the warpage, they are responsible for knowing how to prevent tile lippage through mechanical stabilization. Failing to address a non-flat substrate or ignoring the 1/8 inch in 10 feet rule often leads to these visible defects.
What is the maximum allowable lippage for floor tiles?
According to ANSI A108.02 standards, the maximum allowable lippage for grout joints between 1/16 inch and 1/4 inch is 1/32 inch. This tolerance includes the inherent warpage of the tile module. For grout joints wider than 1/4 inch, the allowable limit increases to 1/16 inch. Maintaining these tight tolerances is essential for safety and aesthetics, particularly when overhead lighting is present to prevent the shadow effect on uneven edges across the floor.
Can I fix tile lippage after the mortar has dried?
You cannot easily fix lippage once the thinset has reached its final set. Since the mortar has hardened, the tile is bonded to the substrate in its current position. Attempting to grind down the high edge of a porcelain tile will ruin the factory finish and glaze. The only professional solution is to carefully remove the affected tiles, clean the substrate, and reinstall them using a proper Ceramic Tiles Leveling System to ensure a flat finish.
Do I need a leveling system for small subway tiles?
Leveling systems are generally not required for small subway tiles where all edges are shorter than 15 inches. These smaller modules are less prone to the dramatic center hump found in large format porcelain. However, if you are working with long, narrow subway planks or handmade tiles with significant dimensional variation, using a system can help maintain speed. For standard 3x6 tiles, traditional spacers and a flat substrate are typically sufficient for high-quality results.
How do I calculate how many clips and wedges I need?
Clip consumption depends on the tile size and your layout pattern. For a standard 24x24 inch tile with two clips per edge, you will need approximately 11 clips per square meter, which is roughly one clip per square foot. Larger tiles or offset patterns require more frequent placement to manage bowing. Since wedges are reusable for over 100 cycles, you only need enough to cover your maximum daily square footage plus a small buffer for job site breakage.
Can I use a leveling system with natural stone?
You can use a leveling system with natural stone, but you must be cautious with softer materials like marble or limestone. The high tension applied by the wedges can occasionally chip or spall the edges of soft stone if the clips are overtightened. It is also critical to ensure the stone has consistent thickness. If the stone varies significantly in gauge, the leveling system may struggle to bridge the height difference without creating hollow spots in the mortar bed.
What trowel notch is best for preventing lippage?
Selecting the right notch size is a key part of how to prevent tile lippage on large-format projects. For tiles 15 inches or longer, a 1/2 inch by 1/2 inch square notch or a specialized Euro-notch is the professional standard. These larger notches provide the depth necessary to collapse the ridges and achieve 95 percent coverage. This volume of mortar allows the tile to be pressed into the bed, accommodating minor substrate dips and tile warpage.
Why are my leveling clips breaking off too early?
Leveling clips often break prematurely if mortar has squeezed up into the grout joint and hardened around the clip's break point. This creates a bridge of thinset that prevents the plastic from snapping at its base. Another common cause is removing the clips before the mortar has reached a final set. Always wait at least 24 hours and ensure you are striking the clips parallel to the joint to ensure a clean break below the tile surface.


