

Did you know that manual niche construction and waterproofing account for a significant portion of moisture related failures in modern custom showers? It's a frustrating reality for many installers. You can spend hours framing, blocking, and mudding a custom box, only to struggle with inconsistent slopes or pinhole leaks in those tight internal corners. Choosing a high quality preformed shower niche for tile isn't just about convenience. It's a strategic move to eliminate the variables that lead to structural rot and costly callbacks.
We understand that performance on the job site matters more than marketing flair. You need a solution that fits perfectly within standard 14.5 inch stud bays and integrates seamlessly with a reliable barrier. This guide will show you how to select and install the right preformed niche to ensure a 100% waterproof, professional grade finish. We'll cover the technical specifications of XPS foam versus ceramic inserts, the benefits of the PSC Pro Gen II Waterproofing System, and how to achieve perfectly square corners that make tiling easier. By the end of this article, you'll know how to reduce your labor time by up to 75% while maintaining a vapor tight seal that exceeds industry standards.
Key Takeaways
- Learn why factory-sealed units are superior to custom-framed niches in preventing common waterproofing failures at corner seams.
- Compare XPS foam and high-impact plastic to determine the best material for your specific tile bonding requirements and structural needs.
- Understand how to select a preformed shower niche for tile that fits standard 16-inch on-center stud spacing without compromising load-bearing framing.
- Master the installation process using PSC Pro Gen II waterproofing components to ensure a flush, professional-grade finish.
- Discover how pre-sloped sills and integrated bonding flanges can reduce on-site labor time by up to 75% compared to traditional methods.
Why Professionals Choose Preformed Shower Niches over Custom Framing
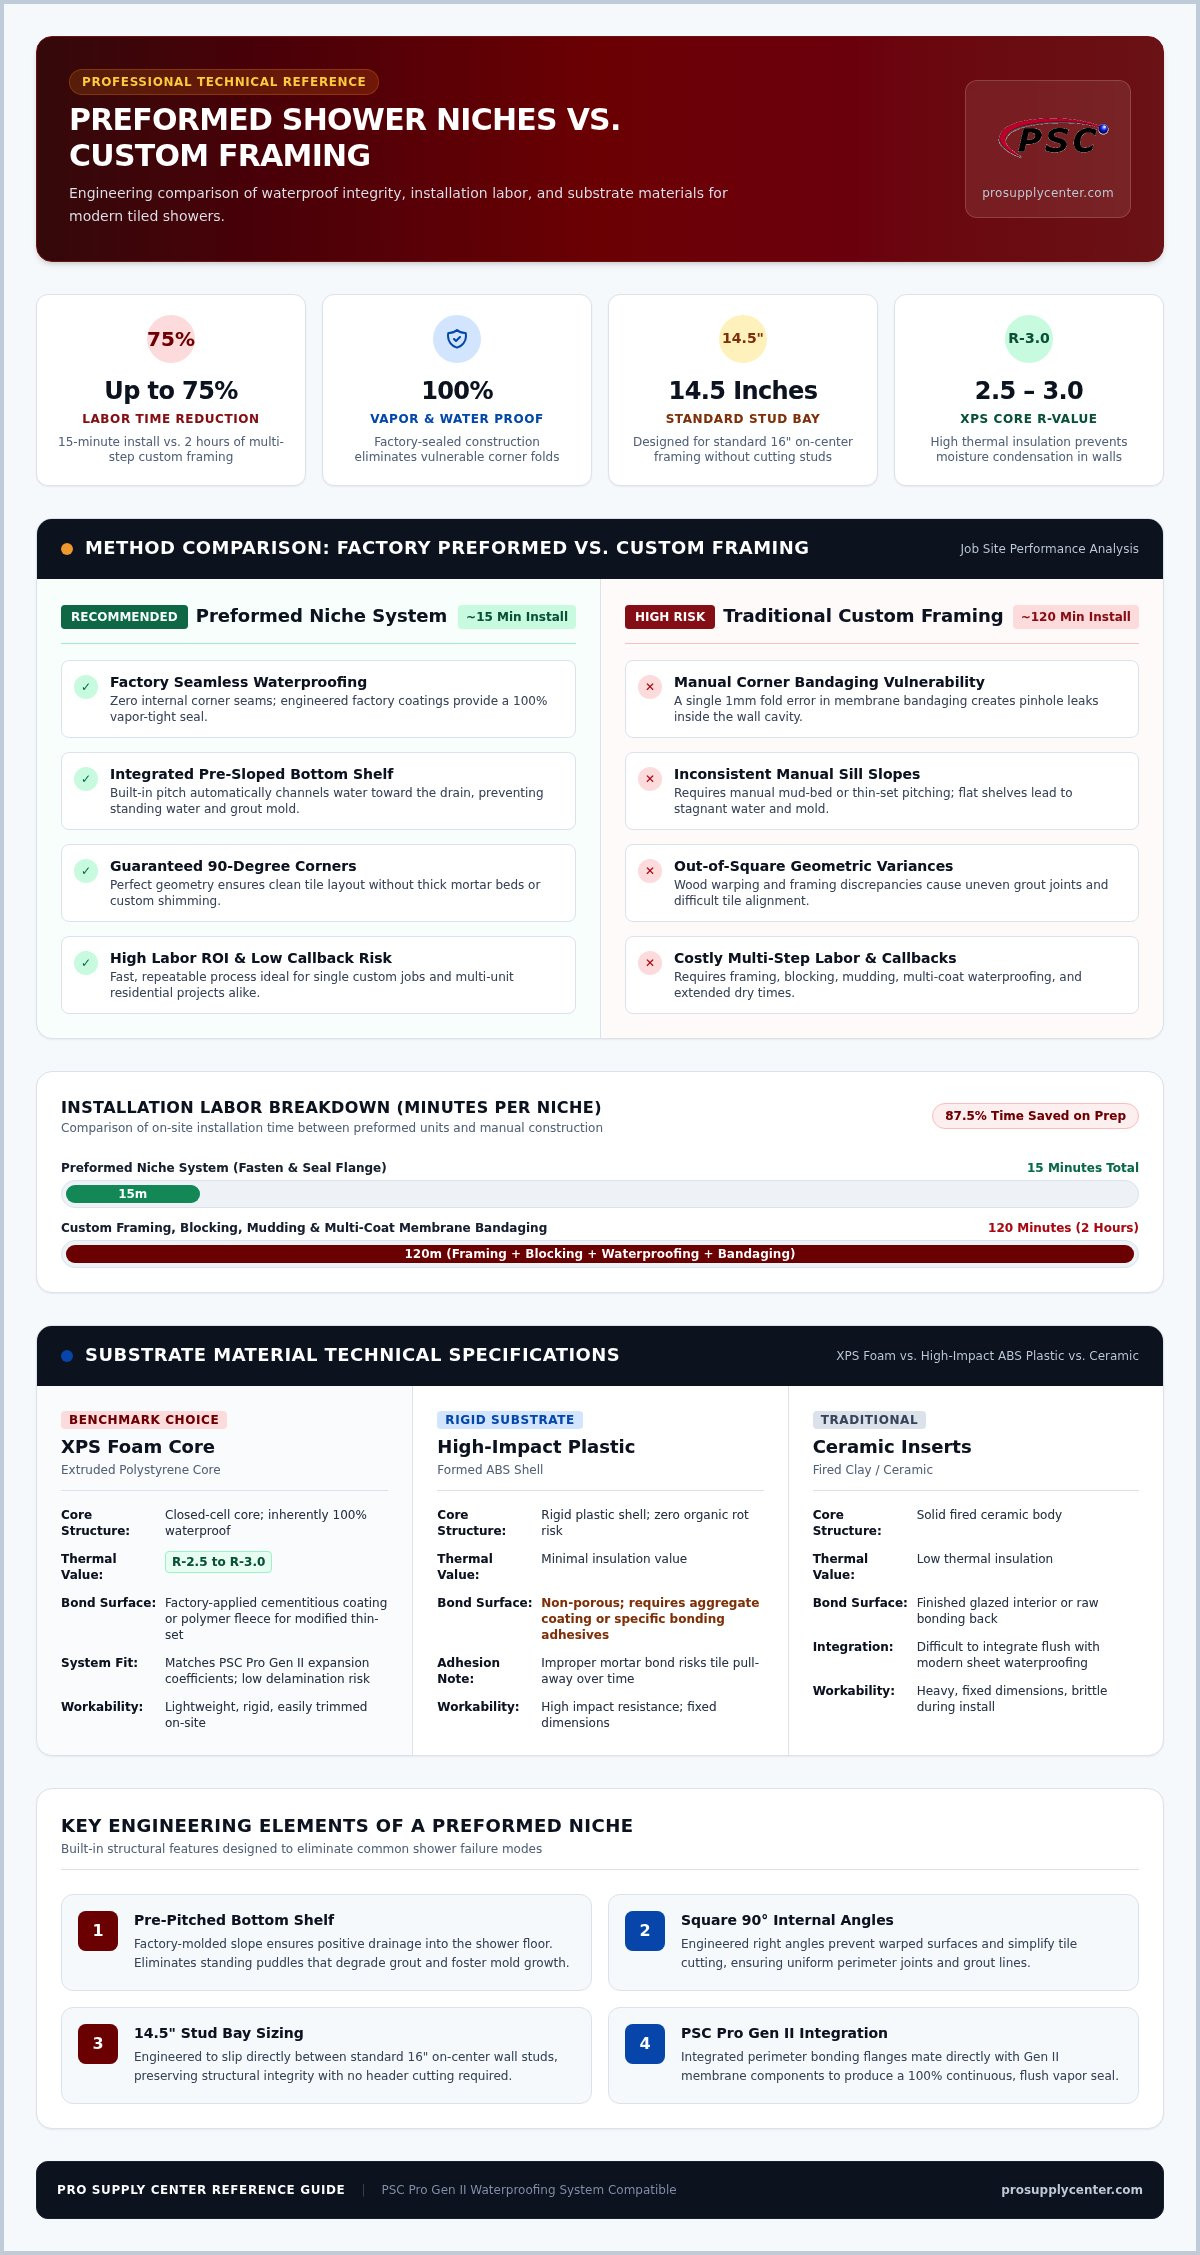
A preformed shower niche for tile is a factory-sealed, recessed cubby designed to be fastened directly to wall studs. While custom framing was once the standard, modern building science favors integrated components that eliminate human error. Traditional custom-built niches are notorious failure points because they rely on perfect manual execution of complex corner bandaging. If a single fold in the membrane is off by a millimeter, water will find its way into the wall cavity. This vulnerability makes custom niches the most common site for leaks in a tiled shower.
The shift toward preformed units is driven by a simple comparison of labor. A professional can install a preformed niche in about 15 minutes. In contrast, custom framing, blocking, and applying a multi-coat membrane system typically consumes two hours of high-skill labor. Beyond time savings, these units provide predictable geometry. You get perfectly square 90-degree angles every time. This simplifies the tile layout, ensuring that your grout lines remain consistent and your finish looks professional without the need for excessive shimming or thick mortar beds.
The Waterproofing Advantage
Seamless construction is the foundation of a leak-proof shower. Preformed units remove the need for intricate corner patches that often fail over time. These niches are engineered with factory-applied coatings that provide 100% vapor and water resistance, adhering to the fundamental principles of waterproofing. One of the most significant benefits is the pre-pitched bottom shelf. Instead of relying on an installer to manually slope a mud bed or thin-set layer, the niche comes with a built-in pitch that directs water toward the drain. This prevents standing water and the subsequent growth of grout mold, which are common issues in flat-bottomed custom niches.
Contractor ROI: Time vs. Material Costs
For contractors, the return on investment comes from the reduction of call-backs and faster project turnarounds. Standardized components, such as those found in the PSC Pro Gen II Waterproofing System, ensure that every niche installation meets the same high-performance criteria. This is especially critical in multi-unit residential builds where speed and consistency are paramount. Using a preformed shower niche for tile allows for a faster project timeline without sacrificing the integrity of the build. It transforms a high-risk custom detail into a reliable, repeatable process that protects both the structure and the contractor's bottom line.
Material Comparison: XPS Foam vs. High-Impact Plastic vs. Ceramic
Selecting the right preformed shower niche for tile depends on the substrate material and the specific environment of the shower. The three primary materials used in manufacturing, XPS foam, high-impact plastic, and ceramic, each offer distinct mechanical properties that affect bond strength and thermal performance. Choosing the wrong material can lead to long term issues with tile adhesion or moisture penetration.
XPS Foam: The Modern Standard
Extruded Polystyrene (XPS) is the current industry benchmark for high-performance installations. These niches feature a lightweight, closed-cell core that's inherently waterproof. High-density foam cores provide an R-value between 2.5 and 3.0, which offers thermal insulation that prevents condensation within the wall cavity. Most XPS niches come with factory-applied cementitious coatings or polymer fleece to ensure a superior bond with modified thin-set mortars.
This material works effectively with the PSC Pro Gen II Waterproofing System. Because the niche and the membrane share similar expansion coefficients, the risk of delamination is significantly reduced. Professionals often prefer XPS because it's easy to cut and adjust on-site while maintaining structural rigidity. It's the most versatile option for a standard preformed shower niche for tile.
Plastic and Ceramic Alternatives
High-impact ABS plastic niches offer extreme rigidity and zero rot risk. These are often used when impact resistance is a priority. However, they require careful attention during the bonding phase. Because plastic is non-porous, you've got to use specific adhesives or aggregate-coated models to ensure the waterproofing membrane adheres correctly. Without a proper mechanical bond, the tile may eventually pull away from the surface.
Ceramic inserts, such as recessed ceramic soap dishes, serve a different role. They're typically pre-finished and used for specific aesthetic requirements where a tile-over finish isn't desired. While durable, ceramic is heavy and lacks the framing flexibility of foam or plastic. These units are better suited for traditional designs rather than modern, integrated wet rooms.
Thermal Expansion and Steam Zones
Material choice becomes critical in steam showers or high-temperature zones. Materials expand and contract at different rates. Plastic expands more than ceramic or foam when exposed to heat. In a steam shower, where temperatures fluctuate rapidly, using a niche with a low permeance rating is essential. The PSC Pro Gen II membrane features a permeance of 0.07 perms, which far exceeds the TCNA threshold of 0.50 for steam applications.
When installing preformed manufactured niches, you've got to ensure the perimeter flange integrates seamlessly with the surrounding wall board. For those looking to upgrade their current inventory, you can browse a wide selection of professional-grade shower niches to find the right material for your next project.
Sizing and Configuration: Planning for Stud Spacing
In standard North American residential construction, wall studs are spaced 16 inches on-center. This configuration creates a rough opening of 14.5 inches between the 2x4 members. This is why 12-inch and 14-inch widths dominate the market. A preformed shower niche for tile is specifically engineered to slide into this cavity without requiring you to cut or notch structural framing. If you choose a niche that exceeds 14.5 inches in width, you'll need to install a header and jack studs to maintain the wall's load-bearing capacity. Cutting into studs without proper reinforcement can compromise the structural integrity of the entire bathroom wall.
Vertical configurations are the most common because they stay within a single stud bay. These tall niches allow for multi-shelf setups that accommodate modern shampoo bottles and taller accessories. Horizontal niches offer a distinct aesthetic but often require extensive reframing. Regardless of the orientation, following established shower niche installation and waterproofing guidelines is essential to ensure the unit doesn't become a source of structural moisture damage. Planning the height of the niche is also critical. You'll want it high enough to be reachable but low enough to avoid splashing from the showerhead.
Optimizing Your Tile Layout
Planning your niche placement should happen before you ever pull the trigger on a fastener. For a professional finish, align the edges of the niche with your horizontal grout lines. This prevents "slivers" of tile that look amateurish and are difficult to set. During the setting process, using a ceramic tile leveling system is critical. It helps maintain a flush transition between the wall tile and the niche return, ensuring that the thin-set bed depth remains consistent. Don't forget to account for the thickness of your tile and the bonding layer when measuring the interior depth of the niche.
Structural Requirements
Wall integrity is the priority on any job site. If you're installing an oversized horizontal niche, you must treat the opening like a window or door. This means installing a proper header to transfer the load to the surrounding studs. For standard installations, the most important factor is ensuring the niche flange sits perfectly flush with the wall substrate. If the flange is proud of the cement board, you'll have a bump in your tile that's nearly impossible to hide. A preformed shower niche for tile with a thin bonding flange makes this transition much easier to manage, keeping the surface plumb for the final tile application.
Installation Fundamentals: Ensuring a 100% Waterproof Seal
Successful installation of a preformed shower niche for tile starts long before the first trowel of thin-set hits the wall. You must verify that your substrate, whether it's cement board or a foam-based backer, is perfectly plumb and flat. If the wall is bowed, the niche flange won't sit flush against the surface. This creates a "lip" that's nearly impossible to hide with tile and often leads to gaps in the waterproofing seal. Use a straight edge to check the framing and shim the studs if necessary before you fasten the wall boards.
To bridge the gap between the niche and the wall, you have two primary options: modified silane polymers or high-performance thin-set. While traditional thin-set is reliable for many applications, modern hybrid sealants offer superior flexibility and immediate waterproofing at the joint. Apply the sealant or thin-set generously around the perimeter of the rough opening before pressing the niche into place. This creates a gasket-like seal that prevents moisture from wicking into the wall cavity behind the flange.
Integrating with Waterproofing Systems
For the highest level of security, many professionals opt for integrated waterproofing shower kits. These kits provide a unified system where the niche, membrane, and drain components are designed for chemical and mechanical compatibility. Apply a liquid membrane or specialized waterproofing tape over the niche flanges to create redundant protection. This ensures that the transition between the preformed shower niche for tile and the surrounding wall board is completely impervious to both vapor and liquid water. Always maintain a minimum two-inch overlap with your waterproofing band to guarantee a capillary break.
Common Installation Pitfalls
One of the most frequent errors on the job site is "back-pitching." This happens when the niche is installed with a slight tilt toward the back wall. Even a minor tilt causes water to pool, which eventually leads to grout erosion and mold growth. Always check the shelf pitch with a small level during the installation process. Another issue is over-tightening the fasteners. If you drive screws too deep, you can crush the foam core or crack a plastic flange, which compromises the niche's structural integrity. Finally, don't forget to account for the thickness of your tile and any bullnose or metal trim. If the niche is set too deep, your finishing pieces won't properly cover the raw edges of the field tile.
Never skip the water test before you begin tiling. Once the sealants have fully cured, spray the interior of the niche and check for any signs of moisture penetration. Verification is the only way to guarantee a leak-free result and protect your reputation from costly callbacks. You can order professional-grade sealants and waterproofing supplies here to ensure your next build meets these rigorous standards.
The PSC Pro Advantage: Integrated Niches and Gen II Systems
A preformed shower niche for tile is a critical component, but its performance is dictated by the system surrounding it. PSC Pro Gen II Waterproofing Systems provide a cohesive environment where every layer, from the membrane to the niche flange, is chemically and mechanically compatible. This engineered synergy eliminates the guesswork that often leads to adhesion failure or moisture wicking. When you use components designed to work together, you create a monolithic barrier that handles structural movement and thermal expansion without compromising the seal.
Durability is the hallmark of contractor-grade hardware. While big-box alternatives often rely on thin materials that can flex or crack under the weight of heavy stone tile, PSC Pro niches are built for stability. This rigidity is essential for maintaining the integrity of grout lines over time. By integrating these niches with advanced components like linear shower drains for tile, installers can offer a comprehensive, high-end solution that reduces long-term liability and ensures a leak-free environment.
Why PSC Pro Gen II is the Professional Choice
The PSC Pro Gen II system stands out because it prioritizes bond strength. It's compatible with all standard modified thin-sets, allowing for a faster, more reliable installation process. You don't have to wait for specialized adhesives to cure before moving to the next phase of the build. This streamlined workflow is backed by a brand that understands the nuances of professional shower installation components. It's about giving you the tools to finish the job correctly the first time.
Next Steps for Your Project
Success on a job site requires planning and the right inventory. Before starting your next contract, evaluate the specific storage needs of the client to select the optimal niche size and configuration. Bundling your preformed shower niche for tile with a complete PSC Pro waterproofing kit is the most efficient way to ensure a unified warranty and consistent performance across all surfaces. For large-scale multi-unit projects, consulting with Pro Supply Center for bulk order specifications can help manage costs while maintaining a high standard of quality.
Upgrade Your Next Build with Professional Shower Hardware
Transitioning from risky custom framing to factory-sealed units is the most effective way to eliminate moisture related callbacks. By selecting a high performance preformed shower niche for tile, you ensure perfectly square corners and a pre-pitched sill that prevents standing water. These components don't just save hours of labor; they provide a level of geometric precision that custom mud work simply cannot match. It's a strategic choice that prioritizes long term structural integrity over traditional, high-risk methods.
The PSC Pro Gen II system compatibility ensures that every layer of your installation works in chemical and mechanical synergy. Our contractor-grade XPS foam construction provides the structural rigidity and thermal insulation required for both residential and heavy commercial use. We provide national shipping on all tiling supplies to keep your projects moving forward without delay. It's time to stop gambling on manual membrane folds and start building with integrated reliability.
Shop Professional Preformed Shower Niches at Pro Supply Center today and deliver the professional-grade finish your clients expect. We're here to support your success on every job site.
Frequently Asked Questions
Can I install a preformed shower niche in an existing wall?
Yes, you can install a niche in an existing wall, but it requires removing a section of the wall board to expose the framing. You must cut an opening that matches the outer dimensions of the niche while ensuring no plumbing or electrical lines are in the way. Once the cavity is clear, the unit is fastened to the studs and the perimeter is sealed to integrate with the existing waterproofing system.
Do preformed shower niches need to be waterproofed after installation?
While the core of a preformed shower niche for tile is inherently waterproof, the joint where the niche meets the wall board must be sealed. You must apply a waterproofing band or a liquid membrane over the flange and the surrounding substrate to create a continuous barrier. This step prevents water from penetrating the seams and damaging the wood or metal framing behind the tile surface.
What is the best height to install a shower niche?
The standard installation height is typically between 38 and 48 inches from the shower floor. This range keeps soap and shampoo within easy reach for most adults while avoiding the direct spray of the showerhead. For the best aesthetic result, you should align the top or bottom of the niche with your tile layout's horizontal grout lines to ensure a clean finish and avoid small tile slivers.
Are foam shower niches strong enough to hold heavy stone tiles?
High density XPS foam niches are engineered specifically to support the weight of heavy stone and large format tiles. When properly bonded with a modified thin-set mortar, the niche becomes part of a rigid, unified assembly. The structural integrity depends on the niche being fastened securely to the wall studs, which transfers the load of the stone directly to the home's structural framing.
How do I finish the edges of a tiled shower niche?
You can finish the edges using bullnose tiles, mitered tile edges, or metal trim profiles. Metal profiles are popular because they provide a crisp transition and protect the tile edges from chipping over time. Regardless of the method, ensure the transition is fully backed by thin-set to maintain the waterproof integrity of the niche returns and the main wall surface. This prevents moisture from reaching the substrate.
Can I use a preformed niche with a liquid waterproofing membrane?
Most preformed niches are fully compatible with liquid waterproofing membranes. The cementitious or fleece coating on the niche surface is designed to provide an excellent mechanical bond for these coatings. When using the PSC Pro Gen II system, applying a liquid membrane over the flange ensures a redundant, vapor tight seal that exceeds standard residential requirements for moisture protection in high steam environments.
What size niche fits between standard 16-inch studs?
A niche with an outer width of 14 inches or less fits perfectly within standard 16-inch on-center stud spacing. This construction standard typically provides a 14.5 inch rough opening between the studs. Choosing a preformed shower niche for tile in this size range allows for a fast installation without the need to cut structural framing or install additional headers and jack studs to support the wall.
Do I need to slope the bottom shelf of a preformed niche?
Most professional grade preformed niches come with a factory engineered slope on the bottom shelf. This built-in pitch, usually around 1/8 to 1/4 inch, ensures that water drains toward the shower floor instead of pooling in the back corners. If you are using a model with a flat bottom, you must manually create this positive slope using thin-set during the tile setting process to prevent mold growth.


