

What if the most expensive part of your surface preparation isn't the disc you're holding, but the labor hours you're wasting because it failed? Many contractors treat sandpaper and grinding wheels as simple commodities, but the hidden costs of poor material removal and surface damage can quickly erode your project margins. You've likely dealt with grit that sheds too fast or inconsistent finishes that require hours of rework. These aren't just minor inconveniences; they're symptoms of using supplies that aren't built for the rigors of a professional job site.
Choosing true professional grade abrasives is about understanding the technical relationship between mineral stability and backing durability. This guide provides the technical knowledge you need to select the right materials for faster removal and superior results. We'll examine how the July 2026 industry standards for superabrasive products and increased lead times for specialized materials impact your selection process. By the end of this article, you'll know how to optimize your abrasive inventory to reduce labor costs and ensure your final finish meets the highest trade standards on every project.
Key Takeaways
- Understand the structural differences between retail sandpaper and industrial supplies, focusing on grit size consistency and backing integrity.
- Identify the technical properties of Aluminum Oxide and Silicon Carbide to match the correct mineral to your specific substrate.
- Master the "Rule of 100" grit selection framework to ensure efficient material removal without causing unnecessary surface damage.
- Calculate the true ROI of professional grade abrasives by evaluating cost-per-use and reduced downtime rather than just the initial purchase price.
- Learn how precise abrasive selection acts as the essential final step in delivering the high-quality finishes expected in professional tiling and waterproofing projects.
What Defines Professional Grade Abrasives?
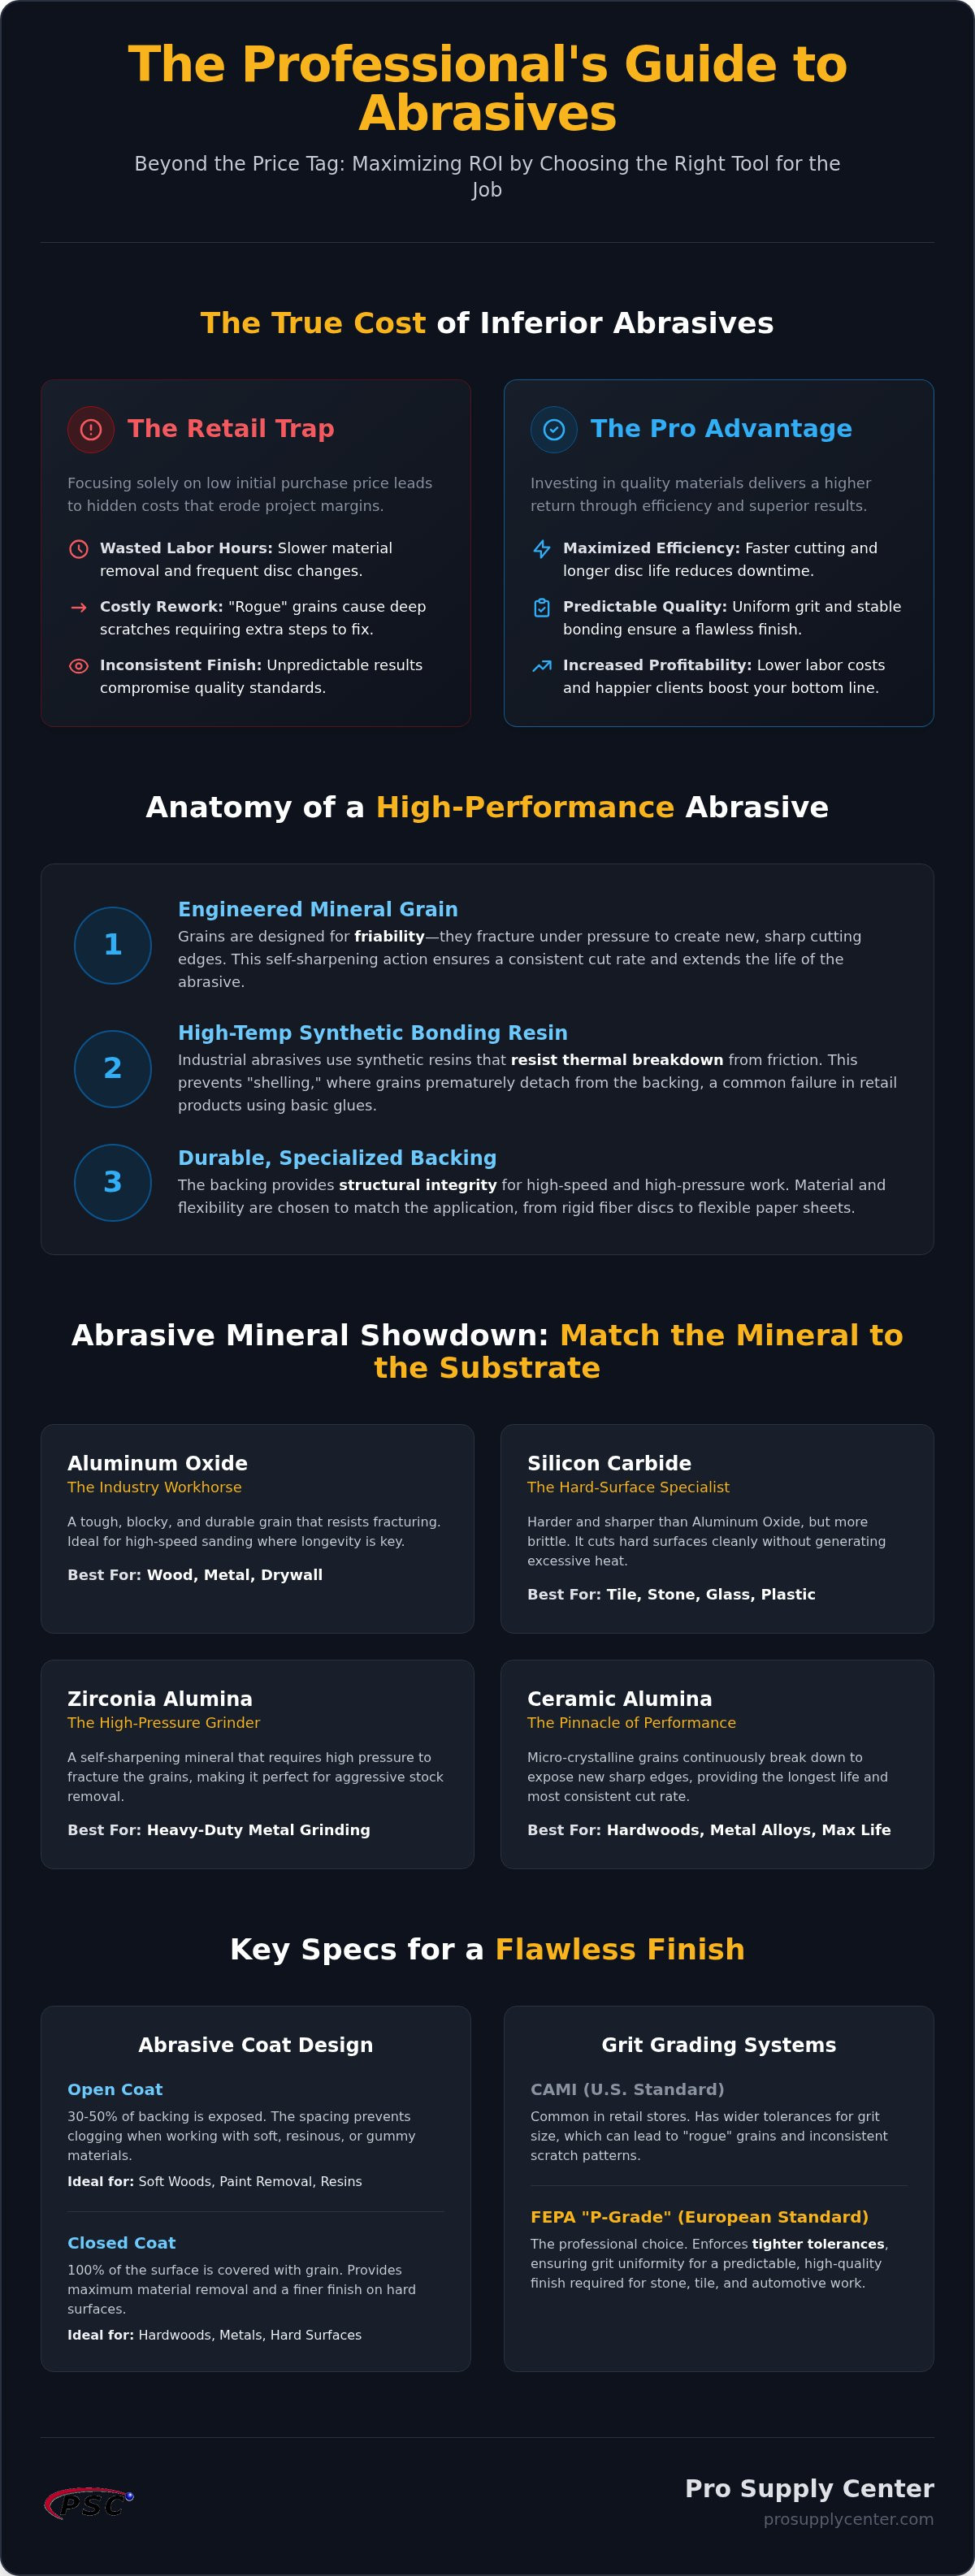
Walk into any hardware store and you'll find aisles of sandpaper. For a contractor, these retail products often lack the precision required for high-stakes finishes. True professional grade abrasives are defined by two primary factors: exact grit uniformity and the structural integrity of the backing material. While a DIY sheet might have "rogue" larger grains that leave deep scratches, industrial-strength options undergo rigorous screening to ensure every particle is the correct size. This consistency prevents the need for costly rework on delicate substrates. Pro Supply Center acts as a filter here, selecting only the most effective abrasive options for contractors who can't afford to waste time on inferior materials.
Professional users prioritize thermal stability because heat is the primary cause of abrasive failure. High-speed grinding generates friction that can melt standard adhesives, leading to "shelling" where the grain separates from the backing. Professionals also choose specific coat designs based on the material. A "closed coat" covers 100% of the surface for maximum material removal on hard surfaces. An "open coat" leaves 30% to 50% of the backing exposed. This spacing prevents clogging or loading when working with soft woods, resins, or paints. Abrasive materials must maintain their sharp edges even as temperatures rise during extended use.
The Anatomy of a High-Performance Abrasive
A professional abrasive is a three-layer system consisting of the backing material, the bonding agent, and the mineral grain. While retail products often use basic hide glues, industrial versions utilize synthetic resins that don't soften under high heat. Grain friability is also a critical metric. It describes how a grain breaks under pressure. Professional grains are engineered to fracture and create new sharp edges, effectively sharpening the tool as you work.
Standards and Grading Systems
Accuracy in finishing depends on the grading standard. The CAMI scale is common in the U.S., but many pros prefer the FEPA P-grade system for its tighter tolerances. This ensures a P120 disc doesn't contain rogue grains that leave deep scratches in the surface. The FEPA standard serves as the global benchmark for European-style professional abrasives, providing the predictable scratch patterns necessary for high-end stone and tile work. This level of control is what separates a mediocre finish from a trade-quality result.
The Science of Abrasive Minerals: Matching Material to Substrate
The cutting speed and longevity of professional grade abrasives are determined by the mineralogy of the grain. Choosing the wrong mineral doesn't just lead to slower material removal; it can cause thermal damage to the substrate or lead to premature tool failure. Understanding the physical properties of these minerals allows contractors to select the most efficient tool for specific job site conditions. While retail products often use generic "sandpaper" labels, professional supplies are categorized by their mineral composition to ensure predictable performance.
There are four primary minerals used in high-performance abrasives:
- Aluminum Oxide: This is the industry workhorse. It's a tough, blocky grain that resists fracturing, making it ideal for high-speed sanding on wood and metal where durability is the priority.
- Silicon Carbide: This mineral is harder and sharper than aluminum oxide but more brittle. It's the essential choice for stone, ceramic tile, and glass because it cuts through hard surfaces without generating excessive heat.
- Zirconia Alumina: Designed for high-pressure applications, this mineral is best for heavy-duty metal grinding. It features a self-sharpening characteristic that works best under significant force.
- Ceramic Alumina: This represents the pinnacle of abrasive technology. The grains are micro-crystalline, meaning they break down in tiny, uniform pieces to constantly reveal new sharp edges. This self-sharpening nature provides the longest life and most consistent cut rate available.
Choosing Minerals for Tiling and Flooring
In the tiling trade, Silicon Carbide is the preferred choice for smoothing cut edges on porcelain or ceramic tile. Its sharpness allows it to penetrate the glaze cleanly without causing the chipping often seen with tougher, blunter minerals. For subfloor preparation, Aluminum Oxide is usually sufficient. It handles the density of plywood and OSB without the cost of premium ceramic grains. Matching the mineral hardness to the Mohs scale of your substrate is the most reliable way to ensure a clean finish. Sourcing your professional grade abrasives from a partner that understands these technical differences ensures you're always using the right tool for the job.
Thermal Management and Abrasive Life
Heat dissipation is a critical factor in abrasive performance. When grains can't shed heat, the bonding resin softens, leading to "loading" where the removed material clogs the abrasive surface. This is particularly dangerous during high-speed applications where friction builds rapidly. Maintaining proper tool speed is not just about efficiency; it's a safety requirement. Adhering to OSHA safety standards for abrasive wheels ensures that tools are operated within their thermal and structural limits. Professionals use open-coat designs or specialized lubricants to manage these temperatures and extend the life of the tool.
Professional Grit Selection Framework
The success of any surface preparation depends on a disciplined grit sequence. Experienced contractors follow the "Rule of 100," which dictates that you should never skip more than one grit size in a progression. For example, if you begin with 60-grit, your next step shouldn't exceed 100-grit. Jumping from a coarse abrasive directly to a fine one doesn't save time; it leaves deep, microscopic valleys that the finer grit cannot reach. This results in a surface that looks polished but contains structural defects that can lead to coating failure or visible sanding marks under final lighting. Utilizing professional grade abrasives within this framework ensures that each stage effectively removes the scratch pattern of the previous step.
Grit sizes are categorized by their intended function on the job site. Coarse grits (24-60) are designed for rapid material removal and leveling uneven substrates. Medium grits (80-120) serve as the transition phase, removing tool marks and preparing the surface for adhesives or initial sealers. Fine to ultra-fine grits (150-2000+) are reserved for high-gloss polishing and final finishing. According to Manufactured Abrasives Information provided by the USGS, the physical properties and hardness of these grains determine their effectiveness across these different ranges. Choosing the wrong grit for the stage often leads to "loading," where the abrasive becomes clogged with debris and stops cutting.
Grit Sequences for Common Contractor Projects
For smoothing the cut edges of porcelain tile, a sequence of 60, 100, and 200-grit pads usually provides a factory-clean finish. When preparing a concrete subfloor for the PSC Pro Gen II Waterproofing System, contractors typically use 30 to 60-grit diamond or silicon carbide tools to achieve the required Concrete Surface Profile (CSP). For metal trims and transitions, moving from 120-grit up to 400-grit produces a seamless, burr-free look that integrates perfectly with high-end tile installations.
Dry vs. Wet Sanding Applications
The choice between dry and wet sanding is often dictated by the need for dust suppression and finish clarity. Wet sanding uses water as a lubricant to carry away swarf, preventing the abrasive from clogging and keeping the surface cool. This is essential for achieving a "mirror" finish on stone or metal. However, wet applications require professional grade abrasives with specialized waterproof backings, such as latex-impregnated paper or polyester film. Standard retail paper will disintegrate when exposed to moisture. Wet sanding generally produces a more uniform scratch pattern because the water prevents the "pilling" of debris that causes deep, stray scratches in dry applications.
Maximizing Job Site Efficiency and ROI
The true cost of an abrasive isn't found on the initial invoice; it's found in the labor hours saved on the job site. Many contractors fall into the "cost-per-unit" trap, choosing cheaper alternatives that seem like a bargain. However, if a retail-grade disc requires three changes to finish a single task, you've tripled your downtime and increased your waste. Professional grade abrasives offer a significantly lower cost-per-use because they maintain their cutting edge for longer durations. This durability means fewer interruptions and a more consistent workflow for your crew.
Efficiency gains are best measured by the Material Removal Rate (MRR). This metric helps you plan project timelines with precision by quantifying how much material is stripped away over a set period. High-quality minerals allow for a higher MRR without requiring excessive pressure from the operator. This reduces physical fatigue and prevents the tool from bogging down. When you can remove more material in a single pass, you accelerate the entire project schedule and lower your total labor expenditure.
Proper storage is often overlooked but remains critical for maintaining performance. Abrasives are sensitive to humidity. Excess moisture can soften the bonding resins or cause backing materials to curl; this makes them difficult to attach to backing pads. Store your supplies in a climate-controlled environment to prevent these issues and ensure they perform as intended from the first pass. Keeping discs flat and dry prevents the premature cracking that often leads to abrasive failure.
Waste Reduction and Environmental Factors
Reducing job site waste is a direct result of using longer-lasting supplies. When a single professional sheet does the work of several standard ones, you're sending less debris to the landfill. Integrating dust extraction systems also plays a vital role here; by removing swarf immediately, you prevent it from abrading the grain itself. Clog-resistant coatings save up to 30% in material costs by keeping the abrasive surface clear and functional for a longer period.
Safety Standards for Professional Grinding
Safety and efficiency go hand-in-hand. Using high-speed tools requires strict adherence to PPE protocols, especially respiratory protection against silica and metal dust. You must also verify the RPM rating of every disc before mounting it. Exceeding these limits can cause an abrasive to shatter, creating a significant hazard for everyone on the site. Regular tool maintenance, such as checking for worn backing pads, ensures your professional grade abrasives make even contact with the substrate for a safer, more predictable result. You can browse our full inventory of professional grade abrasives to ensure your team has the tools required for maximum productivity.
Integrating Quality Abrasives into Your Workflow
Surface preparation is often the most visible indicator of a contractor's skill. While much of our focus remains on the structural integrity of a build, the final finish determines the customer's perception of quality. Choosing the correct abrasive is just as critical as selecting the right waterproofing shower kits for a wet area. If the waterproofing fails, the project is a disaster; if the abrasive finish is inconsistent, the aesthetic value is lost. Integrating professional grade abrasives into your daily workflow ensures that your results match the technical standards of the systems you install beneath the surface.
Sourcing these materials from a trusted trade partner rather than a general retailer eliminates the guesswork. Pro Supply Center acts as a technical filter for the industry. We curate our inventory based on material performance and job site durability, not marketing trends. With lead times for some superabrasive materials increasing to over 10 weeks in 2026, relying on a stable supply chain is more important than ever. This approach allows you to focus on the installation while we ensure the supplies meet the rigors of professional use.
The Pro Supply Center Advantage
Working with a specialized supplier provides access to material-specific recommendations that general hardware stores cannot offer. You can streamline your supply chain by bundling your abrasives with your tiling or waterproofing systems. This strategy reduces administrative overhead and ensures that your prep tools are compatible with your finish materials. Consistency in supply is another major factor. Retail brands often suffer from "batch variance," where the grit quality fluctuates between orders. When you prioritize professional grade abrasives, you receive a uniform product every time, preventing unexpected scratches or slow removal rates.
Next Steps for Your Project
Before starting your next project, evaluate the substrate and the desired final sheen to determine your grit and mineral requirements. If you're dealing with high-volume needs or custom stone work, consulting with a professional supplier can help you identify the most cost-effective sequence. For a more detailed look at specific products, read our Professional Tile Abrasives: 2026 Contractor Guide.
Use this final checklist to audit your current inventory:
- Verify that your abrasives are stored in a dry, climate-controlled area to prevent curling.
- Check that your grit sequences follow the "Rule of 100" to avoid deep scratch patterns.
- Ensure your PPE is rated for the specific dust types generated by your substrates.
- Confirm that all grinding wheels and discs are within their expiration dates and RPM ratings.
Optimizing Your Surface Preparation Strategy
Surface preparation is the foundation of any high-quality installation. By moving beyond retail commodities and adopting a technical approach to mineral selection, you ensure that your finishes meet the rigorous standards of your trade. Mastering the "Rule of 100" and understanding the specific hardness of grains like Silicon Carbide for tile work will directly reduce your labor hours and eliminate the frustration of inconsistent results.
Investing in professional grade abrasives isn't just about the physical disc; it's about the reliability of your workflow. High-purity mineral grains and contractor-vetted durability provide the consistency needed to avoid "rogue" scratches that ruin final builds. Pro Supply Center serves as your technical partner, offering a curated inventory and national shipping to keep your projects moving without delay. Explore our full range of Professional Grade Abrasives at Pro Supply Center to upgrade your inventory today. Your commitment to using the right materials will pay off in faster project completion and superior results that your clients will notice.
Frequently Asked Questions
What is the difference between Aluminum Oxide and Silicon Carbide abrasives?
Aluminum Oxide is a tough, durable grain that resists fracturing, making it the industry standard for wood and metal preparation. Silicon Carbide is harder and sharper but more brittle; this makes it the essential choice for cutting through stone, ceramic tile, and glass. While Aluminum Oxide handles high-speed friction well, Silicon Carbide provides the clean, chip-free edges required for professional porcelain tile and dense masonry finishes.
How do I know which grit size to start with for my project?
Your starting grit depends on the severity of the surface imperfections and the hardness of the material. For heavy leveling or stripping thick coatings, start with a coarse 36 or 40 grit. If the surface is generally flat and you only need to remove minor tool marks, an 80 grit is a better starting point. Always progress through the grits without skipping more than one size to ensure a uniform finish.
Why do professional abrasives last longer than standard sandpaper?
Professional grade abrasives use high-purity minerals and synthetic resin bonds that remain stable under extreme heat. Standard sandpaper often uses basic glues that soften during use, leading to premature grain loss. Industrial versions feature reinforced backings and friable grains that fracture to reveal new sharp edges. This structural integrity allows the tool to maintain a consistent cut rate for a longer duration, reducing the total number of disc changes required.
Can I use the same abrasive for both wood and ceramic tile?
You should not use the same abrasive for both wood and ceramic tile because their physical properties are fundamentally different. Wood preparation requires the toughness of Aluminum Oxide to handle organic fibers without dulling. Ceramic tile is significantly harder and requires the sharpness of Silicon Carbide to cut through the glaze without causing chips. Using a wood-specific abrasive on tile will cause the tool to dull almost instantly and generate excessive heat.
What does "open coat" mean in abrasive terminology?
"Open coat" describes an abrasive where the mineral grains cover approximately 50% to 70% of the backing material. The gaps between the grains provide space for dust and debris to escape, which prevents the surface from clogging or "loading." This design is essential when sanding soft woods, paints, or resins. "Closed coat" abrasives cover the entire surface and are reserved for hard materials where maximum material removal is the primary goal.
Is it worth the extra cost to buy professional grade abrasives for a DIY project?
It is absolutely worth the investment because professional grade abrasives produce a superior surface finish with less physical effort. High-quality supplies reduce the risk of surface damage and ensure that preparation for systems like the PSC Pro Gen II Waterproofing System is technically sound. Because these abrasives last longer, you'll actually use fewer discs over the course of the project, often making them more cost-effective than cheaper retail alternatives.
How should I store my abrasives to prevent them from becoming brittle?
Abrasives should be stored in a dry, climate-controlled area with a relative humidity between 40% and 50%. Excessive moisture can soften the bond and cause the backing to curl, while very dry air makes the resins brittle and prone to cracking. Keep your discs and sheets flat in their original containers. This prevents the edges from fraying and ensures the abrasive remains flexible enough to conform to the substrate during use.
What are the risks of using a low-quality abrasive on expensive stone or tile?
Low-quality abrasives often have inconsistent grit sizes, which can leave deep, stray scratches that are impossible to remove from expensive stone or tile. Poorly bonded grains can also cause uneven friction, leading to localized heat buildup that may crack the substrate. The cost of replacing a single damaged tile or stone slab far exceeds the price of using trade-quality supplies. Professional materials ensure the predictable scratch patterns necessary for high-end results.


