

Why spend thousands of dollars on a custom tile installation only to trust your everyday storage to a plastic suction caddy that inevitably crashes down at night? If you are fed up with failing suction cups, mushy soap sitting in pooled water, and cheap fixtures degrading your bathroom aesthetic, permanent hardware is the right upgrade. Selecting quality ceramic soap dishes for showers, however, requires more than matching a glaze to your wall tile. You must also balance body absorption ratings, self-draining pitch, and proper integration with your wall's moisture barrier.
It is completely normal to worry about puncturing a waterproofing membrane or choosing the wrong profile for your framing. This comprehensive guide covers how to select, waterproof, and install durable ceramic soap dishes in tiled showers without risking costly moisture leaks behind the wall. We will compare recessed boxes against surface-mount profiles, outline ANSI-compliant bonding materials, and detail the exact setting steps needed for a clean, lifetime installation.
Key Takeaways
- Evaluate your wall framing and shower footprint to choose the right format between recessed, corner, or surface-mounted ceramic soap dishes for showers.
- Select vitreous glazed fixtures with an integrated forward pitch to ensure water drains freely and soap bars stay dry.
- Preserve the continuous waterproofing membrane across backer boards to prevent moisture intrusion behind accessory cutouts.
- Bond ceramic fixtures using ANSI-compliant polymer-modified thin-set mortar, never pre-mixed organic mastic adhesives that break down in wet conditions.
- Seal perimeter joints with permanently flexible 100% silicone rather than rigid grout to eliminate cracking and protect against hidden water leaks.
Types of Ceramic Soap Dishes for Showers: Recessed, Corner, and Surface-Mounted
Plastic caddies yellow over time, and suction baskets inevitably drop under the weight of wet bars. Coated metal baskets also corrode once moisture breaches their thin protective shell. Selecting permanent ceramic soap dishes for showers provides a rigid, cleanable solution that lasts as long as the surrounding tile. Choosing the right profile comes down to your shower's framing depth, spatial layout, and whether you are tiling from scratch or updating an existing wall.
Recessed Ceramic Soap Dishes and Shampoo Shelves
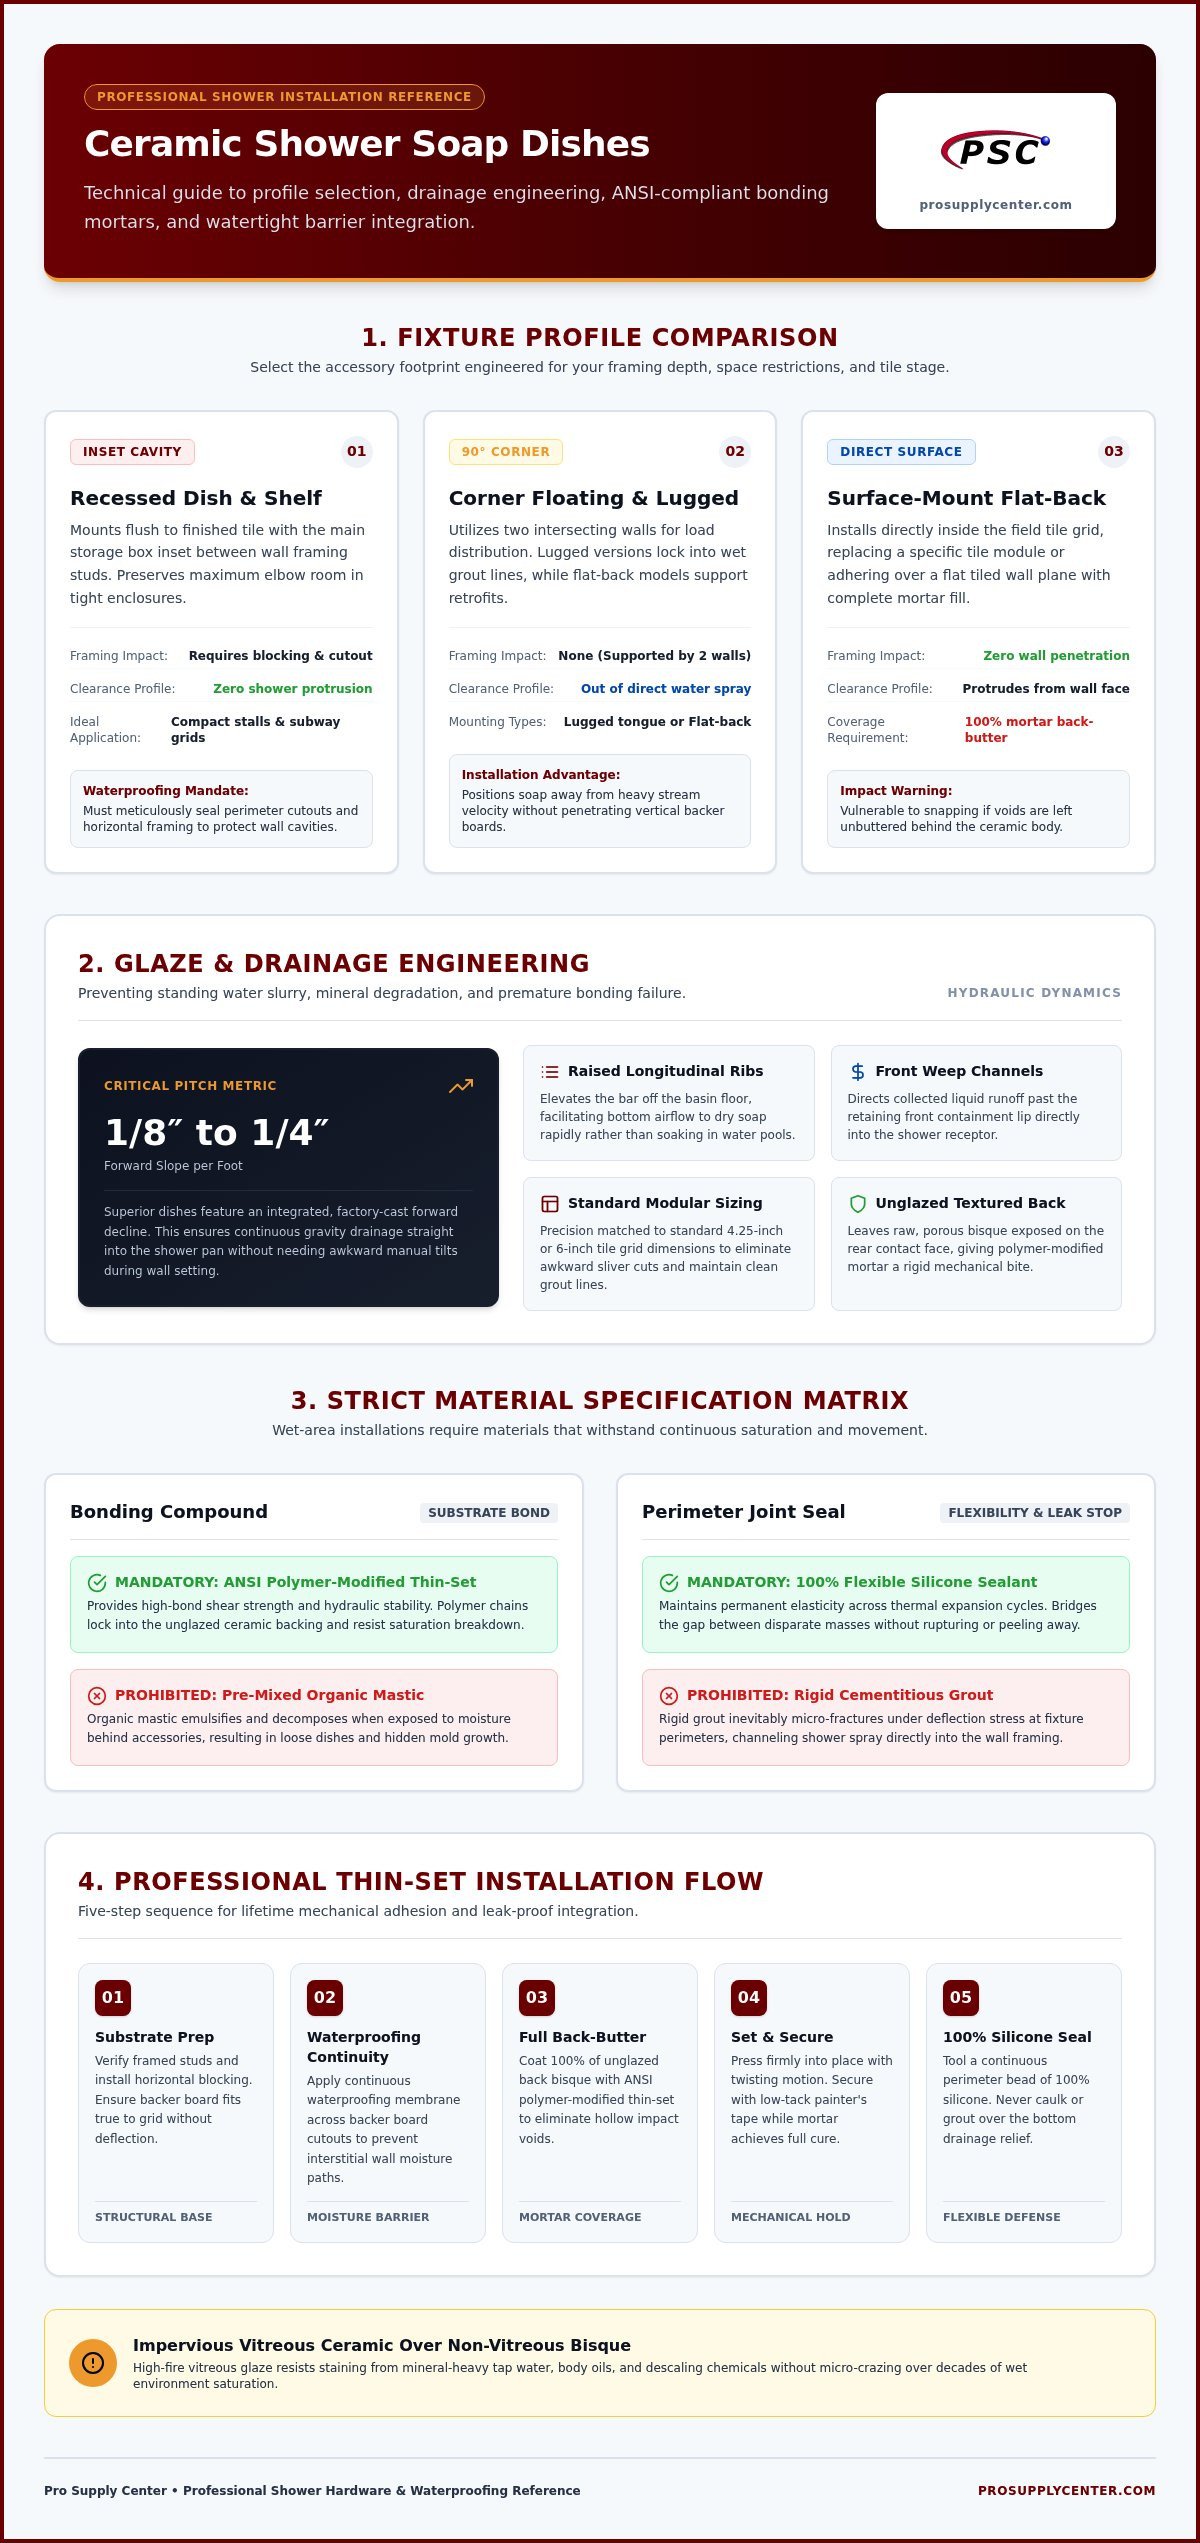
Recessed soap dishes set flush against the finished tile face, positioning their storage cavity directly inside the wall cavity. This recessed footprint saves valuable elbow room in compact shower stalls where a protruding shelf restricts movement. Installing a recessed unit requires cutting the backer board between studs, framing horizontal blocking, and meticulously sealing the perimeter to preserve the waterproof barrier. It creates a classic, inset look that remains standard in traditional and subway-tile bathroom restorations.
Corner Floating and Lugged Ceramic Soap Trays
Corner fixtures capitalize on the 90-degree intersection of two shower walls to carry weight without intruding into primary standing space. Lugged corner designs feature an integrated ceramic tongue that locks directly into open horizontal grout joints during the tiling phase. For retrofits, flat-back corner trays bond over existing cured tile using high-strength epoxy or modified mortar. Both corner styles keep your accessories accessible while routing them away from the direct water stream.
Surface-Mounted and Flat-Back Ceramic Holders
Surface-mounted holders install directly within the field tile grid, replacing a cut tile or bonding against a flat tiled plane. Because these units sit entirely outside the substrate, they eliminate the need to cut into backer boards or disrupt structural framing. Achieving a permanent bond requires full thin-set coverage behind the entire ceramic body. Skipping proper back-buttering leaves hollow voids that can snap under impact or trap stagnant moisture behind the accessory.
Key Selection Criteria: Glazed Durability, Drainage Pitch, and Tile Compatibility
Selecting the right fixture involves far more than matching a color swatch to your wall tile. A poorly engineered accessory causes standing puddles, dissolved soap, and glaze degradation from everyday cleaning chemicals. High-performance ceramic soap dishes for showers balance material density, surface geometry, and dimensional alignment with your wall layout. Matching the accessory width to common tile grid dimensions, such as 4.25-inch or 6-inch modules, eliminates awkward tile slivers and preserves clean grout lines across the wall plane.
Vitreous vs. Non-Vitreous Ceramic Performance
Standard ceramic accessories often rely on non-vitreous clay bisques covered by a thin decorative coating. In saturated wet zones, you need high-fire vitreous ceramic or impervious porcelain bodies that prevent moisture penetration. A quality vitreous glaze resists staining from mineral-heavy tap water, body oils, and aggressive descaling chemicals without micro-crazing over decades of use. The rear mounting surface must remain unglazed and textured. This porous raw face allows polymer-modified mortars to bite directly into the clay, establishing a rigid mechanical lock that smooth finishes cannot provide.
Drainage Dynamics and Surface Geometry
Retail listings frequently overlook drainage engineering, treating accessories as simple flat shelves. Installing a completely level dish guarantees standing water, which breaks down bar soap into a messy slurry and accelerates mold growth along the perimeter seal. Superior fixtures feature a factory-cast forward pitch of 1/8 inch to 1/4 inch per foot. This slope directs water runoff straight into the shower pan without requiring you to tilt the fixture awkwardly during installation.
Surface geometry matters just as much as fall slope. Look for these practical functional details when comparing designs:
- Raised longitudinal ribs: Elevate the soap bar above the basin floor to facilitate underside airflow and rapid drying.
- Front weep channels: Provide an open path for collected water droplets to escape past the retaining front lip.
- Integrated towel bars: Offer an understated hanging point for washcloths in compact guest bathrooms without adding separate wall hardware.
When you are planning a renovation, sourcing engineered ceramic soap dishes with integrated drainage geometry ensures your storage remains clean, dry, and sanitary for the life of the shower.
Waterproofing Substrates Behind Ceramic Fixtures: Preventing Hidden Wall Leaks
Tile assemblies are water-resistant systems, not hermetic waterproof seals. Standard cementitious grout absorbs moisture, and minor stress cracks around accessories act as entry points for capillary water migration. When you install ceramic soap dishes for showers, your underlying substrate details dictate whether that moisture harmlessly evaporates or rots your framing lumber. Cement backer board does not degrade in water, but it remains fully porous without an approved topical membrane.
Integrating Accessories with Bonded Waterproofing Membranes
Recessed soap dishes penetrate the outer board plane, making them vulnerable to water intrusion if the rough framing remains exposed. To protect the stud bay, line the cut opening with cement board and apply a bonded waterproof sheet membrane across all interior corners. Systems like the PSC Pro Gen II Waterproofing System create a continuous, vapor-tight envelope when properly overlapped with wall panels. Using preformed waterproof corners inside the rough opening ensures no pinholes develop at 90-degree transitions, maintaining complete barrier integrity before you set the fixture in mortar.
Waterproofing Pre-Trough Shower Framing
Surface-mount dishes skip framing cutouts, but their substrate must still resist heavy deflection and water cycling. Proper wall prep starts well before the first tile goes up:
- Solid horizontal blocking: Fasten 2x4 lumber between wall studs directly behind the planned accessory height to prevent backer board flex under load.
- Sealed panel joints: Embed alkaline-resistant mesh tape and modified mortar across all cement board seams, finishing flush with the board face.
- Flashing fastener heads: Cover every backer screw with liquid membrane or bonded sheet patches to isolate metal fasteners from moisture.
Reviewing our guide to waterproofing shower kits provides complete details on pairing sheet membranes, bonded collars, and perimeter seals into a unified, leak-proof assembly before bonding heavy ceramic fixtures.
How to Install a Ceramic Shower Soap Dish: Professional Thin-Set Method
Long-term accessory performance depends entirely on mechanical adhesion. For permanent bonding in wet enclosures, always use an improved polymer-modified dry-set mortar meeting ANSI A118.4 or ANSI A118.15 standards. Never substitute pre-mixed organic mastic or tubed construction adhesives. Mastic re-emulsifies in high-humidity zones, resulting in mold blooms and catastrophic bond failure. For optimal ergonomics, set ceramic soap dishes for showers between 48 and 54 inches above the shower pan floor, clear of the primary showerhead stream.
Substrate Layout, Notching, and Dry Fitting
Always dry-fit the fixture before mixing thin-set. Hold the dish against your layout lines to confirm that perimeter margins align neatly with adjacent tile grout joints. Place a small torpedo level across the top edge while verifying that the interior basin floor retains a slight forward slope toward the drain. Finally, wipe the unglazed rear biscuit with a damp sponge to remove manufacturing dust that would otherwise choke your mortar bond.
Mortar Application and Setting Technique
Key a thin layer of mortar directly into the cured substrate using the flat side of a trowel to force the paste into the surface pores. Next, back-butter the rear mounting face of the ceramic dish with a solid, directional coat of mortar. Trade standards mandate 100% adhesive coverage behind heavy wall accessories to eliminate hollow voids. Press the dish into place with firm, uniform pressure, sliding it slightly across the ridges to collapse the mortar bed completely. Once aligned, brace the fixture to the surrounding tile using heavy-duty painter's tape to prevent slippage while the mortar sets.
Grouting, Perimeter Caulking, and Cure Windows
Leave the stabilizing tape in place for at least 24 hours while the thin-set cures. After pulling the tape, remove any excess mortar from the perimeter joints. Never run rigid cementitious grout around the edge of the fixture; vibration and thermal expansion will crack it within months. Instead, tool a continuous bead of mildew-resistant, 100% silicone sealant conforming to ASTM C920 into the perimeter change of plane. Allow the silicone to cure fully before turning on the water.
Ready to upgrade your bathroom build? Visit Pro Supply Center to source professional-grade shower accessories, waterproofing systems, and setting materials designed for trade-level durability.
Maintaining Grout Seals and Integrating Professional Shower Hardware
Setting your fixture in thin-set creates an unyielding bond, but ongoing maintenance protects the surrounding wall assembly over decades of daily wet-room cycling. Even top-tier ceramic soap dishes for showers rely on flexible joints to accommodate natural structural movement. When joint maintenance falls behind, minor breaches admit moisture into the thin-set bed, creating hidden mildew pockets that degrade adhesive strength and stain perimeter lines.
Cleaning and Glaze Preservation Practices
Preserving the factory surface finish requires non-abrasive care. Vitreous glazes withstand hot water and soap residue with ease, but harsh chemical agents and rough pads cause irreversible surface wear over time:
- Neutral pH cleaners: Wash the ceramic face with mild detergents rather than acid-based descalers that strip protective glaze shine and erode neighboring grout.
- Soft microfiber cloths: Skip steel wool, scouring stones, or metallic scrubbers that leave stubborn gray transfer marks across the light ceramic surface.
- Annual sealant checks: Inspect perimeter silicone beads every twelve months for pinholes, pulling away, or localized mold. Strip and replace compromised joints immediately.
- Penetrating grout sealers: Apply a high-grade penetrating sealer across surrounding cementitious grout joints once a year to limit water absorption through unglazed seams.
Coordinating Soap Dishes with Modern Shower Systems
Modern shower layouts balance multiple storage zones rather than relying on a single accessory. A lone soap dish holds bar soap cleanly, but taller shampoo bottles, body washes, and deep conditioners demand larger vertical compartments. Pairing a low-profile ceramic soap tray with a prefabricated shower niche creates a balanced storage plan without overcrowding the main showerhead wall.
Planning your accessory placement alongside other core wet-room hardware streamlines the entire construction process. Sourcing through reliable professional shower installation components guarantees that your drains, structural niches, and waterproofing membranes integrate seamlessly without material conflicts. Explore complete shower solutions at Pro Supply Center to find trade-tested components that keep every wet-area installation durable, clean, and completely watertight.
Build a Watertight Foundation for Lasting Shower Storage
Upgrading your bathroom with permanent fixtures eliminates the frustration of collapsing suction caddies and deteriorated hardware. Installing durable ceramic soap dishes for showers requires a systematic approach: selecting vitreous bodies with self-draining slopes, preserving a continuous moisture barrier behind the substrate, and bonding the fixture with polymer-modified thin-set rather than organic adhesives. Sealing the perimeter with flexible 100% silicone ensures your installation stays resilient through years of daily water exposure.
A reliable installation starts with trade-grade materials. Whether you are framing a brand-new stall or renovating an existing enclosure, Pro Supply Center provides the contractor-grade components you need for a leak-free build. Explore professional shower hardware and waterproofing supplies at Pro Supply Center, including PSC Pro Gen II Waterproofing Systems, integrated shower niches, drains, and tiling accessories shipped directly nationwide. Equip your project with engineered systems built to perform, and construct a shower space that lasts for decades.
Frequently Asked Questions
Can you install a ceramic soap dish over existing shower tile?
Yes, flat-back ceramic soap dishes for showers can be installed directly over existing tile surfaces without cutting the wall. The tile glaze must be scuffed or abraded to ensure a mechanical bond, and the surface thoroughly cleaned of soap scum. Bond the accessory using a two-part epoxy adhesive or high-bond polymer-modified mortar, then seal the perimeter with flexible silicone. Recessed models cannot be retrofitted without opening the wall substrate.
What is the best adhesive to mount a ceramic soap dish in a shower?
Polymer-modified dry-set mortar meeting ANSI A118.4 or ANSI A118.15 is the industry standard for new installations over cementitious backer boards. For direct-to-tile retrofit mounts, a high-strength structural epoxy provides superior shear resistance and bonds reliably to non-porous surfaces. Both adhesives resist continuous moisture and won't soften when exposed to daily hot water cycling, unlike tubed adhesives or water-based pastes.
At what height should a ceramic shower soap dish be installed?
The standard mounting height ranges from 48 to 54 inches above the shower pan floor for standing enclosures. For combination tub-shower units, install the dish lower, around 36 to 40 inches, so bathers can reach it while seated. Always position the accessory outside the direct, pressurized spray pattern of the showerhead to keep your soap bar dry between uses and reduce premature silicone wear.
Why is my ceramic soap dish collecting standing water?
Standing water occurs when a dish is set completely flat or tilted backward toward the wall rather than pitched forward toward the pan. To shed water properly, shelves and dishes require a forward drop of 1/8 to 1/4 inch per foot. If the dish lacks integrated drainage grooves, water pools against the retaining lip, causing the soap bar to soften and encouraging mildew along perimeter joints.
Is a recessed ceramic soap dish better than a corner soap shelf?
It depends on your shower footprint and framing access. Recessed dishes save valuable interior room in narrow shower stalls because the basin sits flush inside the stud wall. However, corner shelves utilize dead corner space and install cleanly into horizontal grout joints without requiring framing alterations. If you are renovating without opening the drywall, flat-back corner ceramic soap dishes for showers offer a simpler, leak-free retrofit.
Can I use premixed mastic to install ceramic accessories in a wet shower?
No, never use premixed organic mastic (ANSI A136.1) to install accessories in wet areas. Mastic cures through air evaporation and will re-emulsify when exposed to chronic shower humidity. This chemical breakdown softens the adhesive bond, harbors hidden fungal growth, and eventually causes heavy ceramic fixtures to shear off the wall. Always choose cement-based thin-set mortar or moisture-cured epoxy instead.


