

What if the most expensive part of your bathroom renovation isn't the high-end tile or the designer fixtures, but the invisible layer hidden beneath them? Most professionals understand the anxiety that comes with sealing a wet area. One missed corner or a poor bond can lead to mold and structural rot. Learning how to install PSC Pro Gen II waterproofing membrane correctly is the most effective way to mitigate these risks. This high-performance system offers a PERM rating of 0.07; this makes it an ideal choice for both standard showers and demanding steam room environments.
You want a project that stands the test of time without the guesswork of mortar compatibility or seam integrity. We'll walk you through the entire process to ensure you achieve a perfectly sealed enclosure that passes a 24-hour flood test with zero leaks. This guide covers the technical requirements for 2-inch overlaps, proper thin-set selection, and the management of pipe penetrations. By the end of this article, you'll have a flat, durable surface ready for immediate tiling and the confidence that your build is structurally sound and professionally executed.
Key Takeaways
- Learn how to prepare your substrate by ensuring walls are plumb and surfaces are free of dust to guarantee a permanent bond for the membrane.
- Master the step-by-step process of how to install PSC Pro Gen II waterproofing membrane, including mixing mortar to the correct fluid consistency for optimal adhesion.
- Discover the professional method for sealing high-risk areas like corners and pipe penetrations using pre-formed components for a leak-proof finish.
- Understand the technical requirements for a successful 24-hour flood test to verify the integrity of your shower enclosure before you begin tiling.
- Explore how integrated components and complete shower kits streamline the installation process while enhancing the overall durability of the system.
Essential Preparation and Material Requirements
Success begins before you open a single roll of membrane. If you want to know how to install PSC Pro Gen II waterproofing membrane like a professional, you have to start with the substrate. A wall that's out of plumb or a floor without a consistent slope will create pooling and tile lippage later. Check your floor slope to ensure a 1/4 inch drop per linear foot toward the drain. Clean every surface thoroughly. Dust acts as a bond breaker; even a thin layer of drywall residue can prevent the mortar from grabbing the substrate. Use a damp sponge to wipe down the area just before application.
You'll need a specific set of tools for this job. A 1/8 inch by 1/8 inch or 1/4 inch by 3/16 inch V-notched trowel is standard for applying the mortar bed. Keep a flat trowel or a rubber grout float handy to embed the membrane without tearing it. Use sharp utility blades for precision cuts around drains and niches to avoid frayed edges. Having these tools ready prevents delays once the mortar is mixed and the clock starts ticking on its open time.
Choosing the Right Thin-Set Mortar
Modern waterproof membrane systems rely on chemical and mechanical bonds to remain stable. While some industry alternatives require unmodified mortar to cure between non-porous layers, the PSC Pro Gen II system is designed for use with modified thin-set mortar. This is a significant advantage for contractors because modified mortars contain polymers that enhance bond strength and flexibility. Ensure your chosen mortar meets ANSI A118.10 standards for load-bearing, bonded membranes. Using a high-quality modified thin-set ensures the membrane stays flat and bonded even in high-moisture environments like steam showers.
Substrate Compatibility Check
The Gen II membrane is versatile and bonds well to cement backer boards, moisture-resistant drywall, and even exterior-grade plywood in specific floor applications. However, porous substrates like cement board can suck the moisture out of your mortar too quickly. Lightly pre-wet these surfaces with a sponge before spreading your thin-set. This prevents the mortar from "skinning over" and ensures it remains tacky enough to achieve 100% coverage. Double-check that your shower pan is rigid and free of deflection; a stable base is the only way to guarantee the long-term integrity of the waterproofing layer.
Step-by-Step Installation of the PSC Pro Gen II Membrane
Precision layout is the first step in learning how to install PSC Pro Gen II waterproofing membrane. Measure your wall and floor sections carefully before mixing any mortar. Pre-cut the membrane rolls on a clean, flat surface to minimize waste and ensure you aren't fighting with oversized sheets in a confined shower space. This preparation allows you to focus entirely on the bonding process once the thin-set is active.
Mix your modified thin-set mortar to a "fairly fluid" consistency. It should be slightly thinner than the mix used for setting tile; it needs to flow easily into the fleece backing of the membrane to create a mechanical bond. If the mortar is too stiff, you won't achieve the necessary suction. Test a small area first to ensure the mortar stays wet long enough for the membrane to be fully embedded without skinning over.
Apply the mortar using a 1/8" x 1/8" or 3/16" V-notched trowel. Comb the mortar in a single direction to help air escape when the membrane is pressed into place. Lay the membrane into the wet mortar and use the flat side of a trowel or a rubber float to embed it. Work from the center toward the edges to remove all air pockets. Achieving 100% coverage is vital for a leak-proof result. For those managing complex layouts, using components from PSC Waterproofing Shower Kits can simplify the coordination of materials.
The Wall-to-Floor Sequence
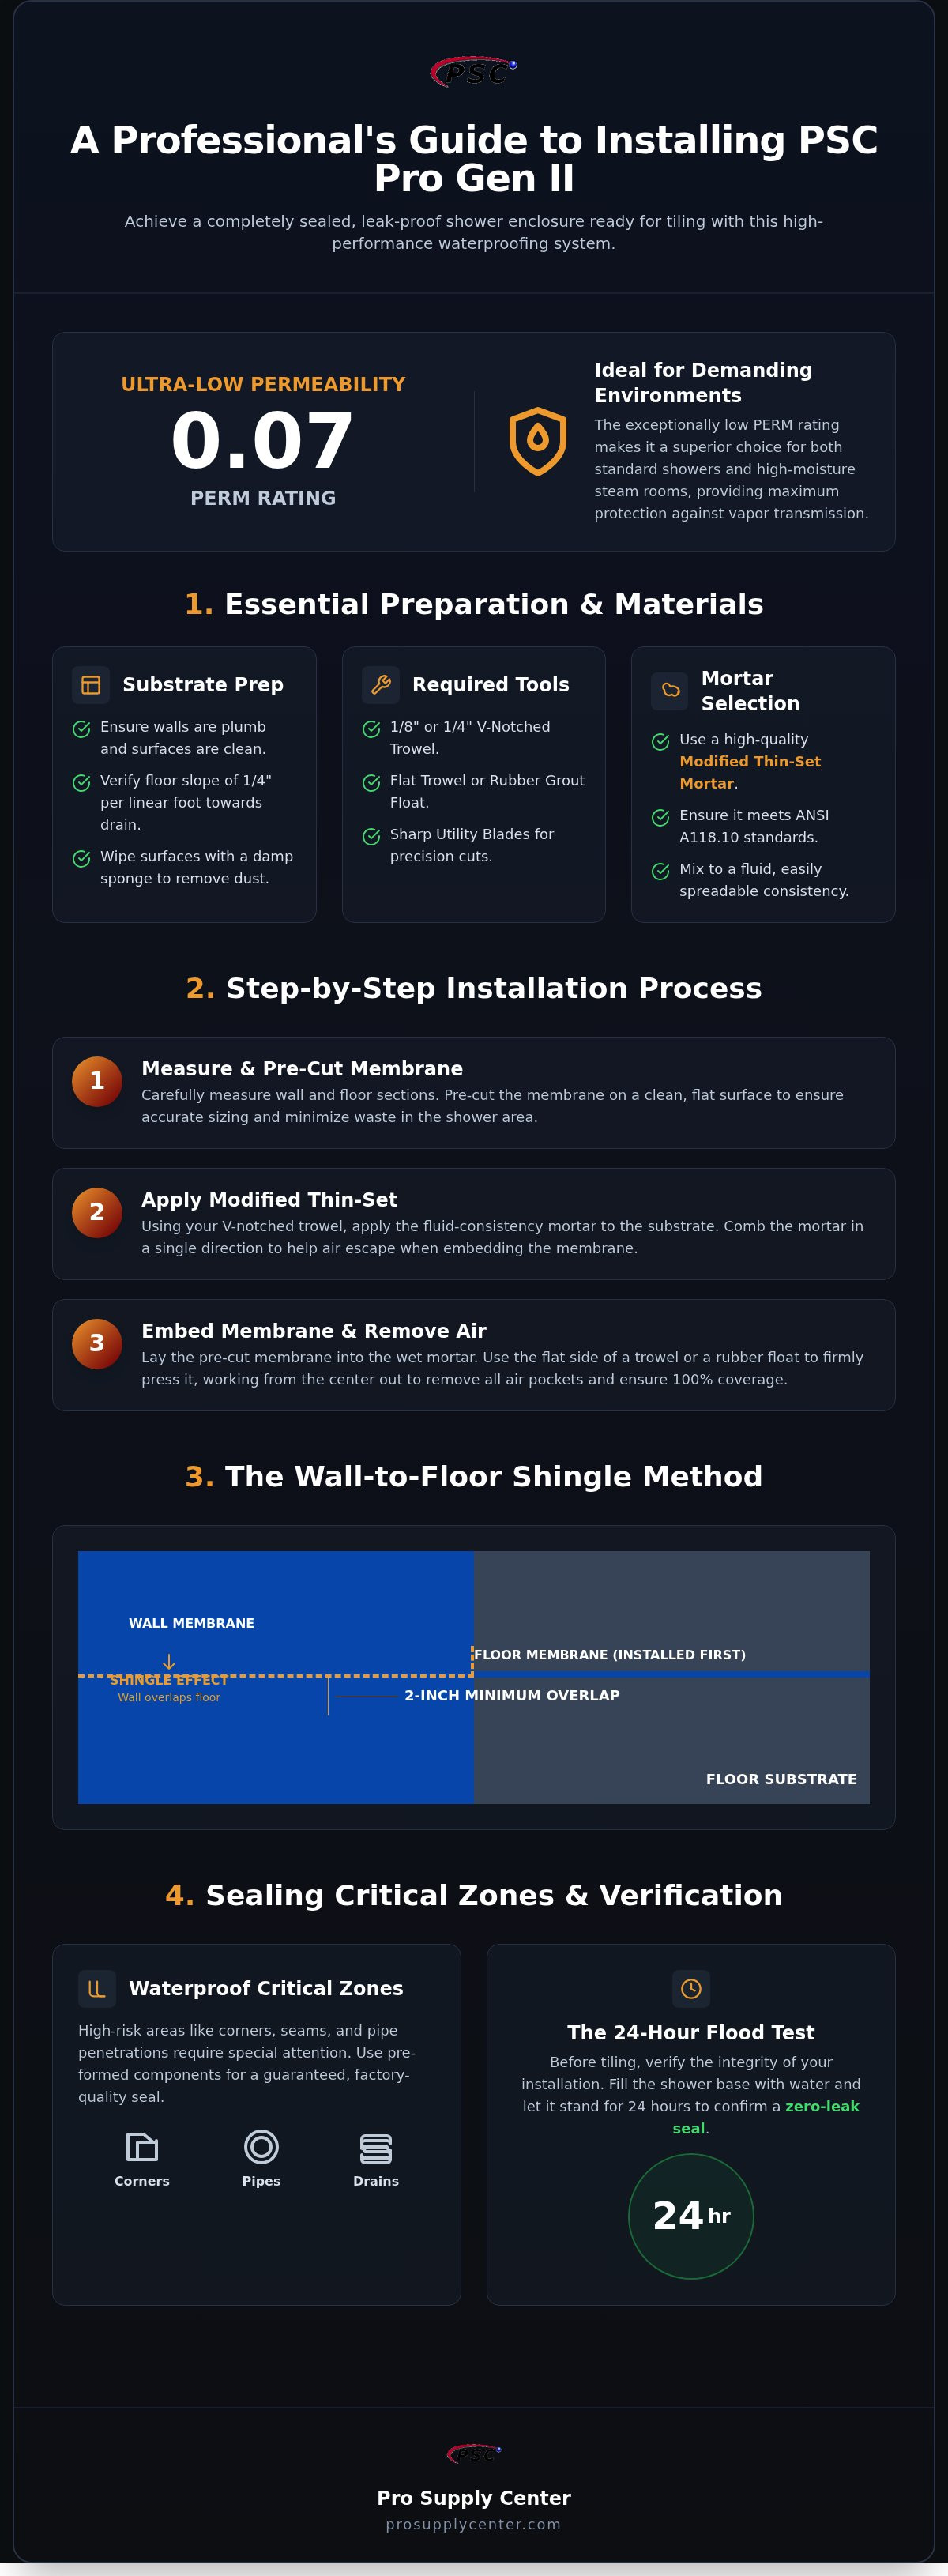
Always install the floor membrane before moving to the walls. By establishing the floor base first, you can overlap the wall membrane onto the floor, creating a shingle effect. This ensures that any moisture running down the walls is directed onto the floor and toward the drain rather than behind the floor membrane. Extend your wall coverage at least 3 inches above the shower head height to protect the substrate from steam and spray.
Managing Seams and Overlaps
Seams are the most critical points of the installation. The PSC Pro Gen II system requires a minimum 2-inch overlap at all joints to maintain waterproof integrity. Apply mortar to the edge of the installed sheet before laying the overlapping piece. Use a flat trowel or a taping knife to bleed out excess mortar from the seam. This prevents a thick buildup that could cause tile lippage. A flat, consistent surface is essential for a professional tile finish.
Waterproofing Critical Zones: Corners, Pipes, and Drains
Most waterproofing failures occur at corners or around plumbing penetrations. When you learn how to install PSC Pro Gen II waterproofing membrane, you realize that the accessories are just as vital as the membrane sheets. Pre-formed inside and outside corners eliminate the risk of pinholes that often occur when trying to fold standard membrane into tight 90-degree angles. These components provide a factory-sealed shape that fits perfectly into the junction of the wall and floor. If you encounter a non-standard angle where a pre-formed corner doesn't fit, use the "butterfly" technique. This involves cutting a custom patch of membrane and overlapping it to maintain the mandatory 2-inch seal across the joint.
Don't rely on sealant alone for pipe penetrations. Use PSC Pro pipe seals and mixing valve seals to bridge the gap between the plumbing and the membrane. These seals feature a flexible rubber center that stretches over the pipe to create a tight gasket. Apply your modified mortar to the wall, slide the seal into place, and embed the fleece edges. This ensures that the waterproof integrity remains intact even if the plumbing vibrates or shifts slightly over time. It's a professional-grade solution that provides far more reliability than a bead of caulk.
Achieving a Perfect Corner Seal
Apply your modified thin-set into the corner fold using the tip of your trowel to ensure full coverage. Avoid using excessive mortar; a thick buildup causes "tenting," where the corner becomes rounded. This makes it difficult for tile to sit flush against the wall. The correct layering sequence is to install your wall membrane first, then apply the corner seals over the top. Press the corner firmly into the wet mortar to remove air pockets and ensure a flat, stable surface for your tile installation.
Drain Flange Integration
The PSC Pro Gen II drain flange is engineered with a factory-bonded fleece specifically designed to accept thin-set. Apply bonding mortar directly to the flange before laying your floor membrane. Center the membrane over the drain opening and cut a hole that matches the internal diameter of the flange. Once embedded, check that the membrane is fully saturated with mortar. This creates a monolithic seal between the shower floor and the drainage system. Testing the bond strength at the drain is a critical step before moving on to the rest of the wall installation.
Flood Testing and Verifying a Leak-Proof Seal
The installation process concludes with a mandatory verification phase. A 24-hour flood test is the only reliable way to confirm that your work is 100% leak-proof before you cover the membrane with tile. This step is a standard requirement for many local building codes and serves as your final insurance policy against structural damage. Once you have completed the steps for how to install PSC Pro Gen II waterproofing membrane, allow the system to set before introducing water.
Begin by inserting a mechanical test plug into the drain below the flange level. Ensure the seal is tight so you aren't misinterpreting a leaky plug for a failure in the membrane. Fill the shower pan with water until the level reaches the top of the curb. Mark the water line clearly on the membrane using a grease pencil or a piece of electrical tape. If you have access to the floor joists from a basement or crawlspace, inspect the underside of the subfloor periodically for any signs of moisture.
Use this checklist to ensure your test is valid:
- Plug the drain: Use a mechanical expansion plug, not just a rag or tape.
- Fill to the curb: The water should reach the highest point of the horizontal waterproofing.
- Mark the level: Use a precise mark to distinguish between evaporation and a leak.
- Wait 24 hours: Do not cut the test short; slow leaks take time to manifest.
When to Perform the Test
Timing is critical. You must wait for the modified thin-set mortar to reach sufficient strength before flooding the pan. In standard conditions, this typically means waiting 24 hours after the final piece of membrane is installed. High humidity or low temperatures can extend this cure time. If the mortar is still wet, the water pressure could compromise the bond. A small amount of water loss due to evaporation is normal; however, a significant drop in the water level or damp spots on the surrounding subfloor indicates a failure that must be addressed immediately.
Documentation for Inspections
Professional contractors should document the entire testing process. Take a clear photo of the water level at the start of the 24-hour period and another photo at the conclusion. These images provide proof of performance for building inspectors and peace of mind for the property owner. For a deeper look at technical specifications and compliance, consult our PSC Pro Gen II Waterproofing System: The Professional Reference Guide. Following these protocols ensures your project meets the highest industry standards for durability.
If you need to replace a test plug or stock up on sealant before your next project, you can find all necessary professional waterproofing supplies at Pro Supply Center.
Optimizing Your Shower Build with PSC Pro Gen II Systems
Completing the membrane application is only part of the project. To achieve a truly professional result, you should consider the advantages of using complete waterproofing shower kits. These kits ensure that every component, from the pre-sloped pan to the drain flange, is engineered to work together. This eliminates the uncertainty of material compatibility that often plagues custom builds. When you know how to install PSC Pro Gen II waterproofing membrane as part of a unified system, you reduce the risk of localized failures at the transitions between different materials.
Integrating professional shower installation components like niches and benches further streamlines the process. Instead of framing these features from scratch and struggling to wrap them in membrane, pre-formed components allow for a direct bond. Apply your modified thin-set to the niche flange and overlap the Gen II membrane by the standard 2 inches. This creates a seamless, vapor-tight transition that is ready for tile as soon as the mortar cures.
Before you begin tiling, perform a final inspection of the surface. The Gen II membrane provides a flat substrate, but any ridges in the mortar should be addressed. If you are installing large format tile, surface flatness is non-negotiable. Use a straightedge to verify that there are no humps or dips that could cause lippage. A perfectly flat membrane layer makes the tile setting process faster and more precise.
System Compatibility and Warranty
Mixing products from different manufacturers is a common mistake that can lead to bond failure. The PSC Pro Gen II system is designed as a complete ecosystem. Using the integrated drain and niche system ensures that the fleece backings are identical, providing a consistent mechanical bond throughout the enclosure. For the final preparation of your tile edges or substrate adjustments, using professional grade abrasives ensures that you aren't introducing contaminants that could interfere with your tile mortar's adhesion.
Efficiency on the Job Site
Efficiency is the hallmark of a seasoned contractor. Pre-measured PSC kits reduce installation time by removing the need for complex on-site fabrication. This methodical approach minimizes call-backs by providing superior vapor management, which is especially critical in steam showers where moisture drive is high. A successful project is one that stays sealed for the life of the home. Ready to start your next project? Order your PSC Pro Gen II system today.
Build a Leak-Proof Foundation for Your Next Project
Mastering how to install PSC Pro Gen II waterproofing membrane transforms a high-risk renovation into a stable, long-term asset. You've learned the technical requirements for substrate preparation, the precision needed for 2-inch seam overlaps, and the critical role of a mandatory 24-hour flood test. By focusing on these methodical steps, you eliminate the common failure points that lead to moisture intrusion and structural damage. This system isn't just about a single layer; it's about the synergy of integrated components like pre-formed corners and fleece-covered drains.
The PSC Pro Gen II system offers contractor-grade reliability and a high vapor permeance rating of 0.07, which exceeds the standards for demanding steam shower environments. Choosing a complete, compatible system ensures that every bond is chemically and mechanically secure from the subfloor to the final tile layer. You can Shop the PSC Pro Gen II Waterproofing System at Pro Supply Center to access the same high-performance materials used by trade professionals. Take the guesswork out of your next build and move forward with the confidence that your waterproofing is engineered to last for the life of the installation.
Frequently Asked Questions
Do I need a vapor barrier behind the PSC Pro Gen II membrane?
No, you don't need a separate vapor barrier behind the membrane. Because the PSC Pro Gen II membrane has an exceptionally low PERM rating of 0.07, it functions as both a waterproofing layer and a vapor retarder. Installing a second barrier, such as plastic sheeting behind the backer board, can actually trap moisture within the wall cavity. This leads to rot and mold growth over time. Stick to a single, high-performance layer for the best results.
Can I use liquid waterproofing over PSC Pro Gen II seams?
You can use liquid waterproofing as an additional precaution, but it isn't a substitute for proper seam construction. The system relies on a mechanical bond created by a 2-inch overlap of membrane sections joined with modified thin-set. If you choose to apply a liquid product over the seams, ensure it's compatible with the fleece backing. However, following the standard steps for how to install PSC Pro Gen II waterproofing membrane correctly provides all the protection you need.
What kind of thin-set should I use to bond tile to the membrane?
When learning how to install PSC Pro Gen II waterproofing membrane, you'll discover that using a high-quality modified thin-set mortar is essential for bonding tile. Modified mortars contain polymers that provide the necessary flexibility and bond strength for non-porous surfaces. Ensure the mortar meets ANSI A118.10 or A118.15 standards to guarantee long-term performance. Using the same mortar for both the membrane installation and the tile setting helps maintain system consistency throughout the build.
How long do I have to wait after installation before I can start tiling?
You can technically begin tiling immediately after the membrane is embedded, but waiting is the safer professional choice. Most contractors prefer to wait 24 hours to allow the mortar to reach an initial set before performing a flood test. Once the flood test is successfully completed and the area is dry, you can proceed with tile. This methodical approach ensures that your waterproofing is fully verified before it's permanently covered by the finish material.
Is PSC Pro Gen II suitable for steam shower applications?
Yes, the PSC Pro Gen II is specifically engineered for steam shower applications. The TCNA Handbook requires a vapor permeance rating of 0.50 or lower for steam rooms; this membrane significantly exceeds that standard with a rating of 0.07 PERM. This low permeability prevents water vapor from migrating into the wall studs and causing structural damage. It's one of the most reliable options available for high-moisture environments where standard membranes might fail to provide adequate protection.
Can I install PSC Pro Gen II over existing tile or painted surfaces?
Installation over existing tile or painted surfaces is generally not recommended. The modified thin-set requires a clean, stable, and slightly porous substrate to achieve a proper mechanical bond. Paint and glazed tile act as bond breakers that can cause the membrane to delaminate over time. If you're working on a remodel, it's best to strip the area down to the original studs and install new backer board to ensure the system performs as designed.
What should I do if I accidentally puncture the membrane during installation?
If the membrane is punctured, you can easily repair it with a patch. Cut a piece of Gen II membrane that is large enough to provide a 2-inch overlap in every direction from the center of the damage. Apply a layer of modified thin-set over the puncture, embed the patch, and use a flat trowel to bleed out any excess mortar. This maintains the waterproof integrity of the system without requiring you to replace the entire sheet of membrane.
Does PSC Pro Gen II require a specific type of shower drain?
While the membrane is versatile, it performs best when integrated with a bonded flange drain system. Using the PSC Pro Gen II drain flange is ideal because it features a factory-bonded fleece that is specifically designed to create a monolithic seal with the membrane. Using a traditional clamping ring drain is possible but requires more complex detailing and increases the risk of leaks at the most critical point of the shower floor where water accumulates.


