

A single chipped porcelain tile on a custom shower wall doesn't just waste material; it erodes your reputation and your profit margin. You've likely dealt with the frustration of a diamond blade that starts strong but begins to chatter and chip after only a few linear feet of dense material. It's a common bottleneck that turns a productive afternoon into a series of expensive re-cuts. Finding professional grade abrasives for tile that can withstand the rigors of modern, high-density porcelain is essential for maintaining a competitive edge in 2026.
We understand that your tools need to be as reliable as your waterproofing system. This guide will help you master the selection and application of high-performance abrasives to ensure chip-free cuts and expert-level finishes on every installation. We will examine the technical specifications of diamond blades, the mechanics of non-wandering hole saws, and the exact polishing sequences required for exposed edges. By the end of this article, you'll have a clear framework for reducing installation times and delivering the zero-chip results that high-end clients demand. Whether you are finishing a complex niche or polishing a mitered corner, the right abrasive selection ensures your craftsmanship remains the focus of the project.
Key Takeaways
- Identify how diamond concentration and bond hardness impact performance when using professional grade abrasives for tile on high-density porcelain.
- Master the "dressing" technique to revive glazed tools and maintain a sharp, efficient cutting edge throughout the project.
- Learn the optimal RPM settings for different materials to prevent heat-related chipping and extend the life of your diamond blades.
- Establish a reliable polishing sequence to create factory-quality finishes on mitered edges and exposed tile corners.
- Understand how precision abrasive work integrates with the PSC Pro Gen II Waterproofing System to deliver professional-grade shower installations.
Understanding the Role of Professional Grade Abrasives in Modern Tiling
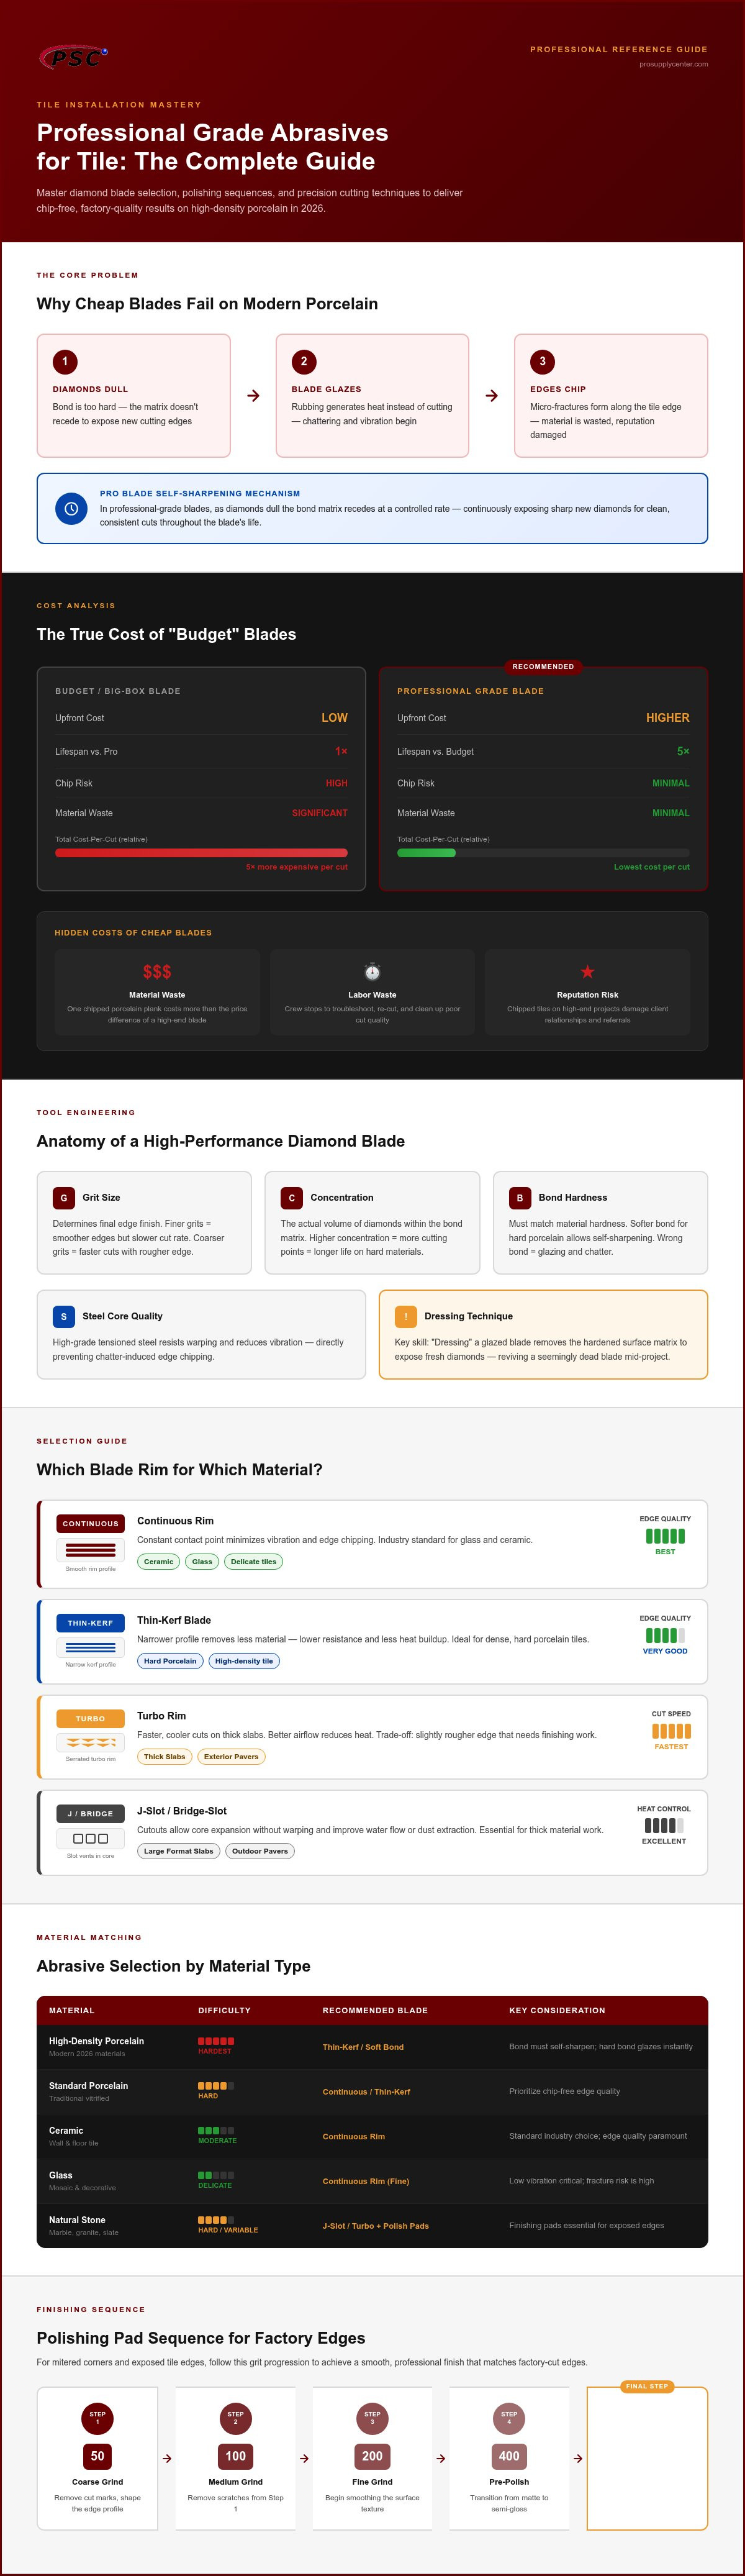
Professional grade abrasives for tile are defined by two primary engineering factors: diamond concentration and bond hardness. Unlike consumer-grade options, these tools utilize a high volume of industrial diamonds suspended in a metallic matrix. This matrix is engineered to wear away at a specific, controlled rate. This process ensures that as diamonds dull, the bond recedes to expose new, sharp edges. Without this self-sharpening mechanism, a blade will simply rub against the material, generating heat rather than a clean cut.
The 2026 industry standards for high-density porcelain have increased material hardness and vitrification levels significantly. Standard abrasives typically fail on these materials because their bond is too hard. The diamonds dull, but the matrix remains intact, leading to "glazing." Once a blade glazes, it begins to chatter and vibrate, resulting in micro-fractures along the tile edge. Clean edges translate directly to consistent grout joints. When a blade leaves a ragged edge, the grout must work harder to hide the imperfections, which often leads to uneven joint widths and potential failure points in the finished floor or wall.
Precision cutting is also a prerequisite for a successful installation over the PSC Pro Gen II Waterproofing System. When tiles are cut with high accuracy, they fit tighter against shower drains, niches, and corners. This precision minimizes the amount of sealant or grout required to bridge gaps. Reducing these gaps decreases the mechanical stress on the underlying waterproofing membrane during natural thermal expansion and contraction, ensuring the long-term integrity of the wet area.
The Anatomy of a High-Performance Diamond Blade
A professional blade's performance relies on its diamond matrix. Grit size determines the final finish; finer grits produce smoother edges but cut at a slower pace. Concentration refers to the actual volume of diamonds within the bond. A high-quality steel core is equally critical. Professional blades use high-grade, tensioned steel that resists warping and reduces vibration. This stability is what prevents the chatter that causes edge chipping. Contractors generally choose between continuous rims for maximum edge quality or turbo rims for faster, cooler cuts on thicker slabs.
Why "Big Box" Abrasives Cost More in the Long Run
Retail-grade blades often seem like a bargain, but the cost-per-cut tells a different story. A professional blade might cost more upfront, but it can outlast five cheap alternatives. There is also the hidden cost of material waste. One chipped porcelain plank can cost more than the price difference of a high-end blade. Finally, labor efficiency is the most significant factor. Using professional grade abrasives for tile allows your crew to cut faster and requires less cleanup, allowing the project to move forward without stopping to troubleshoot poor cut quality.
Essential Abrasive Categories for Professional Tile Installations
A successful tile installation requires a layered approach to abrasive selection. While the primary cut is critical, the final aesthetic often depends on the secondary and tertiary tools used for edge refinement and precision penetrations. Professional grade abrasives for tile include a range of specialized diamond tools designed to handle the specific densities of modern materials without compromising the structural integrity of the tile or the substrate.
Diamond Blades: Selecting the Correct Rim and Bond
Continuous rim blades are the industry standard for ceramic and glass because they provide a constant contact point, which minimizes vibration and edge chipping. For harder porcelain, thin-kerf blades are preferable. Their narrower profile reduces the amount of material removed, lowering resistance and heat buildup during the cut. If you're working on thick slabs or exterior pavers, blades with J-slot or bridge-slot designs are essential. These cutouts allow the steel core to expand and contract without warping while facilitating better water flow or dust extraction. Integrating these high-performance abrasives into your workflow ensures your custom cuts match the quality of the surrounding factory edges.
Polishing Pads: Achieving a Factory Edge
Cutting a tile is only the first step if the edge remains exposed. Professional polishing pads allow you to restore a factory finish to cut edges or create custom miter joints. The process follows a strict grit progression. You'll usually start with a coarse 50-grit pad to shape the material and remove major saw marks. From there, you move through 100, 200, 400, 800, 1500, and finally a 3000-grit pad for a high-gloss buff. Wet pads generally produce a superior finish and extend tool life, but dry pads are more convenient for quick on-site adjustments where water management is difficult.
Hole Saws and Core Bits for Precision Openings
Plumbing penetrations in shower walls require precision to ensure the trim plates properly cover the opening. Vacuum-brazed diamond bits are ideal for dry drilling through porcelain and ceramic, offering speed and convenience for most residential jobs. Sintered bits, where the diamonds are embedded deeper in the metal bond, are better suited for high-volume commercial projects where tool longevity is the priority. To prevent the bit from "walking" or sliding across the glazed surface, start the cut at a 45-degree angle until a small groove is established. Once the bit has a bite, slowly bring the tool to a 90-degree position to finish the hole. This technique prevents surface scratches and ensures your professional grade abrasives for tile perform as intended.
Beyond these primary categories, keep abrasive files and rubbing stones on hand. These are invaluable for micro-adjustments and smoothing out the "v-lead" on the back of a cut tile. This small detail ensures a perfectly flush fit against the next piece, especially when using a leveling system.
Matching Abrasives to Material: Porcelain, Ceramic, and Stone
The physical properties of your material dictate the bond and grit requirements of your tools. Using a single blade for every project leads to premature tool wear or ruined inventory. Professional grade abrasives for tile are engineered to interact with specific densities, and understanding these interactions is the difference between a clean install and a series of expensive mistakes.
Porcelain is highly vitrified and extremely dense. It requires a soft-bond abrasive. Because the material is so hard, it doesn't provide much "dressing" action to the tool. A soft metallic bond is designed to erode quickly enough to expose fresh diamonds, preventing the blade from glazing and overheating. Ceramic tile, by contrast, has a softer clay body but a delicate, often brittle glaze. The challenge here is balancing cutting speed with chip control. High-speed blades can cause the glaze to "fire-chip" along the cut line, so a continuous rim with a medium bond is usually the safest choice for maintaining edge quality.
Glass tile presents the most significant challenge. It's prone to shattering and back-side chipping. Specialized glass blades utilize an ultra-fine grit, often 200-grit or higher, to essentially grind through the material rather than cutting it. This minimizes the shock to the glass structure. When working with natural stone, heat management becomes the priority. Dense stones like granite require significant water flow to manage the slurry, while softer stones like marble can be easily stained by low-quality metal-bond abrasives. Always use high-quality resin-bonded pads for stone polishing to avoid leaving metallic "rust" marks on light-colored materials.
Tackling Large Format Porcelain (LFP)
Large format porcelain slabs are under significant internal tension. A single micro-crack caused by a vibrating blade can travel across the entire five-foot span, resulting in a total loss. To prevent this, use thin-kerf professional grade abrasives for tile that reduce the mechanical load on the slab. Vibration dampening is critical; ensure your saw is perfectly calibrated and the material is fully supported. Coordinating these precision cuts with a ceramic tile leveling system ensures the substrate is perfectly flat. This prevents the "lippage" that often leads to edge damage during the final polishing and grouting stages.
Abrasives for Natural Stone and Terracotta
Natural stone is porous and requires a methodical grit sequence. If you skip a step in the polishing process, you'll leave visible scratches that only appear once the stone is sealed. Start with a 50-grit shaping pad and move through each grit without rushing. For terracotta and other highly porous materials, manage your slurry carefully. If the abrasive slurry dries on the surface, it can be difficult to remove from the open pores of the clay. Using a wet-cutting environment and cleaning the tile immediately after the abrasive work is the only way to ensure a professional finish.
Maximizing Tool Life and Cut Quality: Professional Standards
Professional installers measure tool efficiency through the "cost-per-cut" metric rather than the initial purchase price. A budget blade that requires replacement every twenty cuts is significantly more expensive than a high-performance tool that lasts for hundreds. When using professional grade abrasives for tile, maintaining this efficiency requires strict adherence to mechanical standards. If your tools aren't performing as expected, the issue usually stems from improper operation rather than a manufacturing defect.
RPM management is the most misunderstood aspect of abrasive use. Many contractors assume that higher speeds lead to faster production, but over-revving a diamond blade can cause the metallic bond to overheat and "smear" over the diamond edges. This glazing prevents the tool from cutting. Instead, match your tool speed to the manufacturer's recommended range. Letting the tool do the work by maintaining a steady, moderate feed rate prevents the steel core from flexing. For wet-cutting operations, optimize your water flow so that the jets hit the point of contact directly. This doesn't just cool the segment; it flushes away the abrasive slurry that would otherwise accelerate bond wear.
If a blade stops cutting effectively but still has segment height, use the "dressing" technique. Run the blade through a dedicated dressing stone or a piece of abrasive sandstone. This process strips away the glazed metallic layer and exposes fresh diamond points. You can find high-durability abrasives and maintenance tools designed to keep your equipment running at peak performance through our professional supply catalog.
Troubleshooting Common Cut Issues
Wandering or curved cuts are usually a sign of core fatigue or improper tensioning. If the blade has been overheated, the steel core loses its "memory" and will wobble during the cut. Bottom-edge chipping in porcelain typically indicates a feed rate that is too aggressive or a blade that is too thick for the material density. You should retire an abrasive immediately if you notice segment loss, hairline cracks in the core, or if the diamond segment height reaches 1/16th of an inch. Continuing to use a fatigued blade is a major safety risk and will inevitably ruin your material.
Job Site Safety with High-Speed Abrasives
OSHA compliance regarding crystalline silica exposure is a non-negotiable standard for modern contractors. When dry grinding or polishing, utilize HEPA-filtered vacuum attachments to capture dust at the source. PPE essentials must include a fit-tested respirator, wrap-around eye protection, and hearing protection. Before mounting any abrasive, inspect the tool flanges for debris or burrs. Even a microscopic grain of sand trapped between the flange and the blade can cause a significant wobble at 10,000 RPM, leading to poor cut quality and potential tool failure.
The Final Polish: Integrating Abrasives into the Shower System
While the structural integrity of a shower relies on the waterproofing membrane, the client's perception of quality is dictated by the visible finish. A perfectly installed PSC Waterproofing Shower Kits only reaches its full potential when the tile work is executed with precision. This is where professional grade abrasives for tile become indispensable. They allow you to bridge the gap between the rough-in phase and the high-end aesthetic expected in modern residential and commercial bathrooms.
The transition from the tile surface to the shower hardware is a critical failure point for both aesthetics and hygiene. If a cut around a drain or niche is ragged, it creates a trap for soap scum and mold, regardless of how well the substrate is waterproofed. Using the correct diamond tools ensures that every penetration is clean and every edge is safe. A final inspection should always involve a tactile check. Run your hand along mitered corners and exposed edges to ensure no sharp burrs remain that could injure the end-user.
Abrasives and Shower Hardware Integration
Customizing tile for linear shower drains requires long, perfectly straight cuts that match the drain's profile. Any deviation is magnified by the long lines of the fixture. Similarly, integrated shower niches demand expert miter joints. By back-cutting the tile at a 45-degree angle and using a fine-grit polishing pad, you can create a seamless stone-look corner that eliminates the need for plastic or metal trim pieces. Smoothing the transition between wall tile and cove base molding also requires a steady hand and a fine-grit abrasive stone to ensure the grout joint remains consistent where the different planes meet.
The Pro Supply Center Advantage
At Pro Supply Center, we don't just sell individual tools; we provide a complete system for professional success. Our curated selection of professional grade abrasives for tile is chosen specifically for its compatibility with the high-density porcelain and ceramic materials used in today's market. We understand the nuances of a job site and the pressure to deliver zero-chip results on tight schedules. By sourcing your abrasives alongside your PSC Pro Gen II Waterproofing System, you ensure that every component of your build works in harmony. From the pan liner to the final polished edge, we are your partner in delivering installations that stand up to both technical scrutiny and client expectations.
Elevating Installation Standards for 2026
Success in modern tiling requires more than just a steady hand; it demands a technical understanding of how your tools interact with increasingly dense materials. By matching the bond hardness of your blades to the specific vitrification level of your tile, you eliminate the chatter and chipping that ruin high-end installations. Integrating these precision techniques with the PSC Pro Gen II Waterproofing System ensures that your craftsmanship is supported by a foundation of structural integrity and expert-level aesthetics.
Investing in professional grade abrasives for tile is a strategic decision that reduces long-term labor costs and material waste. These tools offer contractor-grade durability and are specifically curated for the rigors of modern job sites. Whether you're performing a complex miter on a niche or a precision cut for a linear drain, the right abrasive makes the difference between a standard job and a master-level finish.
Shop Professional Grade Abrasives at Pro Supply Center to access our curated selection with national shipping for professional installers. Take the next step in refining your workflow and delivering the zero-chip results your clients expect.
Frequently Asked Questions
What is the difference between a wet and dry diamond blade for tile?
Wet blades require constant water flow to cool the metallic core and flush away abrasive slurry. Dry blades are engineered with high-temperature bonds and specialized cooling slots to dissipate heat without liquid. While dry blades offer on-site convenience, wet blades generally provide a cleaner cut and significantly longer tool life. This is because they eliminate the extreme thermal stress that causes diamond segment glazing and core warping.
How do I stop my porcelain tile from chipping when I cut it?
Chipping is usually caused by using a blade with a bond that is too hard for the material. You should switch to a thin-kerf blade designed specifically for porcelain; these reduce resistance and heat buildup. Additionally, ensure your saw is perfectly aligned and you aren't forcing the tile through the cut. Letting the tool do the work at a steady feed rate is essential when using professional grade abrasives for tile.
What grit polishing pad should I use for a matte finish on stone?
Achieving a matte or "honed" finish typically requires stopping the polishing grit progression at 200 or 400 grit. Higher grits like 800 and 1500 begin to create a satin sheen, while 3000 grit produces a high-gloss buff. Always test the sequence on a scrap piece of stone first. The mineral composition of marble or granite can affect how quickly the surface reflects light during the abrasive process.
Can I use a wood-cutting saw with a diamond blade for tile?
No, you should not use a standard wood saw for tile work. Wood saws typically run at higher RPMs than dedicated tile saws, which can cause diamond blades to overheat or shatter. Furthermore, wood saws lack the water management systems required for wet cutting and the dust extraction ports necessary to handle hazardous silica dust. Using the wrong equipment compromises both the safety of the installer and the integrity of the cut.
How long should a professional-grade diamond blade last?
Life expectancy depends on material density and cutting depth, but a professional blade should outlast consumer-grade alternatives by a factor of five. In standard porcelain, a high-quality blade can often achieve between 100 and 200 linear feet of cutting. You'll know it's time to retire the tool when the diamond segment height reaches 1/16th of an inch or if the steel core shows signs of fatigue and vibration.
Why does my diamond blade seem to stop cutting after a few uses?
This is known as "glazing." It occurs when the metallic bond smears over the diamonds because the material isn't abrasive enough to wear the bond away. This often happens when cutting very hard porcelain with a blade that has a bond that is too hard. You can revive the blade by "dressing" it; simply make a few cuts into a dedicated dressing stone or a soft clay brick to expose fresh diamond points.
Do I need different abrasives for glass tile vs. ceramic tile?
Yes, glass requires specialized ultra-fine grit blades to prevent the back-side coating from peeling and the glass from shattering. Standard ceramic blades use a coarser grit that is too aggressive for the brittle nature of glass. Using professional grade abrasives for tile specifically labeled for glass ensures a smooth edge. This prevents the need for extensive manual sanding after the cut is completed, saving significant labor time on the job.
What is the best way to drill a hole in a porcelain shower wall?
Use a vacuum-brazed diamond core bit and start the hole at a 45-degree angle to prevent the bit from "walking" across the glazed surface. Once the bit creates a small groove, slowly tilt the drill to a 90-degree angle. For maximum tool life, use a cooling wax or a small amount of water. This methodical approach ensures precision openings for plumbing fixtures without risking structural cracks in the porcelain.


