

Lippage isn't an inevitable part of working with large format tile; it's a mechanical error that you can solve with the right equipment. Many contractors view tile leveling clips and wedges as simple spacers, but they're actually tensioning devices designed to fight the natural physics of mortar shrinkage. When these tools fail, it's usually because of poor technique or low-quality components that snap prematurely or leave plastic shards behind in the grout joints. You shouldn't have to settle for uneven edges that ruin the aesthetic of expensive porcelain or stone installations.
We know the pressure of delivering a flawless finish on a tight schedule while avoiding the nightmare of call-backs. This guide will help you master the technical mechanics of professional leveling systems to ensure a perfectly flat finish on every job. We'll walk through the strategies for managing large format tile, the logic of clip placement, and how these tools integrate with a complete prep-to-finish workflow. From the invisible protection of the PSC Pro Gen II Waterproofing System to the visible precision of your grout lines, you'll have a reliable framework for achieving zero-lippage results that last.
Key Takeaways
- Learn how to use tile leveling clips and wedges as mechanical tension tools to counteract mortar shrinkage and ensure a perfectly flat surface.
- Understand the specific installation challenges of Large Format Tiles (LFT) and how to manage manufacturing defects like bowing or cupping.
- Master the "Butter and Set" method and substrate preparation standards required to eliminate lippage on every project.
- Identify why professional-grade engineering, including precise break-points, is essential for clean clip removal and high-quality grout joints.
- Analyze the ROI of using reliable leveling systems to speed up installation times and prevent expensive call-backs.
What are Tile Leveling Clips and Wedges?
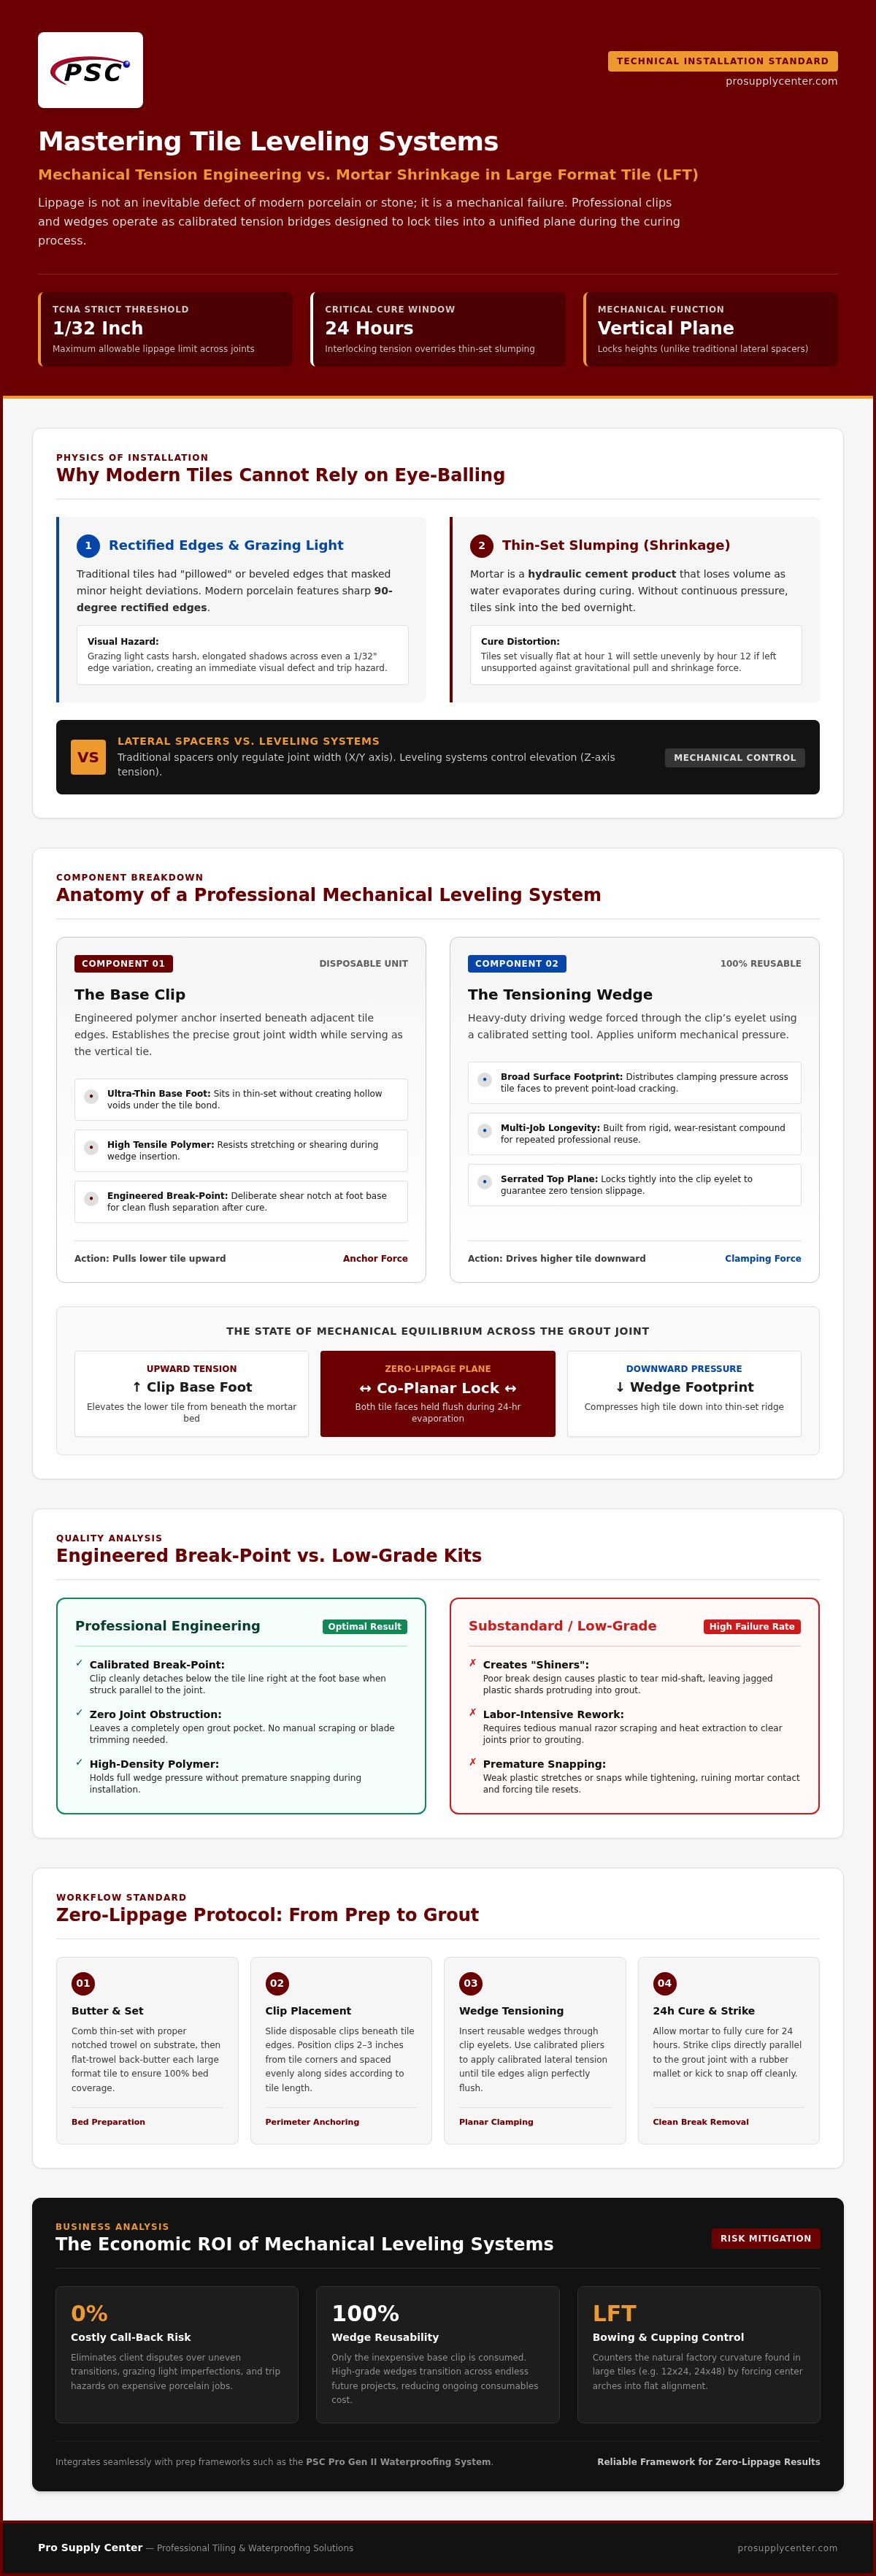
Professional tile leveling systems are far more than just plastic accessories; they are a two-part mechanical solution engineered to eliminate lippage. While traditional spacers only manage lateral spacing, these systems focus on vertical alignment across the entire floor or wall surface. By using tile leveling clips and wedges, installers can lock adjacent tiles into a single, cohesive plane that remains stable throughout the drying process. This mechanical approach removes the guesswork from setting large tiles and ensures a professional grade finish that isn't dependent on manual eye-balling alone.
The system consists of two primary components. The first is a disposable base clip that sits beneath the tile edges, establishing the grout joint width. The second is a reusable tensioning wedge that slides through the clip's eyelet. When you apply pressure with a setting tool, the wedge forces the tiles to a uniform height. This mechanical bridge ensures the surface stays flat while the thin-set mortar cures and naturally shrinks. It's a reliable way to maintain the integrity of your layout from the first tile to the last.
The Problem of Lippage in Modern Tiling
Lippage refers to the vertical displacement where the edge of one tile sits higher than its neighbor. In the context of tile installation fundamentals, this is often a result of substrate irregularities or uneven mortar application. Modern rectified tiles, which feature sharp, 90-degree edges, make even the slightest lippage extremely noticeable. Unlike older "pillowed" or beveled tiles that could hide minor height differences, rectified porcelain creates a trip hazard and a visual defect if not perfectly leveled. It's especially problematic under grazing light, which casts long shadows over even minor ridges.
Industry standards set by the Tile Council of North America (TCNA) provide strict guidelines for allowable lippage. For most installations, the acceptable limit is often as narrow as 1/32 of an inch. Achieving this level of precision manually on large format tiles is nearly impossible without the constant, calibrated pressure provided by tile leveling clips and wedges. These tools are necessary because they account for the inherent "bow" found in many modern manufactured tiles.
How Mechanical Tension Overrides Mortar Shrinkage
Mortar is a hydraulic cement product that loses volume as it cures. This process, known as slumping, occurs as moisture evaporates from the thin-set. Without a leveling system, a tile that looks perfectly flat when first set can "sink" into the mortar bed overnight, resulting in unexpected lippage the next morning. The mechanics of the clip and wedge system effectively counteract this physical reality by locking the tiles in place.
The base clip acts as an anchor, pulling the lower tile upward, while the wedge exerts downward force on the higher tile. This creates a state of equilibrium across the joint. Interlocking tension is the force that prevents tile movement during the 24-hour cure window. By maintaining this tension, the system overrides the natural tendency of the mortar to pull tiles out of alignment as it dries, protecting your work until the bond is permanent.
Anatomy of a Professional Leveling System: Clips vs. Wedges
High-quality tile leveling clips and wedges aren't just molded plastic; they're precision-engineered tools. The clip base must be thin enough to fit under the tile without creating a hollow spot in the mortar, yet strong enough to handle significant tensile load. A common failure in cheap kits is a clip that stretches or snaps while you're tightening the wedge. Professional systems avoid this by using high-density polymers that maintain their shape under pressure.
One of the most important features is the "engineered break-point." This is a deliberate weak spot at the base of the clip, just above the foot. When the mortar has cured, a sharp kick or a strike with a rubber mallet should snap the clip cleanly away from the base. If the break-point is poorly designed, the plastic can tear, leaving "shiners" or jagged pieces sticking up in the grout joint. This ruins the finish and requires tedious manual scraping. It's a technical detail that separates professional gear from hobbyist alternatives.
The wedge serves as the heavy-lifter. Unlike the disposable clip, the wedge is designed for multiple reuses across different job sites. Its wide footprint distributes pressure evenly across the tile surface, which is vital for professional tile floor installation techniques. This even distribution prevents the point loading that can crack delicate stone or thin porcelain. For contractors, investing in a high-performance Ceramic Tiles Leveling System ensures that the wedges don't deform or lose their grip after just one or two uses.
Clip Base Varieties and Grout Joint Widths
Clips are categorized by their thickness, which determines the minimum grout joint. Standard sizes include 1/16-inch for the tight, contemporary joints often seen in high-end porcelain, and 1/8-inch for more traditional spacing. You'll also find flat bases for standard floor installations and curved bases designed to provide extra clearance for wall applications or heavier tiles. Clip height is another factor; specialized clips exist to accommodate everything from 3mm slim porcelain to 20mm thick natural stone. Choosing the right base ensures the clip doesn't bottom out or sit too high for the grout to cover.
Wedge Durability and Ergonomics
High-impact plastic is a requirement for wedges because they must withstand the force of tensioning pliers without flattening. The top of the wedge usually features incremental ribbing. These small teeth allow for precise, click-by-click tensioning, giving the installer total control over the vertical alignment. While some smaller jobs can be handled with thumb-grip pressure, large-scale projects require pliers-driven tensioning to maintain consistency and reduce hand fatigue. This mechanical advantage is what allows you to override the weight of large format tiles effortlessly.
Why Large Format Tiles (LFT) Require Professional Leveling Systems
Large format tile (LFT) is defined as any tile with at least one side longer than 15 inches. While these tiles create a sleek, expansive look with fewer grout lines, they present unique physical challenges that traditional spacers cannot address. The primary issue is the manufacturing process. When porcelain or ceramic slabs are fired in a kiln, the material often develops a slight curve, known as "bowing" or "cupping." Because these tiles are so large, even a minor manufacturing deviation becomes a major lippage hazard when two tiles meet. Tile leveling clips and wedges are the only reliable way to force the center of a bowed tile into a flat alignment with its neighbor.
The weight of LFT also complicates the installation. A single 24x48 inch porcelain slab is heavy enough to displace mortar simply by its own mass. This weight creates a powerful suction effect that makes fine adjustments nearly impossible once the tile is placed. Professional grade leveling systems use heavy duty clips designed to withstand the high tension required to lift these massive pieces. Without this mechanical assistance, you're forced to rely on "beating" the tile into the mortar, which often results in uneven coverage and structural voids beneath the surface.
Placement Strategies for Massive Planks and Slabs
Successful LFT installation depends on a strategic clip layout. For maximum support, place clips every 10 to 12 inches along every edge. On a standard 12x24 inch tile, this usually means a "four-corner" approach supplemented by "mid-span" clips on the long sides. If you're working with 24x48 slabs or larger, the spacing becomes even more critical to prevent the tile from sagging in the middle.
- Offset Patterns: When using a 1/3 bond or brick pattern, the center of one tile (the highest point of the bow) meets the end of another. Leveling systems are mandatory here to bridge that height gap.
- Corner Alignment: Always place clips approximately two inches from each corner to ensure the most vulnerable points stay locked in place.
- Consistency: Use a consistent amount of tension on every wedge to ensure the entire floor moves as a single plane.
Mortar Selection for LFT and Leveling Integration
Standard thin-set isn't designed to support the weight of LFT while using a leveling system. You must use Large and Heavy Tile (LHT) mortar, which is engineered to hold its ridges without slumping. When you tighten your tile leveling clips and wedges, the LHT mortar provides the necessary resistance to keep the tile from sinking too deep into the bed. This combination of mechanical tension and high-performance mortar is the only way to overcome the suction effect mentioned earlier.
A flat substrate is the foundation of this entire process. Leveling systems can correct tile bowing, but they aren't designed to fix a floor that is wildly out of level. For wet area installations, ensuring your prep work is sound is vital. Utilizing the PSC Pro Gen II Waterproofing System provides the stable, flat, and waterproof environment needed before you ever set your first clip. Once your substrate is within 1/8-inch flatness over 10 feet, your leveling system can do its job effectively.
Step-by-Step: How to Install and Remove Leveling Clips
Successful installation begins before the first tile is ever set. You must verify that the substrate is within a tolerance of 1/8-inch flatness over a 10-foot span. If the floor or wall is outside this range, the mechanical force required to align the tiles may exceed the clip's tensile strength. Once the surface is prepped, employ the "Butter and Set" method. Apply thin-set to the substrate with the appropriate notched trowel and back-butter the tile to ensure maximum coverage. This double-bonding technique is vital for preventing voids that lead to cracked tiles later.
Insert the clips under the edge of the first tile, ensuring they're positioned according to your spacing strategy. After setting the adjacent tile, slide the reusable wedge through the clip's eyelet. Use tensioning pliers to drive the wedge until the two tiles are perfectly flush. This calibrated pressure ensures consistency across the entire room. For reliable results on high-stakes projects, choose a professional Ceramic Tiles Leveling System that's built to withstand these installation pressures.
Avoiding Common Installation Pitfalls
One of the most frequent errors is allowing thin-set to squeeze up into the clip base. If mortar hardens around the engineered break-point, the clip won't snap cleanly during removal. Use a small tool or a spacer to clear any excess thin-set from the joint while it's still wet. Additionally, you must never attempt to tension a clip once the mortar has begun to skin over. Doing so can break the adhesive bond between the tile and the substrate, leading to a loose installation. Always check for hollow spots by tapping the tile, even if the leveling system shows a perfectly flat plane.
The Science of a Clean Break
The removal process is just as technical as the installation. You must wait for the mortar to fully cure, which typically requires a 24-hour window. Removing clips too early can cause the tiles to shift or leave plastic fragments embedded in the mortar. The strike must be delivered parallel to the grout joint. This ensures the force hits the engineered break-point directly. A perpendicular strike is the most common cause of "high breaks," where the plastic snaps above the grout line.
While many professionals prefer the speed of a firm kick, a rubber mallet offers more controlled force for delicate stone. If a clip does break incorrectly, don't try to pry it out with a screwdriver, as this can chip the tile edge. Instead, use a heat gun to soften the plastic and carefully trim it below the surface with a sharp utility knife. This attention to detail ensures the grout joint is deep enough to hold material permanently.
Professional Considerations: Cost, Reuse, and Quality
The return on investment for utilizing tile leveling clips and wedges is measured in labor hours saved and the total elimination of call-backs. While the upfront cost of consumables like clips adds to the material bill, it's offset by the speed at which a setter can lock in a flat plane across large areas. On commercial projects, this efficiency allows for higher daily square-footage totals without sacrificing quality. High-performance systems prevent the need for manual "tweaking" of every tile, which is a significant drain on skilled labor time. When you factor in the cost of replacing a single lipped tile after the mortar has cured, the system pays for itself on the first job.
Professional grade components are essential for maintaining this ROI. Low-quality clips often fail under high tension, either stretching without leveling the tile or snapping prematurely during the setting process. This leads to job site frustration and wasted materials. A reliable clip must provide consistent tensile strength while maintaining a precise break-point for removal. Investing in quality ensures that your removal process is as efficient as your installation, leaving a clean joint ready for grout without the need for additional scraping or plastic removal.
Calculating Your Job Site Needs
Estimating your requirements accurately prevents project delays and reduces shipping costs. A standard rule of thumb for a 12x24 inch tile is to place two clips along each long side and one or two on the short ends, depending on the layout. For larger 24x48 slabs, you'll need clips every 10 to 12 inches to prevent sagging and manage the inherent bow of the tile. Contractors should always over-order clips by at least 10% to account for accidental breakage or substrate irregularities that require extra support. While wedges are reusable, they aren't permanent. You should retire wedges when the teeth on the top surface show signs of flattening, as worn teeth won't hold the incremental tension necessary for a perfectly flat finish.
The Complete System Approach
A professional finish is the result of a coordinated workflow where each product supports the next. Leveling systems are most effective when used on top of a perfectly prepped substrate. They complement waterproofing shower kits by ensuring the visible surface is as high-quality as the invisible waterproofing layer beneath. This synergy creates a high-end finish that is both aesthetically perfect and structurally sound for years to come.
Preparation also includes the edges of the tile itself. Using professional grade abrasives to clean and smooth tile edges before setting ensures that the clips sit flush and the grout joints remain uniform. This systematic approach reduces variables and guarantees a consistent result across different installers. To ensure your next project meets these professional standards, view our professional tile leveling systems at Pro Supply Center and equip your team with tools designed for the demands of the modern job site.
Achieving Zero Lippage on Every Project
Mastering the mechanical physics of tile installation transforms a standard job into a high-end showcase. By understanding how tile leveling clips and wedges counteract mortar shrinkage and manufacturing defects in Large Format Tile, you secure the integrity of your finish. These systems provide the necessary tension to bridge height gaps and maintain a single plane throughout the 24-hour curing window. Relying on professional-grade engineering ensures that your removal process is clean and your grout joints remain clear of plastic debris.
Pro Supply Center is your partner in achieving these results. Our inventory features systems designed for contractor-grade durability and LFT success. We provide the essential components you need to manage the visible precision of your work, supported by national shipping on all tiling essentials. When you pair these leveling tools with our flagship PSC Pro Gen II Waterproofing System, you create a complete, reliable installation ecosystem.
Don't settle for uneven edges or expensive call-backs on your next contract. Shop Professional Tile Leveling Systems at Pro Supply Center today. With the right equipment and a methodical approach, you can deliver a perfectly flat, professional surface that stands up to any inspection.
Frequently Asked Questions
How many tile leveling clips do I need per square foot?
You typically need between two and six clips per tile depending on the specific dimensions and layout of your project. For a standard 12x24 inch tile, expect to use approximately four clips per unit to maintain alignment. Larger format tiles like 24x48 slabs require placement every 10 to 12 inches along the edges. It's best to calculate based on your total tile count rather than square footage alone. Always include a 10% overage for potential breakage.
Can I reuse tile leveling wedges for my next project?
Yes, wedges are designed for multiple reuses across several different job sites. Unlike the disposable base clips that stay embedded in the mortar, you can collect wedges after the removal process is complete. You should inspect them regularly for wear on the incremental teeth. If the ribbing becomes flattened or the high-impact plastic deforms, the wedge won't hold the necessary tension. Replace them once they no longer provide a secure, ratcheting lock.
When is the best time to remove tile leveling clips?
The optimal time for removal is 24 hours after the installation is finished. You must wait until the thin-set mortar has reached a full cure to ensure the tiles won't shift during the process. Removing them too early can result in "shiners" where plastic fragments remain visible in the joint. Always strike the clips parallel to the grout line with a rubber mallet or a firm kick to ensure the engineered break-point snaps cleanly below the surface.
Do tile leveling systems work on wall tiles?
Tile leveling systems are highly effective for wall applications, particularly when installing large format porcelain or heavy stone. They prevent the sagging or slipping that often occurs due to gravity before the mortar sets. Using tile leveling clips and wedges on walls ensures that vertical lippage is eliminated. This is critical for modern bathroom designs where grazing light from vanity fixtures can highlight even minor surface irregularities that ruin the aesthetic.
What happens if a tile leveling clip breaks below the grout line?
If a clip breaks below the grout line, it has functioned correctly and requires no further action. The engineered break-point is designed to snap beneath the tile surface so the grout can cover it completely. If a clip snaps above the line, you'll need to use a heat gun to soften the plastic and carefully trim it with a sharp utility knife. Don't attempt to pry it out with a screwdriver, as this often chips the edges.
Are tile leveling systems necessary for small tiles?
Leveling systems aren't strictly necessary for small tiles like mosaics or 4x4 subways because these materials naturally follow the substrate's contour. The primary purpose of tile leveling clips and wedges is to manage the bowing and weight of large format tiles. However, you might find them useful on medium-sized tiles if you're working with a very flat, rectified edge where even minor height differences are visible. Most pros stick to traditional spacers for smaller formats.
Can I use leveling clips with natural stone?
You can use these systems with natural stone, but you must be mindful of the material's relative fragility. Stone like marble or travertine can be softer than porcelain and might chip under extreme tension. Use a rubber mallet instead of the kick method for removal to minimize impact. Ensure the clip base doesn't create a hollow spot, which is especially important when setting heavy stone over the PSC Pro Gen II Waterproofing System in wet areas.
Do I still need to use traditional spacers with a leveling system?
In most cases, you don't need additional spacers because the clip base itself establishes the grout joint width. Standard clips come in sizes like 1/16-inch or 1/8-inch to match your design requirements. You might only use traditional spacers at the perimeter or for complex mosaic inlays where the leveling system isn't applied. For the main field of large format tile, the clips handle both vertical alignment and lateral spacing simultaneously for a faster workflow.


