

Most shower waterproofing failures don't start across the broad field of a wall; they begin at the recessed cutout where moisture finds unsealed framing seams. Installing a prefabricated waterproof shower niche box eliminates tedious site carpentry and drastically cuts installation time, but only if the flange integration and bonding surface chemically match your surrounding assembly.
You already know that framing custom boxes from scrap backer board eats up hours and introduces multiple leak paths. Just as frustrating is struggling to achieve a reliable thin-set mortar bond against slick plastic shells, or worrying whether an oversized custom box will compromise standard 16-inch on-center studs.
This contractor guide evaluates prefabricated niche options by core material, structural stability, and system integration to keep framing cavities bone-dry. We review how high-density foam and rigid plastic shells compare, how factory flanges tie into sheet or liquid membranes, and which surface finishes guarantee permanent tile adhesion.
Key Takeaways
- Compare structural rigidity and bonding surfaces between XPS foam and ABS plastic to select the right core for your substrate.
- Installing a factory-sealed waterproof shower niche box eliminates multi-step site fabrication and dramatically lowers the risk of hidden wall leaks.
- Plan niche dimensions around standard 16-inch on-center stud bays to avoid unnecessary structural framing modifications.
- Ensure long-term moisture defense by locking perimeter flanges into surrounding wall assemblies with compatible bonded waterproofing bands.
- Align rough niche sizing with your planned tile layout to minimize difficult miter cuts and speed up finish tiling.
Key Buying Criteria for a Contractor-Grade Waterproof Shower Niche Box
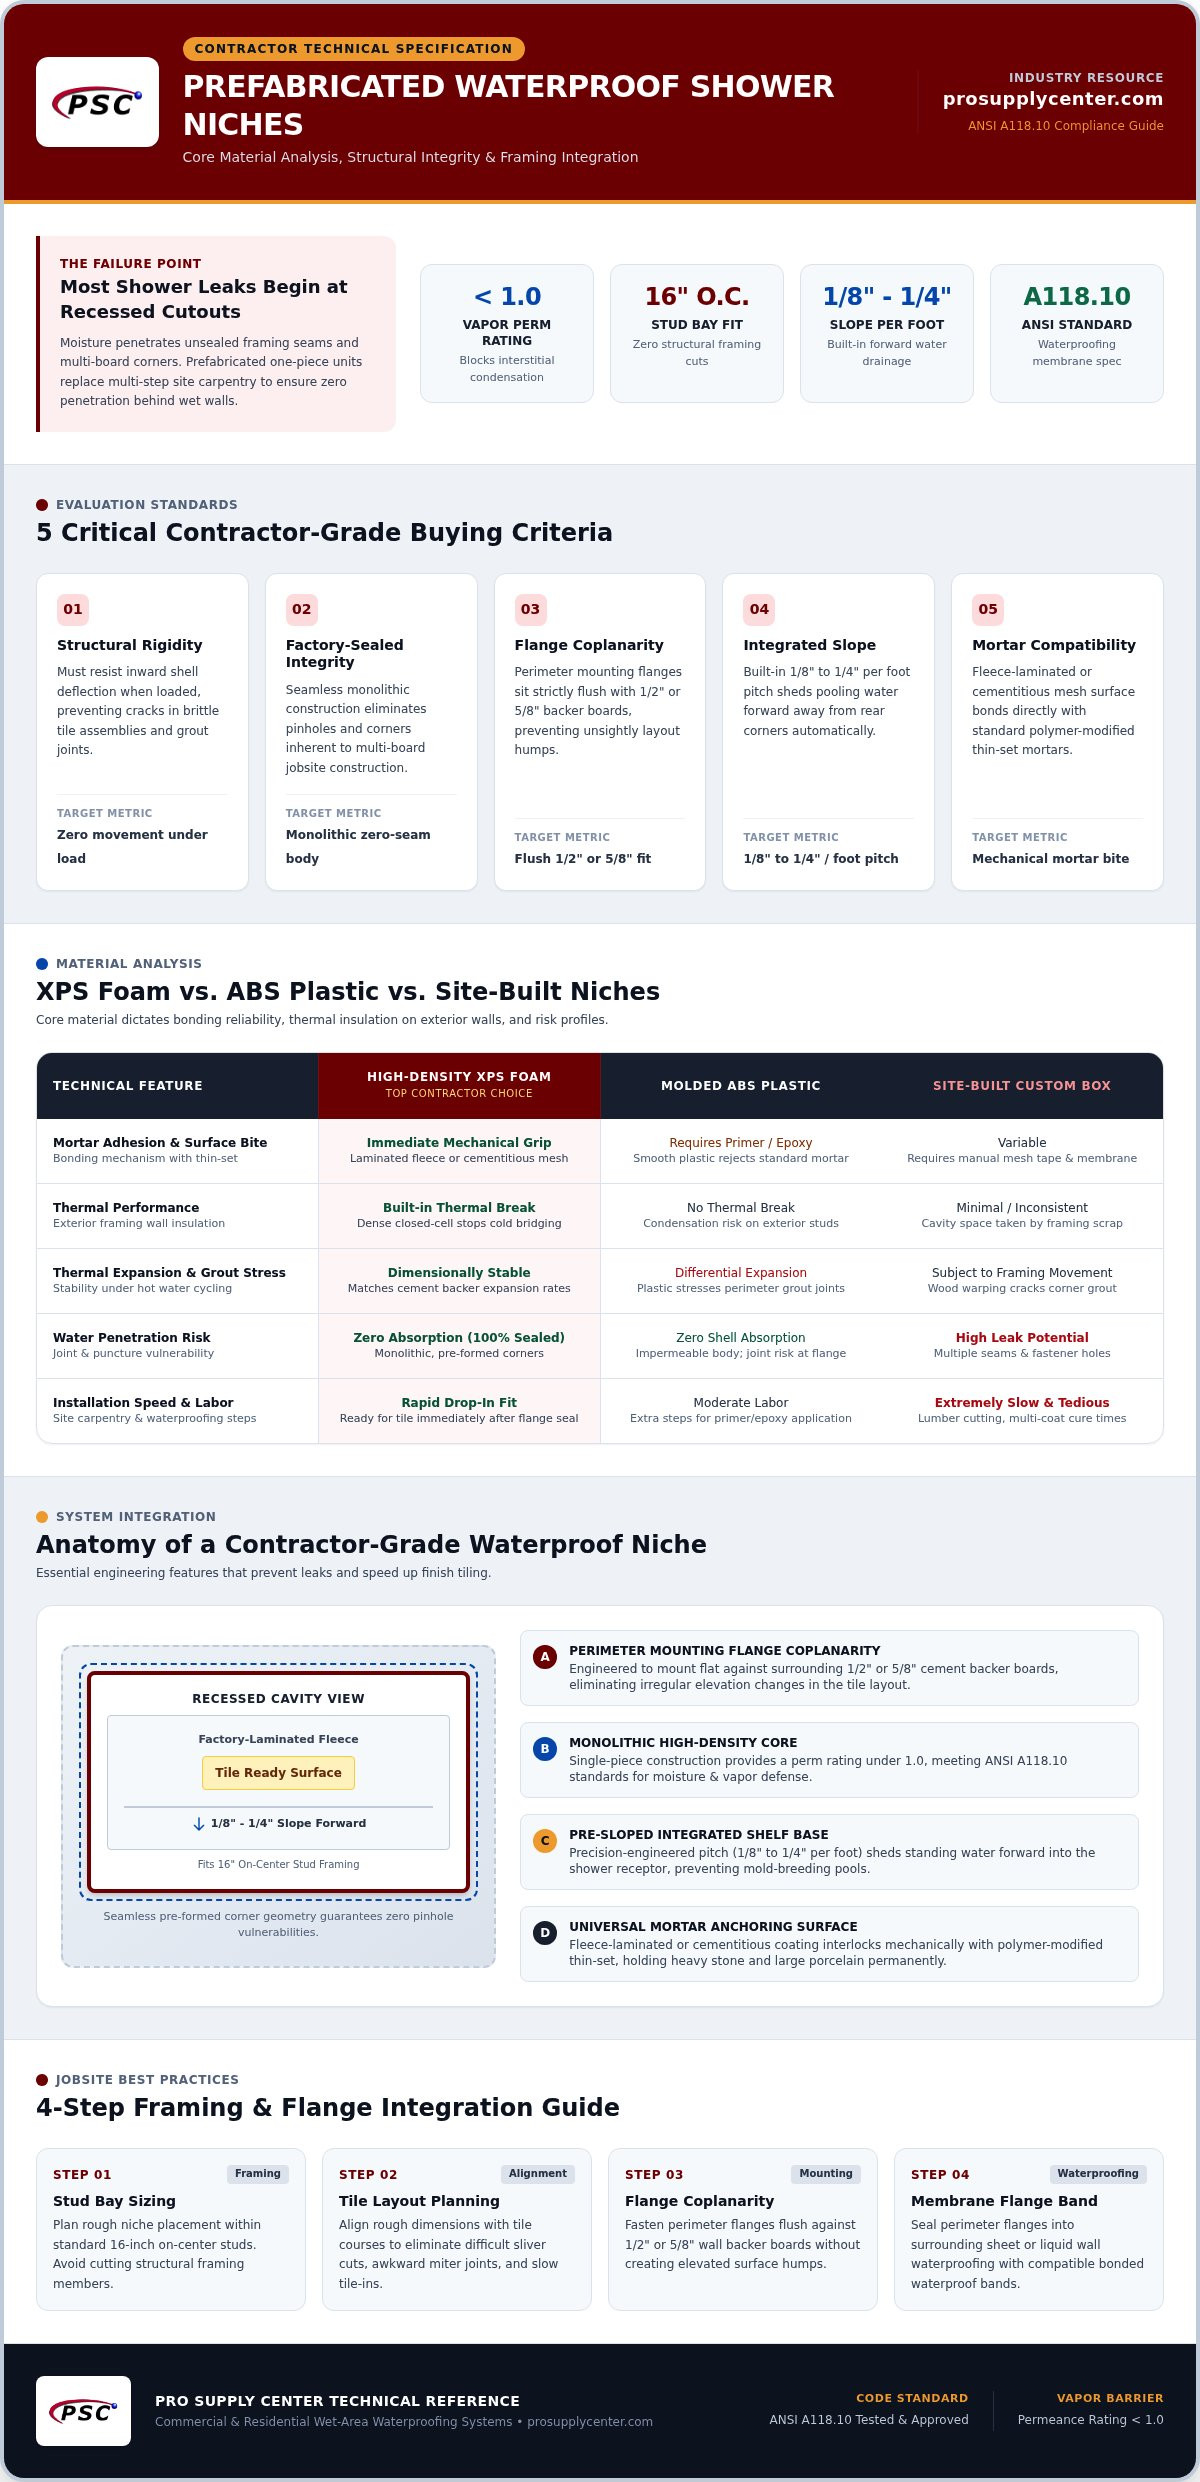
Selecting a contractor-grade waterproof shower niche box requires evaluating how well the unit functions as an integrated component within an overall wet-area assembly. While retail reviews prioritize low costs or exterior dimensions, trade professionals look at structural stiffness, interface geometry, and chemical bonding capabilities. A high-quality niche must withstand wall deflection without cracking surrounding grout joints, while maintaining an impervious barrier against moisture intrusion.
To keep installations durable and code-compliant, prioritize these five core mechanical and structural criteria:
- Structural Rigidity: The shell must resist inward deflection when pressed, protecting brittle tile assemblies from movement-induced cracks.
- Factory-Sealed Integrity: Pre-formed, seamless corners eliminate the pinholes commonly found in site-fabricated, multi-board construction.
- Flange Coplanarity: Perimeter mounting flanges must sit flush with 1/2-inch or 5/8-inch backer boards without creating unsightly humps in the tile layout.
- Integrated Shelf Slope: Built-in drainage pitch (typically 1/8 to 1/4 inch per foot) ensures water sheds forward instead of pooling against back corners.
- Universal Mortar Compatibility: Bonding faces must accept standard polymer-modified thin-sets to keep tiles locked in place under daily soaking.
Waterproofing Integrity and Vapor Permeance
Shower walls require materials that effectively stop both liquid water and vapor migration. In continuous wet and steam applications, understanding baseline waterproofing principles is critical. Look for monolithic molded niche bodies with perm ratings below 1.0, which guarantees defense against hidden interstitial condensation behind tile. One-piece bodies containing zero mechanical seams or structural screw penetrations eliminate the primary failure points typical of multi-piece boxes, ensuring strict compliance with ANSI A118.10 standards.
Surface Bonding and Thin-Set Adhesion
The interior surface of your waterproof shower niche box dictates bond strength. Smooth, untextured plastic shells don't create a reliable mechanical interlock with cementitious setting materials, often demanding specialized epoxy adhesives or surface primers that add labor steps. In contrast, units engineered with fleece-laminated facings or rough cementitious coatings grip standard polymer-modified thin-set mortars instantly. This mechanical bond prevents tiles from delaminating over years of thermal cycling and heavy bottle impacts.
Material Comparison: XPS Foam vs. ABS Plastic vs. Site-Built Niches
Selecting the core material for a waterproof shower niche box determines both installation speed and long-term structural reliability. While all three primary options provide recessed wall storage, their mechanical bonding capabilities, thermal performance, and installation risks vary dramatically on the job site. Choosing the right core prevents tile delamination and moisture migration down the road.
High-Density Extruded Polystyrene (XPS) Boxes
Preformed XPS foam boxes lead modern specifications because they combine high compressive strength with zero water absorption. The dense, closed-cell core acts as a natural thermal break, preventing cold bridging and condensation when installed along exterior framing walls. Most importantly, quality XPS units come factory-laminated with an anchoring fleece or cementitious mesh. This textured facing gives polymer-modified thin-set mortar an immediate mechanical bite, enabling secure bonding for large-format porcelain and heavy natural stone without risk of crushing.
Molded ABS and Polyurethane Niche Units
Molded ABS plastic shells offer exceptional impact toughness and rigid perimeter flanges that resist racking. They drop cleanly between standard wall studs, but bare plastic presents distinct bonding challenges. Traditional cementitious mortars cannot chemically or mechanically adhere to smooth, non-porous polymer walls. Unless the unit features an integrated bonding fleece, installers must apply specialized elastomeric primers or epoxy setting materials. ABS also expands and contracts at a different rate than surrounding cement backer boards, which can stress perimeter grout joints during hot shower cycles.
The High Risk of Traditional Site-Built Niches
Building a custom niche on-site from lumber framing and scrap backer board introduces excessive failure points into the wet wall. Every internal corner requires manual cutting, mechanical fastening, mesh taping, and continuous membrane application. If a single inside seam fails to meet rigid TCNA installation standards, pooling water tracks directly into unprotected wall framing. Fabricating, mudding, and waterproofing a custom box burns hours of costly labor, whereas installing a factory-sealed waterproof shower niche box takes minutes. To streamline installation and eliminate leak risks, many tradespeople upgrade their assemblies with preformed shower niches that arrive ready for direct tile application.
Sizing, Stud Layout, and Placement Planning for Shower Niches
Niche placement requires balancing ergonomics, structural framing boundaries, and finish tile layouts. While a recessed shelf provides practical storage, setting a waterproof shower niche box without pre-planning rough framing often leads to awkward tile slivers or compromised wall framing. Proper placement begins by establishing the primary user's reach range alongside strict adherence to local framing codes and International Plumbing Code requirements for wall integrity.
Vertical placement depends on shower usage:
- Standing Showers: Position the bottom shelf between 42 and 48 inches above the finished shower floor for comfortable, chest-height access.
- Seated or Tub Applications: Place the shelf between 28 and 32 inches from the floor, keeping essentials accessible from a bench or soaking tub.
- Bottle Clearance: Ensure at least 12 to 14 inches of finished vertical opening height to house oversized pump dispensers without tipping.
Standard 16-Inch On-Center Stud Bay Fitment
Most residential interior partition walls use 2x4 framing spaced 16 inches on center. This creates a standard rough cavity roughly 14.5 inches wide. Installing a waterproof shower niche box with an outer shell width of 14 inches allows the unit to slide cleanly into the existing bay without cutting wood framing. Fasten top and bottom horizontal 2x4 blocking between the studs to provide rigid perimeter screw backing. The outer mounting flanges then fasten directly to the stud faces, resting coplanar with adjacent backer boards.
Multi-Shelf and Wide Horizontal Niche Framing
Wider focal-point niches spanning two or three stud bays require structural framing modifications. Cutting an interior wall stud demands structural headers and king studs to carry dead loads, especially on bearing walls. Before committing to a wide niche, inspect the cavity depth; standard 3.5-inch stud depths leave zero room if waste lines, copper supply lines, or plumbing vents run through the bay. When using multi-tiered boxes, verify that each intermediate horizontal divider incorporates a factory-cast forward slope (minimum 1/4 inch per foot) so daily overspray flows freely off shelves instead of collecting stagnant pools against back tiles.
Flange Sealing and System Membrane Integration
Even the highest-grade waterproof shower niche box will leak if the perimeter joint is not sealed correctly. The critical point of failure in any recessed wall assembly sits right at the transition where the niche flange meets the surrounding backer board. Fastening the box squarely to structural framing is step one. To anchor the perimeter mounting flange, drive manufacturer-specified corrosion-resistant screws through the factory markings into the studs and horizontal blocking. Never overdrive fasteners, as dimpling or cracking the flange compromises the flat plane needed for subsequent sealing bands.
Once fastened, sealing this perimeter seam requires strict adherence to industry overlap standards:
- Minimum Overlap: Maintain at least a two-inch continuous waterproofing membrane overlap past every outer edge of the niche flange onto the wallboard.
- Flat Plane Execution: Keep the transition flush so tile layout lines do not kick outward or telegraph unlevel lips through the finish tile.
- Mechanical Fastener Sealing: Cover every screw head penetrating the perimeter flange with an approved waterproofing patch or membrane strip.
Integrating with Sheet Waterproofing Membranes
Sheet waterproofing bands offer superior protection compared to liquid coatings because they deliver consistent, factory-controlled mil thickness across the entire seam. When tying a niche into bonded sheet assemblies like the PSC Pro Gen II Waterproofing System, spread an appropriate polymer-modified thin-set mortar over the flange joint using a 1/8-inch or 3/16-inch V-notch trowel. Embed the waterproof sealing band into the wet mortar, then firmly press it flat from the center outward with a drywall taping knife. This forces out trapped air pockets and excess mortar, creating an impervious, monolithic bond that links the box seamlessly with the surrounding wall membrane.
Liquid-Applied Sealant and Membrane Transitions
If integrating with liquid-applied systems, use an approved hybrid polymer or elastomeric waterproof sealant to bridge the niche perimeter before rolling on topical coatings. Embed alkali-resistant mesh tape directly into the wet base coat or sealant bed to bridge dynamic movement at the framing joint. Standard 100% silicone caulk should never be used as a primary flange seal beneath tile. Silicone acts as a bond-breaker that prevents thin-set mortar from adhering, causing edge tiles to debond under normal use. Always allow flexible flashing compounds to cure fully according to technical datasheets before combing thin-set. To ensure you have all matching components for a watertight build, check out professional supplies at Pro Supply Center.
Selecting the Best Shower Niche Box for Your Tiling Project
Balancing material costs against job site labor savings is the central calculation when selecting a waterproof shower niche box. While building a niche out of loose backer board might seem cost-effective on paper, the cumulative hours required for framing, cutting, taping, and waiting on liquid membranes to dry quickly erode profit margins. Ready-to-tile, factory-sealed boxes streamline that process down to roughly twenty minutes of rough-in work, allowing you to move straight into thin-set application with zero risk of structural seepage.
To maximize efficiency on the job site, keep these practical rules in mind:
- Pre-Sloped Thresholds: Choose units with pre-pitched bottom returns to eliminate the tedious step of manually tapering mortar beds under your sill tiles.
- Assembly Compatibility: Verify that the niche shell and perimeter flanges are engineered to bond directly with your primary shower pan and wall waterproofing membrane.
- Modular Hardware Pairing: Select components that fit into standard framing packages alongside heavy-duty tile leveling clips and premium drains to ensure a clean, lippage-free finish.
Matching Niche Geometry to Tile Selection
Successful niche installations begin with your finish tile layout. Planning the rough opening around tile dimensions minimizes narrow edge cuts and complicated wet saw passes. For mosaic feature walls, align the interior niche dimensions so sheet patterns remain centered and symmetrical without partial chips along the returns. Edge details make or break the aesthetic; plan for metal profiles, solid stone sills, or matching bullnose pieces early to cap the corner joints cleanly. For broader wet room planning and comprehensive layout coordination, refer to our contractor guide on waterproofing shower kits.
Sourcing Professional Shower Components
A durable, watertight enclosure relies on every sub-surface element working in unison. Your waterproof shower niche box must tie into high-performance base components, including matching point drains or modern linear systems, without creating disjointed waterproofing transitions. Review our breakdown of professional shower installation components to see how quality rough-ins work together beneath the tile. Sourcing contractor-grade prefabricated shower niches and fully bonded waterproofing systems directly from Pro Supply Center ensures your rough-in materials bond securely, eliminate moisture callbacks, and stand up to daily use.
Upgrade Your Next Shower Build with Reliable Niche Systems
Eliminating moisture failures behind finished tile comes down to proper material selection and airtight transition details. Replacing risky, multi-piece site carpentry with a factory-sealed waterproof shower niche box saves valuable installation hours while removing human error from the waterproofing equation. Whether you choose fleece-faced XPS foam for direct mortar bite or rigid molded shells, maintaining a continuous bonded seal across perimeter flanges remains the true secret to long-term performance.
A dependable wet wall assembly demands rough-in components engineered to perform together from the studs out. When you pair pre-sloped niches with the PSC Pro Gen II Waterproofing System, matching drains, and precision tile leveling tools, you protect framing cavities against hidden rot and eliminate callbacks. Explore professional shower niches and waterproofing systems at Pro Supply Center to equip your next job with contractor-tested components that deliver lasting durability on every installation.
Frequently Asked Questions
Is a prefabricated waterproof shower niche box better than building one from scratch?
Yes, prefabricated units provide superior reliability and save hours of job site labor. A preformed waterproof shower niche box eliminates multiple internal corner seams, reducing the risk of water leaks behind finished tile. Site-built niches require cutting lumber, fastening multiple backer board pieces, and manually waterproofing every joint. One missed pinhole can ruin wall framing. Preformed boxes arrive 100% watertight, ready for thin-set mortar, ensuring a consistent, code-compliant install every time.
Can I install a waterproof shower niche box between standard wall studs without cutting framing?
Yes, standard 14-inch wide niche boxes are engineered specifically to fit between 16-inch on-center studs. Standard residential framing leaves an interior clear width of roughly 14.5 inches. You simply slide the unit into the bay and screw horizontal 2x4 blocking above and below the box for perimeter support. You avoid cutting structural studs or installing heavy headers, which saves framing time and prevents structural issues on load-bearing partition walls.
What kind of thin-set mortar should be used to tile over a prefabricated niche box?
Polymer-modified thin-set mortar meeting ANSI A118.4 or ANSI A118.15 standards is the industry benchmark for fleece-faced niches. This mortar provides the chemical flexibility and mechanical grab required to hold porcelain, ceramic, or natural stone securely against fleece or cement-coated surfaces. Avoid standard unmodified dry-set mortars or premixed mastic, which can soften under regular shower moisture or fail to cure properly over non-porous membranes. Always match your mortar choice to your tile material.
Do waterproof shower niche boxes have a built-in drainage slope on the bottom shelf?
Most contractor-grade prefabricated niche boxes feature an integrated slope of roughly 1/8 to 1/4 inch per foot. This built-in pitch directs standing water and soap runoff forward toward the shower drain rather than letting it puddle in back corners. While quality foam units include pre-pitched horizontal returns, always verify the slope with a small torpedo level during dry fit. If using a flat plastic shell, you must build that pitch into your bottom mortar bed.
How do you seal the gap between the shower niche flange and surrounding backer board?
Seal the transition using a bonded waterproof sealing band embedded in polymer-modified thin-set mortar. Apply mortar over the flange and adjacent backer board, then press the waterproof membrane strip firmly into the bed with a flat trowel. Maintain at least a two-inch overlap onto both surfaces to ensure full coverage. Squeeze out all trapped air pockets. This technique creates a continuous, watertight barrier that ties the niche directly into your primary shower wall waterproofing system.
Can a waterproof shower niche box be installed on an exterior bathroom wall?
Yes, but you must account for wall cavity insulation and thermal bridging before installing. Exterior 2x4 framing leaves little room for standard batt insulation once a 3.5-inch deep niche box occupies the cavity. In cold climates, missing insulation can cause condensation or frozen plumbing behind the niche. High-density XPS foam niches help by providing natural insulating value, but installing rigid foam board behind the niche shell or choosing an interior partition wall remains the safer building practice.
What happens if you use standard silicone instead of waterproofing membrane over the niche flange?
Using standard silicone over the mounting flange creates an unreliable bond and often leads to loose perimeter tiles. Silicone acts as a bond-breaker for cementitious thin-set mortars, meaning setting bed adhesives cannot stick to it properly. Over time, water vapor or minor framing shifts can break the silicone seal, allowing moisture to slip into wall cavities. Always bridge perimeter flange seams with dedicated waterproofing bands and compatible thin-set mortar, reserving 100% silicone solely for movement joints at finish tile corners.
How do I choose between a single, double, or adjustable shelf shower niche box?
Base your choice on household storage needs, bottle heights, and available vertical stud space. Single-tier boxes work well for minimal setups or compact guest baths. Double-tier boxes provide dedicated room for taller pump bottles on the bottom and smaller soap bars above. If you use custom bottle sizes, look for niches with adjustable shelf inserts. Just ensure internal shelf dividers maintain a forward drainage pitch so standing water never settles against grout lines.


