

In 2026, a single millimeter of lippage isn't just a minor technical flaw; it's a liability that can compromise the integrity of an entire large-format installation. You've likely dealt with the frustration of premium porcelain being undermined by uneven edges or a floor tile leveling kit with clips that snap prematurely, leaving debris stuck in your grout lines. It's a drain on your time and your profit margins. Achieving a perfectly flat, professional-grade finish requires more than just a steady hand. It demands a Ceramic Tile Leveling System designed to handle the mechanical stresses of modern, nature-inspired surfaces and 3D textures.
On a high-pressure job site, you need tools that work as hard as you do. This guide will help you master the technical nuances of selecting the right hardware to ensure every project meets the 2026 ANSI A137.1 standards, where allowable lippage is restricted to just 1/32 of an inch. We'll examine the functional differences between wedges and caps, explore how to optimize your installation speed, and review the most durable systems available today. Whether you're working with rectified tiles or vertical bathroom layouts, you'll gain the practical knowledge needed to deliver a lippage-free result that eliminates costly call-backs.
Key Takeaways
- Understand why modern large-format tiles require a mechanical system to stay co-planar and prevent lippage while the mortar cures.
- Identify the specific components of a high-quality floor tile leveling kit and how high-tensile plastic prevents clips from breaking too early.
- Compare wedge and cap systems to choose the right hardware for your project's speed and surface requirements.
- Learn to select the correct Ceramic Tile Leveling System based on tile thickness and the specific grout joint width of your layout.
- See how proper substrate preparation and thin-set coverage work together with your leveling tools to ensure a flat, durable floor.
The Evolution of Tile Installation: Why Leveling Kits are Essential in 2026
A floor tile leveling kit is a specialized mechanical system designed to ensure adjacent tiles remain perfectly co-planar during the critical mortar curing phase. Historically, tile setters relied on manual adjustments and visual checks to manage floor flatness. However, the 2026 TCNA Handbook and updated ANSI specifications have introduced stricter tolerances that make manual leveling nearly impossible on modern job sites. Using a Ceramic Tile Leveling System has shifted from a luxury to a technical requirement for anyone aiming for a professional-grade finish.
The industry's move toward large-format tiles and thin-set mortars has significantly increased the risk of uneven surfaces. Substrate irregularities that were once hidden by smaller tiles are now magnified by larger slabs. Even a perfectly flat subfloor can't account for "tile memory," where porcelain slightly returns to a bowed shape during production. Without mechanical intervention, these factors lead to failed inspections and expensive rework.
The Problem with Traditional Spacers
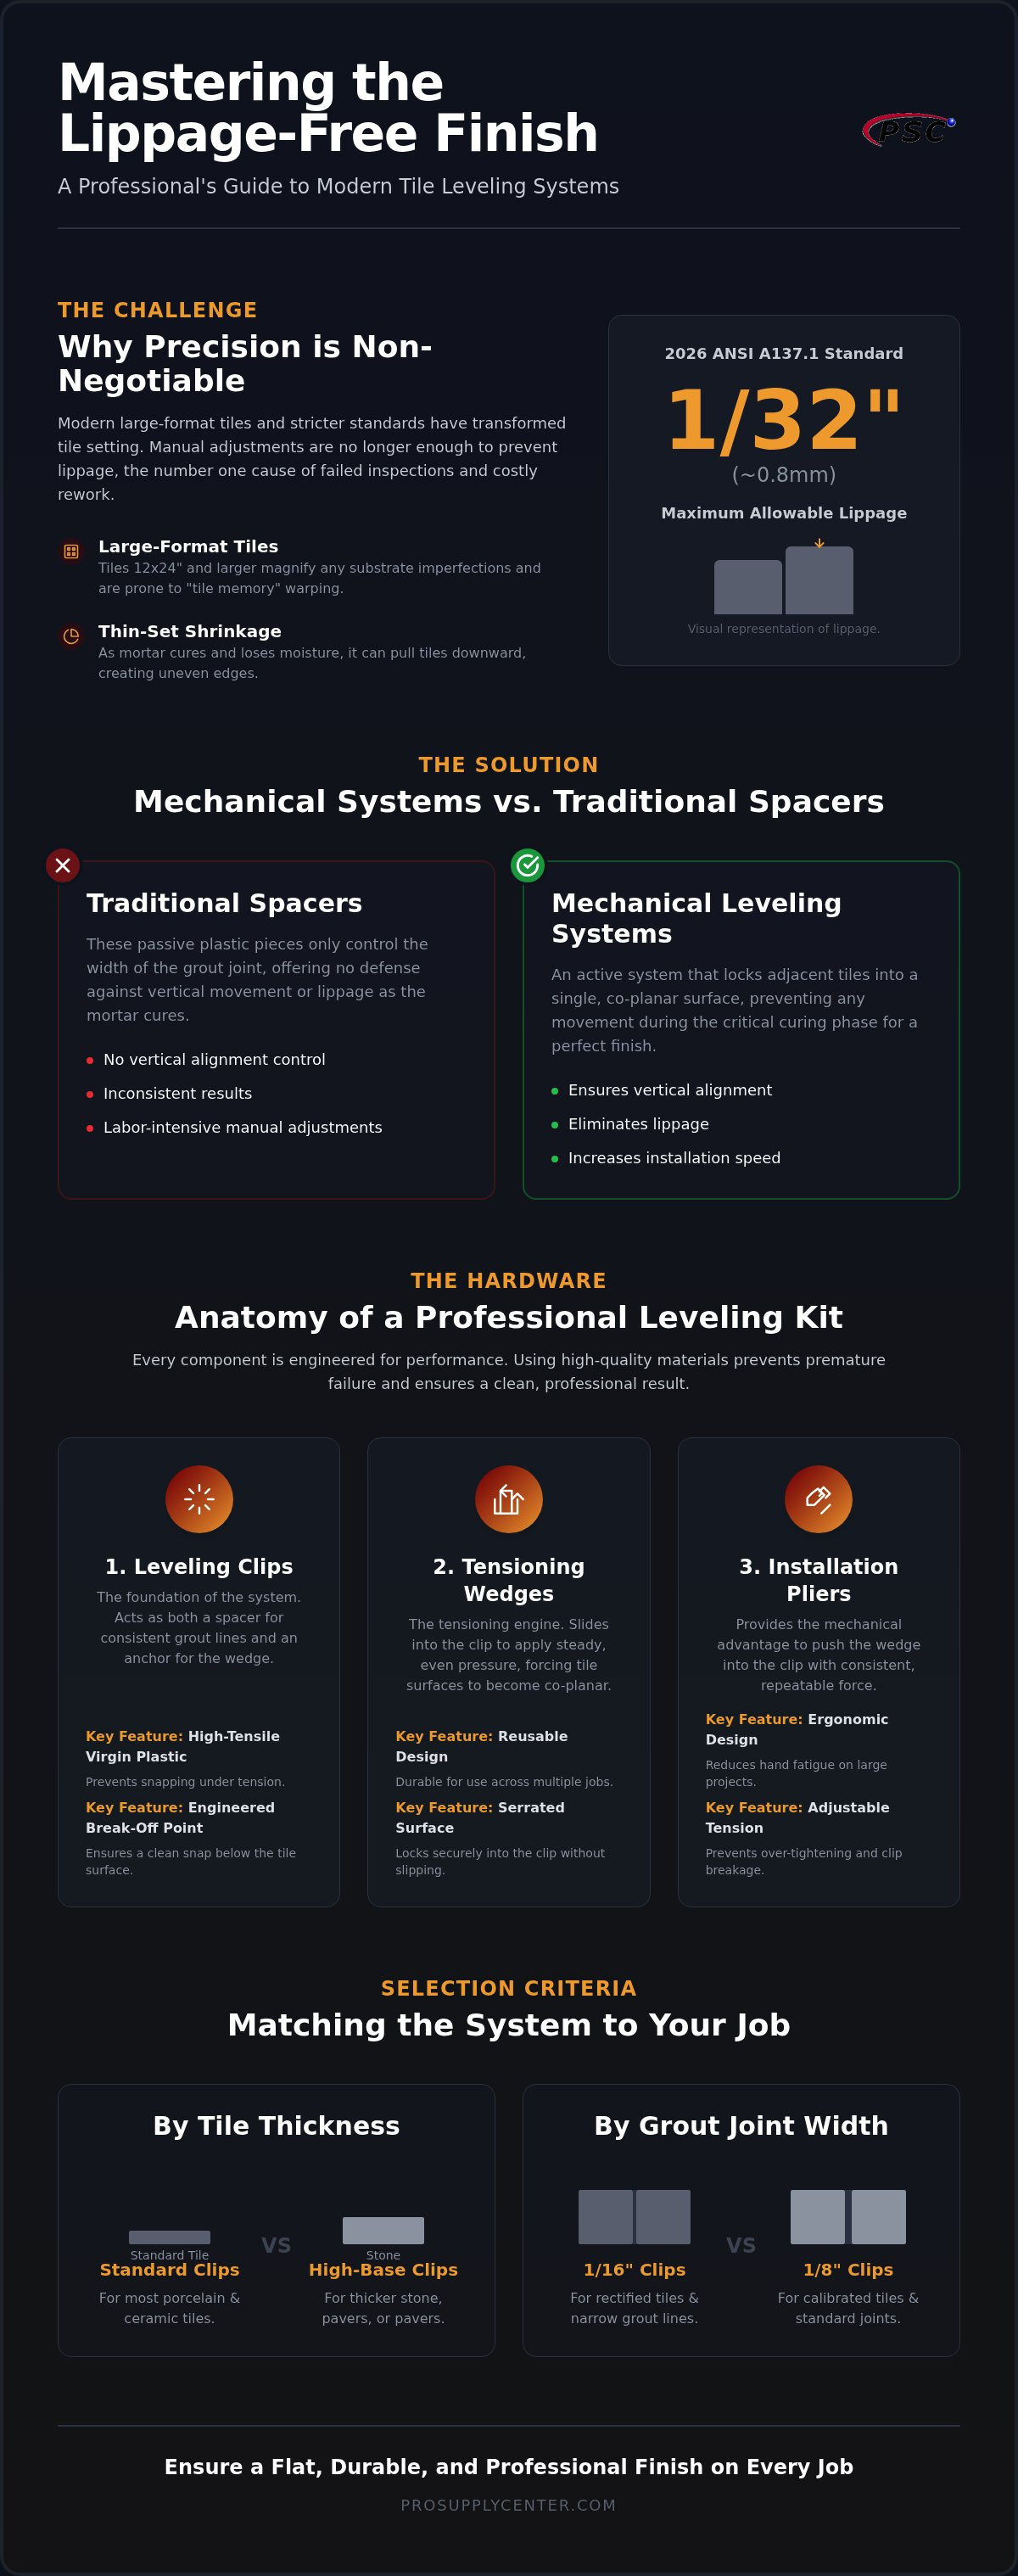
Traditional spacers are passive tools. They manage the width of the grout joint but offer zero control over vertical alignment. As thin-set cures, it naturally loses moisture and shrinks, which can pull individual tiles downward and create sharp, uneven edges. The labor cost of manually "beating in" tiles to match heights is high and the results are often inconsistent. A mechanical floor tile leveling kit eliminates this variability by locking tiles into a single plane, preventing movement until the bond is permanent.
Modern Tile Trends and Mechanical Demands
Current design trends favor 12x24 inch and larger tiles, often with rectified edges that demand narrow grout lines. These materials are prone to center-point bowing, a manufacturing reality that requires physical force to correct during installation. Lippage is the vertical displacement between the edges of adjacent tiles. To meet ANSI A137.1 standards, which limit lippage to just 1/32 of an inch for certain installations, installers must use essential tiling tools alongside mechanical tensioners. This combination ensures that the force applied by the leveling clips overcomes the natural warp of the tile, resulting in a finish that is flush, safe, and professional.
Anatomy of a Professional Floor Tile Leveling Kit
A professional floor tile leveling kit isn't just a collection of plastic parts; it's a mechanical assembly where every component must meet specific engineering tolerances. On a commercial job site, the failure of a single clip can disrupt the alignment of four adjacent tiles. Understanding the anatomy of these tools helps you select a system that withstands high-tension demands without failing prematurely. Consistency is the goal here.
The system consists of three primary elements: leveling clips, tensioning wedges, and installation pliers. The clips serve as both a spacer and an anchor. Wedges act as the tensioning engine, while the pliers provide the mechanical advantage necessary to lock the tiles into a co-planar state. Ergonomic pliers are essential for commercial projects; they allow for consistent pressure across thousands of clips without causing hand fatigue. For a reliable result, you should source a Ceramic Tile Leveling System that uses high-tensile virgin plastic. Unlike recycled materials, virgin plastic offers predictable flexibility and strength, which prevents the clips from snapping while you're applying pressure with the pliers.
A critical design feature of professional clips is the engineered break-off point. This weakened area at the base ensures that once the mortar has cured, a sharp lateral strike snaps the clip cleanly below the grout line. If a clip breaks poorly, it leaves plastic debris that interferes with grout coverage. This can lead to moisture penetration and bond failure later in the floor's life. Precision in the manufacturing of the "break-off" point is what separates professional-grade kits from budget alternatives.
Leveling Clips: The Foundation of the Joint
Clips are categorized by their base height and stem thickness. Standard clips work for most porcelain and ceramic, but "high-base" clips are necessary for thicker natural stone or pavers. The gauge of the clip determines your minimum grout joint. For example, a 1/16" clip is the industry standard for rectified tiles, while a 1/8" clip is often preferred for calibrated materials. Choosing the right gauge ensures you meet the minimum joint requirements set by the 2026 ANSI standards without needing additional spacers.
Tensioning Wedges and Reusable Components
The wedge is the workhorse of the floor tile leveling kit. It features a serrated top surface that locks into the clip's window, distributing downward pressure across the edges of both adjacent tiles. This action forces the tiles into alignment and holds them there as the thin-set shrinks during hydration. Because wedges don't break during the removal process, they are reusable across multiple projects. This makes them a high-value investment for contractors. You can learn more about maximizing your tool budget in our reusable tile leveling system guide.
Comparing Tile Leveling Systems: Wedges, Caps, and Straps
Choosing a floor tile leveling kit depends on the mechanical requirements of the surface and the installer's preferred workflow. While several systems exist, they generally fall into three mechanical categories: wedges, caps, and straps. The mechanic of the system determines its utility on the job site. For instance, a system that works perfectly for a 24x48 floor slab might be cumbersome for a vertical shower wall. A professional Ceramic Tile Leveling System is usually selected based on which method provides the most consistent axial force for the specific material being installed.
The wedge system remains the industry standard for floor applications because it provides the highest amount of compressive force. It's the most efficient choice for heavy, large-format tiles that require significant tension to remain flat. Cap or threaded systems use rotational force rather than a lateral slide. This is often safer for vertical surfaces where gravity works against the installer. Strap systems are specialized alternatives, frequently used for specific tile thicknesses where standard clips might not provide enough reach. Each system has a distinct role in achieving the 1/32-inch lippage tolerance required for modern professional installs.
Wedge-Based Systems for Floor Efficiency
Wedge systems are the preferred choice for large-format floor installations because they prioritize speed and high-tension capacity. The use of adjustable pliers allows an installer to apply a consistent amount of pressure across every joint, which is vital when managing thousands of clips on a commercial project. However, you must be careful to avoid over-tensioning. Applying too much force can lead to clip failure or cause the tile to shift slightly, undermining the bond. Properly calibrated pliers ensure the wedge is seated deeply enough to level the tile without exceeding the high-tensile limits of the plastic clips.
Cap and Screw Systems: Precision Over Speed
Cap and screw systems offer a mechanical advantage through rotational torque. Instead of using pliers to slide a wedge, the installer twists a cap down a threaded stem. This method allows for extreme precision and fine-tuning of the alignment, making it ideal for delicate surfaces or high-gloss tiles where metal pliers might slip and cause scratches. These systems are frequently favored for vertical wall applications because the caps stay in place more reliably during the curing process. While hand-tightening is common for smaller areas, tool-assisted tightening is recommended for larger projects to maintain consistency and reduce hand strain.
When selecting your system, use this simple framework:
- High-Volume Floors: Choose a wedge-based floor tile leveling kit for maximum speed and tension.
- Vertical Walls: Opt for cap and screw systems for better control and stability.
- Delicate/Polished Materials: Use caps to minimize the risk of surface damage from installation tools.
Selection Criteria: Matching Kits to Large Format and Thin Tiles
Selecting a floor tile leveling kit is a technical decision that depends on the physical characteristics of your material. A common mistake in the field is using standard clips for heavy-duty stone or thin gauged porcelain without verifying the manufacturer’s specifications. Professional-grade results require a Ceramic Tile Leveling System that matches the mechanical demands of the project. If the hardware isn't rated for the tile's weight and dimensions, the system will fail to hold the tiles co-planar during the cure.
There are four primary requirements to evaluate before purchasing your kit:
- Requirement 1: Tile Thickness. Standard clips are engineered for materials between 1/8" and 1/2" thick. For Gauged Porcelain Tile Panels (GPTP) or thick exterior pavers, you must use high-base or specialized thin-tile clips to prevent the plastic from snapping prematurely.
- Requirement 2: Joint Width. The gauge of the clip determines your minimum grout line. Selecting a 1/16" clip for rectified porcelain ensures you meet modern aesthetic demands while maintaining the structural integrity of the joint.
- Requirement 3: Project Area. Estimating needs involves calculating the total number of joints rather than just square footage. Larger tiles require fewer clips per square foot but demand more frequent placement along each edge to manage bowing.
- Requirement 4: Tool Compatibility. Pliers are rarely universal. Using pliers from one manufacturer with wedges from another often leads to improper tensioning or damage to the wedge's serrated surface.
Optimizing for Large Format Tile (LFT)
Large Format Tile (LFT) creates unique challenges because of its mass and inherent tendency to bow during manufacturing. To maintain a flat plane, LFT often requires clips every 8-12 inches along each edge. This high-frequency placement is necessary to overcome the physical memory of the porcelain and keep the centers of the tiles aligned. For more advanced strategies on managing these massive slabs, refer to our large format tile leveling professional guide. Skipping these extra anchor points often results in center-point lippage that no amount of mortar can fix.
Calculating Your Kit Requirements
Precision in ordering prevents job site delays. The standard formula for estimating clips involves dividing the total area by a tile size factor and adding a waste percentage. For a typical 12x24 installation, you'll use approximately 100 clips for every 25-30 square feet. Contractors should always maintain a 25% surplus of clips on-site. This buffer accounts for accidental breakage during high-tension applications and allows for layout changes without halting production. For large-scale commercial projects, buying individual components is less efficient than investing in bulk "Contractor Packs." You can secure high-volume supplies by browsing our professional Ceramic Tile Leveling System inventory.
Professional Efficiency: Integrating Leveling Systems into Your Workflow
A floor tile leveling kit is the final mechanical step in a chain of professional decisions; it isn't a magic wand for poor substrate preparation. For the system to perform as intended, the floor must already be within industry flatness tolerances, typically 1/8 inch over 10 feet for large-format materials. When you engage a Ceramic Tile Leveling System on a floor that is structurally unsound or significantly out of level, you're essentially fighting the physics of the mortar bond. The kit is designed to fine-tune the plane, not to correct structural deficiencies.
Proper thin-set coverage is equally vital. Use a directional troweling technique to create ridges that collapse easily when the tile is pressed into place. This allows the leveling system to move the tile vertically without creating hollow spots or air pockets. Before the mortar sets, always clear excess thin-set from the joints where the clips are seated. This simple step ensures the clips can be removed cleanly, preventing plastic fragments from obstructing your grout lines later.
Substrate Prep and Waterproofing
In wet area installations, the synergy between your leveling tools and your moisture management system determines the longevity of the build. A perfectly flat floor is a prerequisite for proper drainage toward the drain assembly. Integrating your leveling workflow with the PSC Pro Gen II Waterproofing System ensures that the structural integrity of the shower remains intact while you achieve a high-end aesthetic. This level of precision is especially important when installing integrated shower niches, where the transition between the wall tile and the recessed storage must be flush to maintain a waterproof seal and a professional finish.
The Removal Process: Avoiding Grout Line Debris
The removal of the clips is a high-speed process that requires the right technique to avoid rework. You must wait for the mortar to fully cure, which usually takes 12 to 24 hours depending on the site temperature and humidity. To remove the clips, use a rubber mallet or the "kick-off" technique with work boots. The strike must be sharp and parallel to the grout joint. Striking at an angle or perpendicular to the joint often causes the clip to snap above the break-off point, leaving plastic visible in the joint. If this happens, you'll need to carefully use a utility knife or a specialized abrasive tool to remove the debris without chipping the tile edges. A clean removal on the first pass is a hallmark of a professional installer who understands the mechanical limits of their floor tile leveling kit.
Mastering the Technical Standard for 2026 Installations
The transition toward large-format tiles and stricter ANSI standards has made a mechanical floor tile leveling kit a mandatory component of any professional inventory. Success on a modern job site requires more than just high-quality mortar; it demands a system-based approach where high-tensile clips are matched to your specific tile thickness. By maintaining a meticulous workflow from substrate preparation to the final removal process, you ensure a finish that is both aesthetically superior and structurally sound.
Integrating a Ceramic Tile Leveling System into your daily routine helps you meet the 1/32-inch lippage limit while significantly reducing the risk of costly call-backs. We invite you to Shop Professional Ceramic Tile Leveling Systems at Pro Supply Center to explore our expert-vetted selection. Our inventory is built for contractor-grade durability and includes reliable national shipping on all essential tiling accessories. With the right equipment and a focus on technical precision, delivering a perfectly flat, professional-grade floor is achievable on every project you undertake.
Frequently Asked Questions
How many tile leveling clips do I need per square foot?
You will generally need between 4 and 10 clips per square foot, depending on the dimensions of your tile. For a standard 12x24 inch installation, most contractors calculate for approximately 100 clips per 25 to 30 square feet. Larger tiles require fewer clips per square foot but demand higher frequency along the edges to manage bowing. Always include a 25% surplus in your order to account for breakage during high-tension applications.
Can I reuse the wedges from my floor tile leveling kit?
Yes, the wedges in a floor tile leveling kit are designed to be reused across multiple projects. Unlike the clips, which are engineered to snap off below the grout line after the mortar cures, the wedges remain intact after removal. This makes high-quality wedges a one-time investment for professionals. Simply collect them after the removal process, clean off any dried thin-set, and store them for your next installation to reduce your recurring material costs.
Do tile leveling systems work on wall tiles as well as floor tiles?
Tile leveling systems are highly effective for both floor and wall applications. While wedge systems are the industry standard for floors due to their high tension, cap and screw systems are often preferred for vertical walls. These systems provide better control against gravity and reduce the risk of tiles sliding before the mortar sets. Using a Ceramic Tile Leveling System on walls ensures that large-format wall tiles remain flush and co-planar throughout the curing phase.
What is the best way to remove leveling clips without damaging the tile?
The most effective removal method is to strike the clips sharply with a rubber mallet or a work boot parallel to the grout joint. You must wait at least 12 to 24 hours for the mortar to reach a full cure before attempting removal. Never strike the clips from the front or at an angle; this can cause the plastic to snap above the break-off point. A clean, lateral strike ensures the clip breaks deep within the joint.
Is a tile leveling kit necessary for small tiles like subway tile?
A leveling kit is generally not necessary for small-format materials like standard 3x6 inch subway tiles. These tiles are lightweight and have minimal surface area, making them less prone to lippage or center-bowing. However, if you are using modern large subway tiles or long planks, a floor tile leveling kit becomes essential. For small tiles, traditional spacers are sufficient to manage joint width while you manually adjust the tile height during the installation process.
Can I use a leveling system with natural stone or just porcelain and ceramic?
You can use a Ceramic Tile Leveling System with natural stone, provided you select clips designed for the material's thickness. Natural stone like marble or travertine is often thicker than standard porcelain, requiring high-base clips to accommodate the extra depth. Ensure the clip's tensile strength is rated for the weight of the stone. Using standard clips on heavy stone can result in premature snapping before the tiles are properly aligned across the substrate.
Why do my leveling clips keep snapping before I finish tensioning?
Clips typically snap prematurely due to over-tensioning with pliers or the use of low-quality recycled plastic. Professional-grade clips use virgin plastic to provide predictable flexibility under load. If your clips continue to fail, check that your installation pliers are properly calibrated for the specific wedge design. Additionally, ensuring that the mortar joints are clear of excess thin-set before inserting the clips prevents mechanical interference that can lead to early breakage during the tensioning phase.
Do I still need to use traditional spacers if I have a leveling kit?
You generally do not need traditional spacers because the leveling clip itself determines the grout joint width. Clips are manufactured in specific gauges, such as 1/16 or 1/8 inch, to serve as both a vertical leveler and a horizontal spacer. However, some installers still use traditional cross-spacers at the intersections of four tiles to ensure perfect alignment of the corners. For most running bond or brick-joint patterns, the leveling clips provide sufficient spacing on their own.


