

For large format tile, a professional leveling system isn't an optional accessory. It's a structural necessity required to combat the inherent warpage found in massive porcelain panels. You've likely felt the frustration of laying a 24x48 slab only to find a sharp edge catching the light or a clip snapping prematurely. Lippage isn't just an eyesore that ruins expensive materials; it's a technical failure that leads to costly call-backs. Integrating a reliable tile leveling system for large format tile into your workflow is the only way to guarantee a flat surface that meets professional standards.
We know that your reputation relies on the precision of your finish. This guide provides a professional framework for selecting and installing the right system to achieve a flawless, lippage-free result on 24x48 and gauged porcelain tiles. We'll cover everything from managing panel warpage to preventing plastic remnants in your grout lines. You'll learn how to increase your installation speed while ensuring the structural integrity of your project stays intact. By following these industry standards, you can deliver a high-end finish that stands up to close inspection.
Key Takeaways
- Understand why inherent warpage in panels over 15 inches makes mechanical leveling a structural requirement rather than an option.
- Select the most efficient tile leveling system for large format tile by comparing the mechanical tension and reusability of wedge versus cap-and-screw designs.
- Master critical installation steps, including maintaining substrate flatness within 1/8 inch over 10 feet and using proper back-buttering techniques.
- Identify professional solutions for common job site issues such as premature clip breakage and over-tensioned grout lines.
- Learn how a lippage-free finish begins with a high-performance foundation like the PSC Pro Gen II Waterproofing System.
Understanding the Challenges of Large Format Tile (LFT)
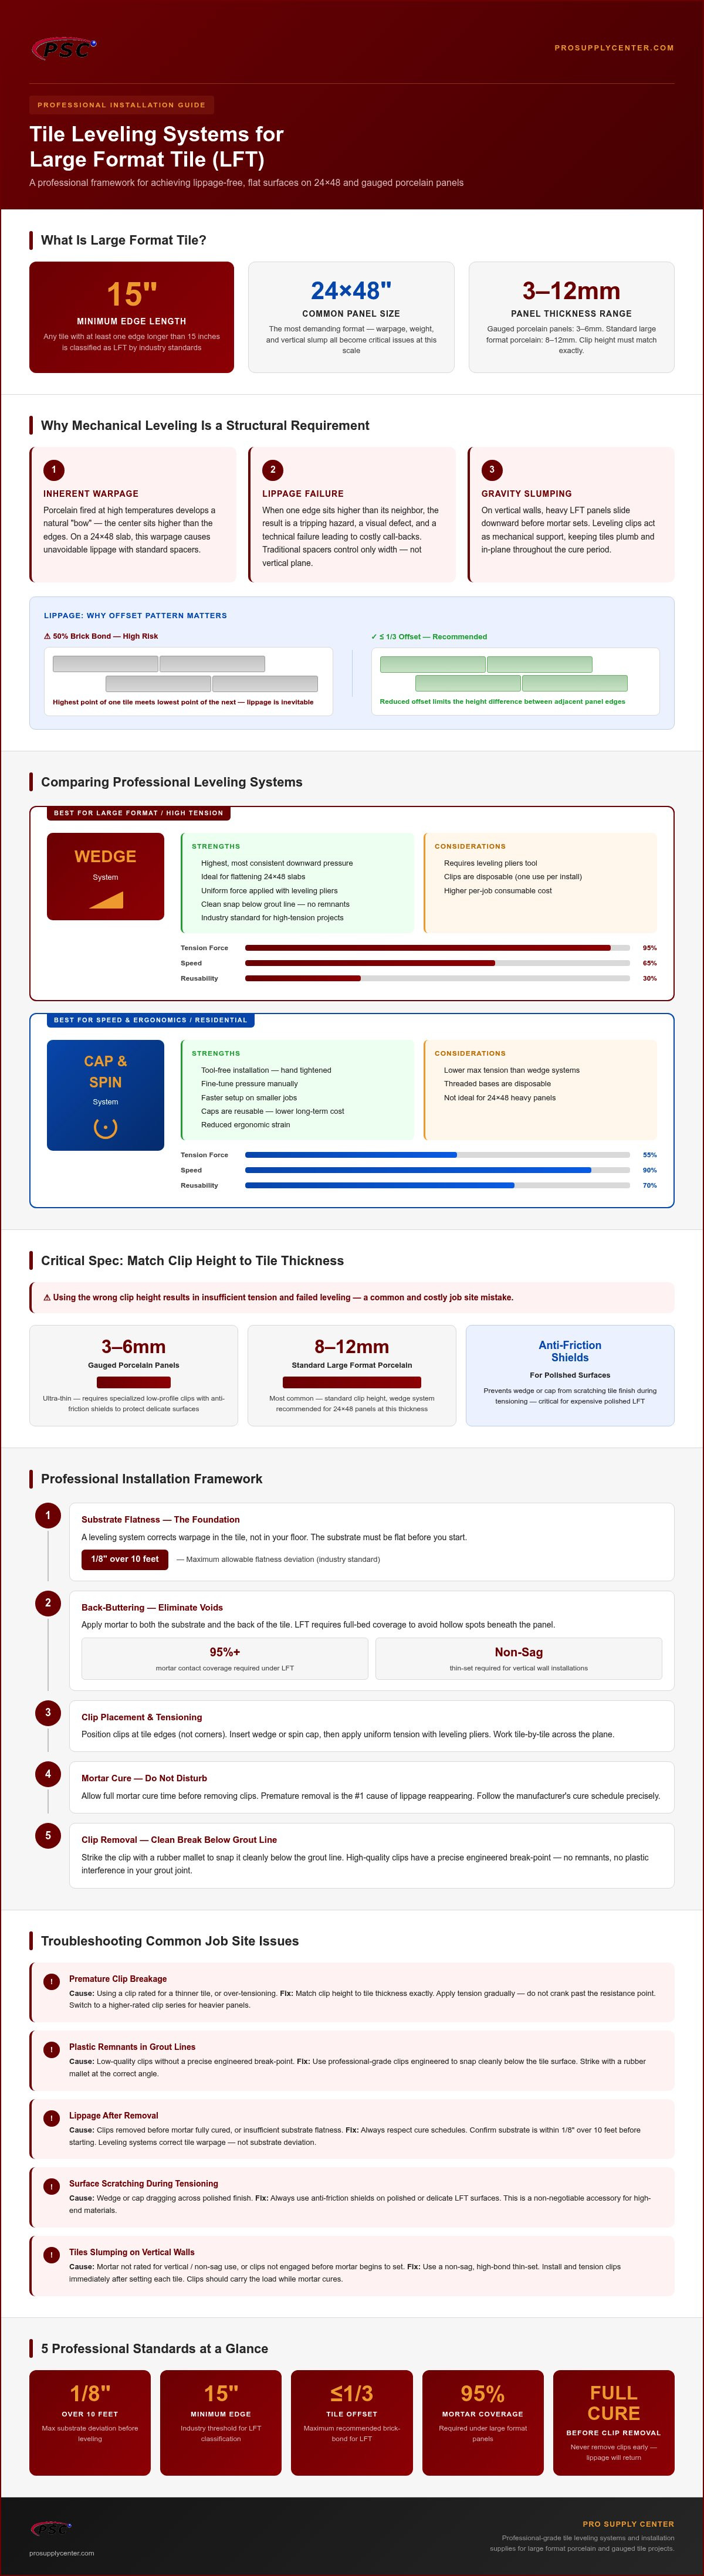
Industry standards define Large Format Tile (LFT) as any ceramic or porcelain unit with at least one edge longer than 15 inches. While these expansive slabs create a sleek, minimal look, they introduce physical variables that smaller tiles simply don't. The most significant hurdle is inherent warpage. Even the highest quality porcelain is rarely perfectly flat. Because of this, using a tile leveling system for large format tile isn't just about speed; it's about correcting material defects that traditional methods cannot handle.
Lippage occurs when the edge of one tile sits higher than its neighbor. In a small 4x4 tile, this is a minor annoyance. On a 24x48 panel, it's a tripping hazard and a visual disaster. Traditional plastic spacers are designed to maintain grout joint width, but they offer zero control over the vertical plane. They can't resist the weight or the tension required to pull a warped tile into alignment with the rest of the floor. Without mechanical intervention, the finish will never be truly flat.
The Physics of Porcelain Warpage
During the manufacturing process, porcelain is fired at extremely high temperatures. As the material cools, it often develops a "bow" or a slight curve. This center-point warpage means the middle of the tile is higher than the ends. If you install these tiles in a 50% brick bond pattern, the highest point of one tile meets the lowest point of the next, making lippage inevitable. This is why many manufacturers require a 1/3 offset or less. A professional tile leveling system for large format tile applies the mechanical force needed to flatten these bows while the mortar cures.
Gravity and Vertical LFT Installations
Wall installations present an additional challenge: slumping. A single 24x48 porcelain slab is heavy. Gravity constantly pulls the tile downward before the mortar has a chance to set. Leveling systems act as a temporary mechanical support, locking the tiles together so they can't shift or slide. When used with a high-bond, non-sag thin-set, these clips ensure the wall remains perfectly plumb. This setup provides the stability required for a professional finish on shower walls or large-scale feature panels, reducing the risk of tiles drifting out of plane during the night.
Comparing Professional Tile Leveling Systems
Choosing a tile leveling system for large format tile requires a comparison of mechanical force and job site efficiency. The market is primarily divided into wedge-based systems and cap-and-screw (spin) systems. While both designs aim to eliminate lippage, their application varies based on tile size and installer preference. Professional systems must manage the overhead costs of disposable clips while providing reusable components that withstand high tension without failing.
You must match clip height to the specific thickness of your material. Standard large format porcelain often ranges from 8mm to 12mm, but gauged porcelain panels can be as thin as 3mm to 6mm. Using a clip designed for standard tile on thin panels results in insufficient tension. For polished or delicate surfaces, anti-friction shields are a critical addition. These shields prevent the wedge or cap from scratching the tile's finish during the tensioning process, preserving the aesthetic of expensive LFT.
Wedge-Based Systems for High-Tension Projects
Wedge systems are the industry standard for high-tension projects. They provide the most consistent downward pressure, which is vital for flattening 24x48 slabs. Using leveling pliers allows you to apply uniform force across every joint, ensuring the tiles are locked into a single plane. High-quality clips are engineered with a precise break point. They snap cleanly below the grout line when struck with a rubber mallet, leaving no plastic remnants behind to interfere with your grout work.
Cap-and-Spin Systems for Speed and Ergonomics
Cap-and-spin systems offer a tool-free alternative that prioritizes ergonomics and speed. These are often the preferred choice for smaller residential projects where a massive amount of tension isn't required. The threaded caps allow you to fine-tune the pressure by hand. This manual control helps prevent the tile from shifting during the final tightening phase. While caps are often reusable, the threaded bases are disposable. Finding the right balance between speed and precision depends on your specific project requirements. You can explore a curated Ceramic Tiles Leveling System selection to find the right fit for your next project.
Step-by-Step Guide: Installing LFT with a Leveling System
Installing LFT requires a methodical workflow to ensure the weight of the panels doesn't compromise the bond. Your substrate must be flat within 1/8 inch over 10 feet before you apply any mortar. If the surface is uneven, a tile leveling system for large format tile will struggle to overcome the height differences, leading to hollow spots or excessive tension on the clips. Correcting substrate issues with a self-leveling underlayment is often a necessary first step before the tile is even staged.
The Importance of 100% Mortar Coverage
LFT requires a high-performance, large format mortar with high sag resistance to support the weight of 24x48 slabs. Use a 1/2 inch x 1/2 inch square-notch trowel to create deep ridges. Back-buttering is a non-negotiable step; applying a thin layer of mortar to the back of the tile ensures 100% coverage and eliminates air pockets. This bond is what prevents the tile from cracking under pressure later. Without this step, even the best leveling system can't prevent the tile from failing under a point load.
Strategic Clip Positioning for LFT
Place your clips roughly 2 inches from each corner to ensure the edges stay aligned. For tiles longer than 24 inches, add intermediate clips at the mid-point of the long edges to manage center-point warpage. Strategic positioning of your tile leveling system for large format tile prevents the panels from shifting during the cure. Always clear excess mortar from the grout joint before inserting the clip. If mortar dries around the base, the clip won't snap cleanly, leaving plastic remnants that are nearly impossible to remove without damaging the tile edges.
When tensioning, you're looking for the tiles to pull into a single plane. If you're using a wedge system, use your pliers to achieve a firm "click" without forcing it. Over-tightening can pinch the grout joint or snap the clip prematurely. Once the mortar has fully cured, usually after 24 hours, remove the clips by striking them with a rubber mallet or kicking them in the direction of the grout joint. A sharp, sideways blow ensures the clip breaks below the tile surface, leaving a clean joint ready for grout. Don't hit the clips from the top, as this often results in an incomplete break.
Troubleshooting Common Large Format Tiling Issues
Even when using a professional tile leveling system for large format tile, job site variables can disrupt the installation process. One of the most frequent errors is "pinched" grout lines. This occurs when an installer applies excessive mechanical force, causing the spacer element of the clip to compress or the tiles to shift too close together. To prevent this, always verify that your grout joints remain consistent across the entire field after the final tensioning of the wedges or caps. If a joint looks tight, back off the tension immediately before the mortar begins to set.
Managing Premature Clip Failure
Clip breakage during the tensioning phase is a common frustration that often stems from material quality. Professional-grade clips manufactured from virgin plastic offer superior flexibility and tensile strength compared to recycled alternatives. Environmental factors also play a role; cold temperatures can make plastic brittle, while high humidity can slightly alter the break point. If a clip base snaps prematurely, you can often implement a "rescue" technique. Slide a new clip into the joint by slightly tilting the adjacent tile edge, provided the mortar is still fresh. If the mortar has already begun to skin over, you'll need to carefully clear a small path with a margin trowel to seat the replacement base.
Mortar Management and Grout Integrity
Mortar "volcanoes" are a leading cause of technical failure during the removal phase. When thin-set oozes up into the clip's engineered break point, it prevents the plastic from snapping cleanly below the tile surface. This results in "shadowing," where plastic fragments remain visible in the finished grout line. These remnants are difficult to remove without chipping the tile edges. You can avoid this by following these professional practices:
- Clear the Trench: Use a margin trowel or a dedicated joint cleaning tool to remove excess mortar from around each clip base immediately after placement.
- Score Dried Mortar: If you find dried mortar has hardened around a clip overnight, score the mortar with a utility knife before striking the clip with a mallet. This ensures the force is directed to the break point.
- Strike Direction: Always strike the clips in the direction of the joint. Striking from the front or at an angle increases the risk of an incomplete break.
Managing these small details ensures that your tools work for you rather than against you. To minimize job site failures and ensure a clean finish, select a high-performance Ceramic Tiles Leveling System designed for the rigors of professional LFT installation. Proper mortar management combined with high-strength clips will significantly reduce your cleanup time and eliminate the need for costly aesthetic repairs during the grouting stage.
The Complete Professional System: From Waterproofing to Finish
Achieving a high-end finish with 24x48 porcelain slabs involves more than just surface-level adjustments. A truly flat installation is the result of a complete support ecosystem that begins at the substrate. If your foundation is uneven, even the most advanced tile leveling system for large format tile will struggle to provide a flawless result. Professional contractors understand that the integrity of the build depends on the synergy between the waterproofing layer and the final setting materials.
Waterproofing as the Foundation
The PSC Pro Gen II Waterproofing System serves as the critical starting point for any large format project. This membrane provides a stable, uniform surface that minimizes the risk of substrate movement, which can lead to cracked tiles or grout failure. When used in conjunction with waterproofing shower kits, you ensure that the shower pan and curb are perfectly prepped for expansive panels. A flat substrate reduces the amount of mortar needed to compensate for dips, allowing your leveling clips to work with maximum efficiency.
Completing the Professional Look
Visual continuity is paramount when working with LFT. Your choice of accessories should complement the minimal grout lines achieved by your tile leveling system for large format tile. For example, linear shower drains are often preferred for LFT floors because they allow for a single-plane slope, eliminating the complex four-way envelope cuts required by traditional center drains. Integrating pre-sloped niches and ceramic soap dishes ensures that the technical precision of your tile layout isn't disrupted by bulky hardware.
Once the clips are removed and the grout is set, the final inspection is your proof of quality. Use a 6-foot or 10-foot straightedge to verify that the surface remains lippage-free across the entire field. Any minor edge adjustments or cleaning of delicate porcelain should be handled with professional-grade abrasives to maintain the factory finish. Finishing the perimeter with high-quality cove base or vinyl trim provides the durability needed for high-traffic areas, ensuring the project remains as stable as it is aesthetically pleasing. This holistic approach reduces labor costs and eliminates the call-backs associated with uneven surfaces.
Master Your Next Large Format Installation
Transitioning from standard tile to 24x48 panels requires a shift in both strategy and materials. Managing inherent porcelain warpage and the weight of massive slabs makes mechanical leveling a technical requirement. By establishing a flat foundation with the PSC Pro Gen II Waterproofing System and using a methodical installation framework, you'll ensure a lippage-free finish that meets the highest industry standards.
Success on a high-end project depends on tools that perform without failure. A professional tile leveling system for large format tile locks every edge into a single plane, protecting your reputation and reducing costly call-backs. Pro Supply Center provides an expert-curated selection of tiling supplies and contractor-grade waterproofing systems with national shipping to keep your workflow efficient and your results consistent.
Browse Professional Ceramic Tile Leveling Systems today to secure the precision your next project demands. With the right equipment and a professional approach, you'll deliver a flawless finish that stands up to the closest inspection.
Frequently Asked Questions
Do I really need a leveling system for 12x24 tiles?
Yes, 12x24 tiles are large format and require mechanical leveling to prevent lippage. Even though they're smaller than 24x48 slabs, they still have a 2:1 aspect ratio that often results in center bowing during manufacturing. Using a tile leveling system for large format tile ensures that the edges remain perfectly flush. This is especially important for offset patterns like a 1/3 bond where the highest point of one tile meets a lower point on the adjacent piece.
Can I reuse the clips or just the wedges and caps?
You can only reuse the wedges and caps; the clips are designed as single-use components. The base of the clip remains permanently embedded in the mortar beneath the tile. When you strike the top of the clip after the mortar cures, it snaps off at a pre-engineered break point below the tile surface. Wedges and spin caps are made of durable, high-impact plastic specifically so they can be used across multiple projects, reducing your long-term overhead costs.
How many clips do I need per square foot for large format tile?
The number of clips depends on the tile dimensions and the complexity of the layout. For a standard 24x48 tile, you typically need clips placed every 8 to 12 inches along the edges. This usually averages out to approximately 1.5 to 2 clips per square foot for large panels. Smaller tiles like 12x24 will require a higher density of clips per square foot because there are more linear feet of grout joints to manage within the same area.
Will a leveling system fix a floor that is not level?
No, a leveling system is designed to eliminate lippage between adjacent tiles, not to correct a substrate that is out of level. You must ensure your floor or wall is flat within 1/8 inch over 10 feet before installation. If the substrate has significant dips or humps, the leveling system will apply excessive tension to the clips, likely causing them to snap. Use a self-leveling underlayment or a patching compound to fix floor levels before you begin tiling.
How long should I wait before removing the tile leveling clips?
You should wait at least 24 hours to ensure the mortar has reached its final set. Removing clips too early while the thin-set is still green can cause the tiles to shift or pull away from the bond coat. If the mortar isn't fully cured, the clip base might not snap cleanly, leaving plastic fragments trapped in the grout line. Always check the manufacturer's specifications for your specific mortar to confirm the required curing time before you strike the clips.
Can I use a leveling system with natural stone tiles like marble?
Yes, you can use a tile leveling system for large format tile with natural stone, but you must take extra precautions to protect the surface. Marble and limestone are softer than porcelain and can scratch easily during the tensioning process. We recommend using anti-friction shields or protective plates between the wedge and the stone surface. This prevents the mechanical force of the leveling tool from leaving permanent marks or bruising on the delicate face of the natural stone.
What is the best way to remove clips without damaging the tile edges?
The most effective method is striking the clip with a rubber mallet or a work boot in the direction of the grout joint. A sharp, sideways blow ensures the clip snaps at its base below the tile edge. Never hit the clips from the front or at an angle, as this often leads to an incomplete break. If a clip doesn't break cleanly, you'll be forced to use a utility knife to pick out plastic remnants, which risks chipping the tile.
Do leveling systems work for both wall and floor installations?
Leveling systems are highly effective for both wall and floor installations. On floors, they manage the inherent warpage of large porcelain panels. On walls, they provide essential mechanical support to prevent slumping or sliding while the mortar cures. Large format wall tiles are heavy, and gravity constantly works against the bond. The clips lock the tiles into a single, vertical plane, ensuring your wall remains perfectly plumb and free of unsightly ledges.


