

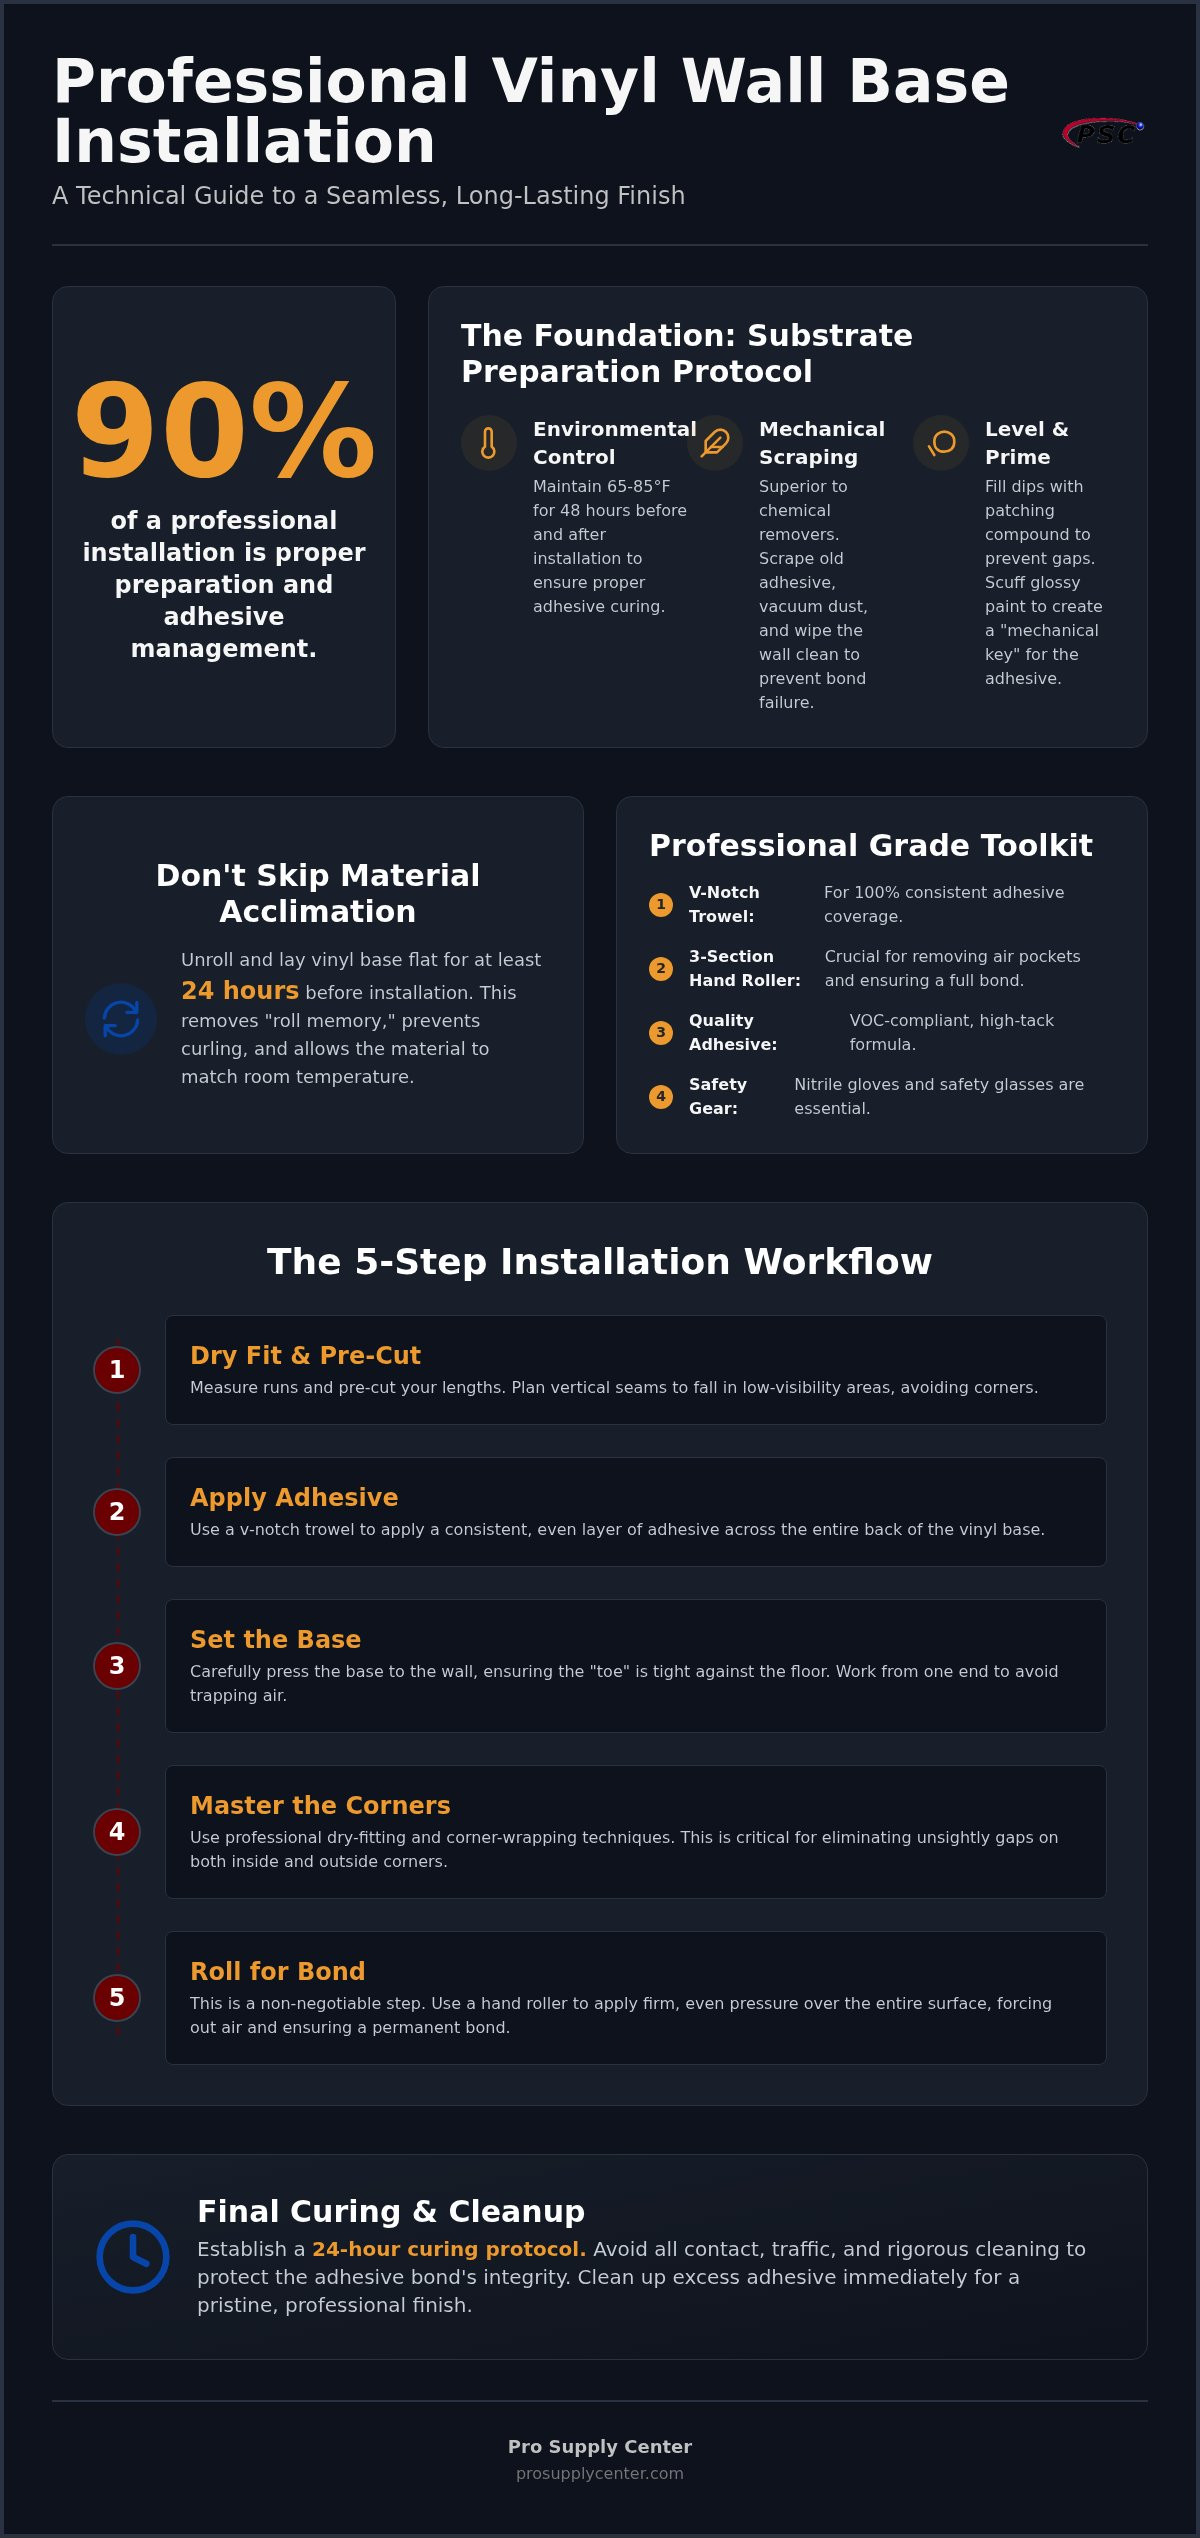
Professional vinyl wall base installation is 90% preparation and adhesive management, not just sticking trim to a wall. You've likely seen the results of a rushed job: baseboards pulling away from the drywall, unsightly gaps at the corners, and edges that lift the moment the floor buffer passes by. It's frustrating to finish a commercial project only to have the punch list highlight failures that could've been avoided with a more methodical technical approach.
This guide bridges the gap between a standard DIY attempt and a high-performance commercial finish. You'll master the technical steps and professional secrets for a seamless result that stands up to heavy foot traffic and rigorous cleaning schedules. We'll cover everything from ASTM F1861 standards and VOC-compliant adhesive selection to the specific cutting techniques required for perfect inside and outside corners. By the end of this manual, you'll have a clear, efficient workflow for achieving a gap-free finish that remains bonded for the long term.
Key Takeaways
- Learn why mechanical scraping is superior to chemical removers for substrate preparation and how environmental conditions dictate bond success.
- Evaluate the technical trade-offs between vinyl and rubber trim to ensure your vinyl wall base installation meets specific commercial durability requirements.
- Select the proper v-notch trowel and adhesive delivery system to achieve consistent coverage and eliminate the risk of the base pulling away.
- Master professional dry-fitting and corner-wrapping techniques to eliminate unsightly gaps and ensure a seamless finish across uneven walls.
- Establish a 24-hour curing protocol and professional cleanup routine to protect the aesthetic and structural integrity of the newly installed trim.
Preparing the Substrate for Vinyl Wall Base Installation
A successful vinyl wall base installation starts long before you open a tube of adhesive. The substrate must be structurally sound, dry, and free of any contaminants that could compromise the chemical bond. While many installers focus on the trim itself, the wall's condition determines if the project will last or fail within months. If the surface isn't properly prepped, even the highest quality cove base will eventually peel away.
Environmental control is a technical hurdle that many rookies overlook. Adhesives have a specific "open time," which is the window during which the glue remains tacky and capable of bonding. High humidity or extreme temperatures can cause the adhesive to skin over too quickly or fail to cure properly. Most professional adhesives require a room temperature between 65 and 85 degrees Fahrenheit for at least 48 hours before and after the job. This ensures the chemical reaction in the adhesive proceeds as intended for a permanent hold.
When dealing with renovations, mechanical scraping is the industry standard for removing old adhesive residue. You should avoid chemical removers. These liquids often leave a greasy film that prevents new adhesive from penetrating the drywall or plaster. Use a heavy-duty scraper or a handheld oscillating tool to remove high spots and old glue ridges. If you're working on a new build, ensure all drywall dust is vacuumed and the surface is wiped down with a damp cloth. A dusty wall is a common cause of bond failure because the glue sticks to the dust rather than the wall.
Surface Cleaning and Leveling Requirements
A clean wall is only half the battle; you must also ensure the contact zone is smooth. If you're working over a glossy paint, use professional grade abrasives to scuff the surface. This creates a "mechanical key" that allows the adhesive to grab the wall. Check for low spots or "waves" in the wall using a straightedge. These dips cause "bridging," where the base stays straight while the wall curves away, leaving an ugly gap. Use a fast-setting patching compound to fill these areas. Additionally, if the base meets a concrete slab, test the floor for moisture. Excessive vapor drive can migrate up the wall and delaminate the base adhesive over time.
Material Acclimation and Sizing
Before you begin the vinyl wall base installation, you must manage the material's "memory." Vinyl trim usually arrives in tight 100-foot rolls. If you apply it directly from the roll, the ends will naturally want to curl away from the wall. Unroll the material and cut it into manageable lengths at least 24 hours before the job starts. This acclimation period allows the vinyl to flatten and reach the same temperature as the room. It's much easier to work with flexible, flat strips than fighting a stiff, curled roll. Pre-cutting your long runs also allows you to plan your vertical seams, ensuring they don't land near corners or high-visibility areas. Understanding What is a Baseboard? and its structural role helps you appreciate why these prep steps are non-negotiable for a professional finish.
Essential Tools and Professional Grade Adhesives
The right equipment turns a labor-intensive vinyl wall base installation into a streamlined, repeatable process. Professionals don't rely on guesswork; they use specialized tools that ensure every linear foot of trim stays exactly where it's placed. While a simple utility knife might get you through a small room, a commercial-grade finish requires a more sophisticated kit.
Adhesive delivery comes in two primary forms: cartridges and bulk buckets. Cartridges are convenient for repair work or small rooms where a standard caulking gun provides sufficient speed. However, for large-scale commercial projects, bucket-spread adhesive is the standard. Spreading adhesive from a bucket using a v-notch trowel ensures 100% coverage across the back of the trim. This thorough application is essential for meeting the ASTM F1861 Standard Specification for resilient wall base, which governs the material quality and performance expectations in the industry.
Using a hand roller is the final, non-negotiable step in the bonding process. Without it, air pockets can remain trapped behind the vinyl, leading to localized bond failure. A 3-section hand roller applies even pressure, forcing the adhesive into both the substrate and the vinyl's backing. When working with high-tack solvents or solvent-based glues, always wear nitrile gloves and safety glasses. These adhesives are designed to be permanent. Skin contact is difficult to clean and can be irritating during long shifts.
Cove Base Adhesive Selection
Acrylic-based adhesives are the most common choice for standard drywall installations. They offer excellent grab and are generally VOC-compliant, making them safer for occupied buildings. Solvent-based options are typically reserved for non-porous surfaces where a faster, more aggressive set is required. You must monitor the "open time" carefully. If the adhesive skins over before the base is applied, the bond will fail. For a standard 4-inch base, expect coverage of approximately 220 to 250 linear feet per gallon when using the recommended trowel size. You can find high-performance cove base adhesives that balance long open times with immediate tack for efficient workflows.
Precision Cutting and Notching Tools
A sharp utility knife is the most versatile tool in your kit, but specialized equipment yields better results on corners. A top-set gouge is used to remove a thin sliver of material from the back of the base at outside corner locations. This reduces the tension of the vinyl, allowing it to wrap tightly without the "memory" pulling it away from the wall. For straight vertical seams, a miter tool or a dedicated cove base cutter ensures the edges are perfectly square. Dull blades are dangerous and lead to ragged edges that show gaps once the adhesive cures. Maintain a fresh edge to keep your seams invisible.
Vinyl vs. Rubber Cove Base: Selecting the Right Trim
Choosing between vinyl and rubber isn't just about the upfront budget. It's about matching the material's physical properties to the environment's specific stressors. For a large-scale vinyl wall base installation, the cost-benefit ratio is often the deciding factor. Vinyl is significantly more affordable than rubber, making it the practical choice for massive retail spaces or multi-unit residential builds where linear footage adds up quickly. However, the lower cost doesn't mean you're sacrificing all performance; it simply means the material has different strengths.
Flexibility is the primary technical difference between the two. Rubber is more pliable and has less "memory" than vinyl. If you're working in a renovation where the walls are irregular or not perfectly plumb, rubber will hug the contours more naturally. Vinyl is stiffer. It requires more aggressive adhesive management and the precise preparation steps we discussed in the previous sections to prevent bridging on curved surfaces. In sunlit corridors, you must also consider UV resistance. While modern vinyl formulations have improved, rubber typically offers superior color depth that resists fading under direct sunlight. Always verify that your selection meets the ASTM F1861 industry standard for the specific material type required for your project.
Maintenance needs vary by sector. In medical settings, a non-porous commercial grade cove base is vital for infection control. Vinyl's smooth surface resists harsh disinfectants and chemical cleaners better than some rubber blends, which can become tacky if exposed to certain solvents. In retail environments, the focus shifts to physical durability and how the base handles impact from shopping carts or heavy equipment.
Performance in High-Traffic Areas
- Scuff Resistance: Vinyl is harder than rubber, which makes it surprisingly resistant to scuffs from floor buffers and footwear. It's easier to wipe clean in high-traffic hallways.
- Chemical Resistance: Vinyl has a distinct advantage in labs or industrial settings. It doesn't react to most acids or alkaline cleaning agents used in heavy-duty sanitation.
- Impact Absorption: Rubber excels here. It acts as a shock absorber. While vinyl might crack or dent under a heavy impact from a pallet jack, rubber is more likely to bounce back without visible damage.
Aesthetic and Design Flexibility
Most commercial projects utilize the standard 4-inch height, but decorative architectural profiles are becoming common in modern offices. Choosing between a "toe" and "toeless" (straight) base depends entirely on your flooring. A coved toe is designed to hide the expansion gap in tile or carpet installations. A toeless base provides a minimalist, flush look that's ideal for luxury vinyl plank (LVP) or polished concrete. Matching your vinyl wall base installation to LVP is often easier with vinyl because manufacturers produce a wider range of colors and textures that mimic wood and stone finishes.
Step-by-Step Guide to Installing Vinyl Wall Base Molding
Execution on the job site relies on a methodical workflow. Once your substrate is prepped and your materials are acclimated, the actual vinyl wall base installation moves quickly if you follow a set sequence. You should always begin by dry-fitting your runs. Lay the strips along the wall without adhesive to plan your cuts. This step is vital because it allows you to shift the material so that vertical seams don't land within 12 inches of a corner. A seam placed too close to a corner is structurally weak and visually distracting.
When you're ready to bond the material, the "three-bead" method is the professional standard for a 4-inch base. If you're using a cartridge with a multi-hole applicator tip, apply three parallel beads of adhesive along the back of the strip. Keep the top bead approximately 1/4 inch below the top edge. This gap prevents the adhesive from squeezing out onto the wall when you apply pressure. The middle and bottom beads provide the structural grip needed to resist impact from cleaning equipment.
Set the base by pressing it firmly against the wall, starting from a corner and working your way out. This direction allows you to "walk" any slight tension out of the material. Immediately follow up with a hand roller. Move the roller in a zig-zag pattern to ensure the adhesive beads flatten and transfer completely to the wall surface. This eliminates air pockets that cause the base to feel "hollow" or pull away later. You can find the necessary vinyl wall base trim and professional adhesives to ensure a high-performance bond on your next project.
Measuring and Cutting Inside and Outside Corners
Corners are where most installations fail. For outside corners, don't cut the base. Instead, use the "V-notch" technique. Use a top-set gouge or a sharp utility knife to remove a vertical sliver of material from the back of the base, exactly where the corner sits. This thins the vinyl without piercing the face, allowing it to wrap around the corner tightly. For inside corners, a miter cut is usually best. Cut two pieces at a 45-degree angle so they meet flush in the center. If the vinyl is stiff, a quick pass with a heat gun increases flexibility, making it easier to seat the "toe" into the floor-wall junction on tight radiuses.
Managing Seams and Transitions
Visible seams are the mark of an amateur job. Always follow the "factory edge to factory edge" rule. When joining two pieces of base on a straight run, ensure the two edges meeting are the ones cut by the manufacturer. These are perfectly square and will disappear if joined correctly. If a small gap persists, a color-matched seam sealer or a tiny amount of adhesive can be used to fill the void. When transitioning to door casings, the base should be "returned" or cut at a slight angle to meet the molding. This prevents a blunt, exposed edge of vinyl from being visible at the end of the run.
Professional Finishing and Long-Term Maintenance
The final steps of a vinyl wall base installation determine whether the project looks like a professional build or a rushed job. Cleanup must happen immediately. If you leave wet adhesive on the face of the vinyl, it will attract dust and become nearly impossible to remove without scratching the finish once it cures. Use a clean, damp cloth for acrylic-based glues. If you're using a solvent-based adhesive, keep a dedicated adhesive remover on hand to wipe away any squeeze-out before it sets.
Respecting the 24-hour curing window is non-negotiable for commercial projects. While the base may feel secure to the touch, the chemical bond is still reaching its full strength. You should delay all heavy floor cleaning, especially the use of floor buffers or auto-scrubbers, during this period. These machines exert significant lateral force and use moisture that can seep behind the base, causing the edges to lift before the adhesive has fully hardened.
Even a perfect installation may require minor repairs over time due to building settling or heavy equipment impact. If a small section pulls away, you don't need to replace the entire run. Carefully peel back the loose area, scrape away any brittle glue, and apply a fresh bead of adhesive from a cartridge. Press it firmly into place and use a hand roller to reset the bond. Sourcing your materials from Pro Supply Center ensures you have access to consistent dye lots and material specifications, which makes these future repairs invisible.
Adhesive Cleanup and Tool Care
If adhesive has already dried on the vinyl, use mineral spirits or a specialized citrus-based cleaner. Always test a small, inconspicuous area first to ensure the solvent doesn't dull the vinyl's sheen. Don't forget your tools. Clean your v-notch trowels with a wire brush or a drywall knife to maintain the exact notch depth. Clogged notches lead to inconsistent coverage on your next project. Finally, inspect the top edge of the base. If the wall is particularly uneven, a thin bead of color-matched caulk can hide minor gaps and prevent dust from accumulating behind the trim.
Why Quality Materials Prevent Call-Backs
Contractors often face expensive call-backs due to material shrinkage. Low-grade vinyl often contains higher concentrations of fillers that cause the material to contract over time, opening up gaps at the vertical seams. Professional-grade supplies are formulated for dimensional stability and UV resistance. A final inspection should include checking all outside corners for tight wraps and ensuring every seam is flush. This contractor-approved finish protects the integrity of the build and ensures the vinyl wall base installation stands up to years of commercial traffic.
Achieving Long-Term Performance for Commercial Wall Finishes
A successful vinyl wall base installation depends on technical precision rather than speed. By prioritizing substrate preparation and using the correct three-bead adhesive method, you eliminate the common causes of bond failure and unsightly shrinkage. It's the difference between a job that requires constant call-backs and one that stands up to years of commercial foot traffic. Remember that corners and seams aren't just aesthetic details; they're the primary points of failure that require the mechanical techniques we've discussed, such as v-notching and factory-edge joining.
The integrity of your build relies on the quality of the supplies you keep in your kit. You can access the same specialized wall finishing inventory used by trade professionals to ensure material consistency and durability. Shop Professional Vinyl and Rubber Cove Base at Pro Supply Center to secure contractor-grade materials with the convenience of nationwide shipping. With the right tools and a methodical workflow, you'll deliver a seamless, gap-free finish that remains secure for the long term. Trust your process and the professional-grade supplies that support it.
Frequently Asked Questions
How long does it take for cove base adhesive to dry completely?
Most professional cove base adhesives require a 24-hour curing window before they reach maximum bond strength. While the initial tack holds the material in place immediately, the chemical drying process continues for up to 48 hours depending on humidity and temperature. It's critical to delay floor buffing or heavy cleaning during this period to prevent the base from shifting or delaminating during the final stages of the project.
Can I install vinyl wall base over existing wallpaper or paint?
You can install vinyl over painted surfaces provided the paint is well-bonded and scuffed with abrasives to create a mechanical key. However, installing over wallpaper is not recommended. The adhesive will bond to the paper rather than the wall, meaning the entire run could peel away if the wallpaper adhesive fails. For a reliable vinyl wall base installation, always remove wallpaper and sand the substrate to ensure a clean contact zone.
What is the best way to cut a 90-degree outside corner on vinyl base?
The most professional method for an outside corner is the "V-notch" or gouging technique. Instead of cutting the piece in two, use a top-set gouge or utility knife to remove a thin vertical sliver from the back of the base. This reduces the material's thickness at the pivot point, allowing the vinyl to wrap tightly around the corner. Using a heat gun for a few seconds can also increase flexibility for a sharper 90-degree fit.
Do I need to use a primer before applying cove base adhesive?
Priming is generally unnecessary for standard drywall or plaster surfaces if they are clean and dust-free. However, if the substrate is extremely porous or chalky, a primer can help stabilize the surface for better adhesive transfer. In most commercial settings, thorough mechanical preparation with professional-grade abrasives is more effective than chemical primers. Always check the specific adhesive manufacturer's technical data sheet to confirm compatibility with your specific wall type.
How do I remove old, dried cove base adhesive from the wall?
Mechanical scraping is the industry standard for removing old, dried adhesive. Use a heavy-duty floor scraper or an oscillating tool with a rigid blade to take the ridges down to the wall surface. You should avoid chemical removers because they often leave a greasy residue that interferes with the bond of the new adhesive. If the wall is damaged during scraping, use a fast-setting patch to level the surface before starting the new installation.
Can vinyl wall base be used in wet areas like bathrooms or kitchens?
Vinyl is highly moisture-resistant and suitable for bathrooms, kitchens, and other areas subject to frequent cleaning. Its non-porous surface prevents water absorption, which helps inhibit mold growth behind the trim. For these environments, where commercial-grade fixtures from Jaraco are frequently installed, ensure you use a high-quality acrylic adhesive and consider sealing the top edge with a bead of caulk. This prevents water from seeping behind the base during floor mopping or accidental spills in high-moisture zones.
A "toe" base features a flared bottom edge that curves forward to cover the junction between the wall and floor. This design is ideal for hiding expansion gaps and imperfections in tile or carpet. A "straight" or toeless base is completely flat and lacks this curve. It's typically chosen for minimalist architectural designs or when installing over luxury vinyl plank (LVP) where a flush, clean look is preferred by the client.
Why is my vinyl cove base shrinking and creating gaps at the seams?
Shrinkage usually occurs because the material wasn't properly acclimated to the room temperature before the vinyl wall base installation. Vinyl has a "memory" and will naturally contract if it was stretched during application or installed while cold. To prevent this, unroll the material 24 hours in advance and avoid pulling or stretching the strips as you press them into the adhesive. Using contractor-grade materials also reduces the risk of long-term dimensional changes.


