

Relying solely on your eye and a standard level is a gamble that most professional contractors can no longer afford to take. As tiles get larger and thinner, the margin for error has effectively disappeared. You've likely experienced the frustration of a costly callback to fix a single "tripper" tile that settled unevenly overnight. This guide analyzes the technical shift of a tile leveling system vs traditional methods to show why mechanical tension is now a structural requirement rather than a luxury accessory.
We agree that your reputation is built on a flawless, lippage-free finish that stands up to scrutiny. In this guide, you'll discover how modern systems eliminate technical errors and significantly reduce the physical strain of constant manual adjustments. We provide a direct comparison of installation speeds and finish quality to help you optimize your workflow. We'll also examine how using a Ceramic Tile Leveling System as the final precision step after a PSC Pro Gen II Waterproofing System ensures the long-term integrity of every project you touch.
Key Takeaways
- Learn how mechanical tensioning prevents lippage by countering mortar slump, a common issue where tiles sink during the thin-set curing process.
- Evaluate the long-term ROI of a tile leveling system vs traditional methods through reduced labor hours and the elimination of expensive floor repair callbacks.
- Master specific clip placement strategies and "clean-as-you-go" techniques to maintain a pristine job site and ensure structural stability.
- Discover how to use the Ceramic Tile Leveling System as the final precision layer to complement the PSC Pro Gen II Waterproofing System for high-stakes projects.
The Evolution of Tiling: Why Traditional Methods Struggle in 2026
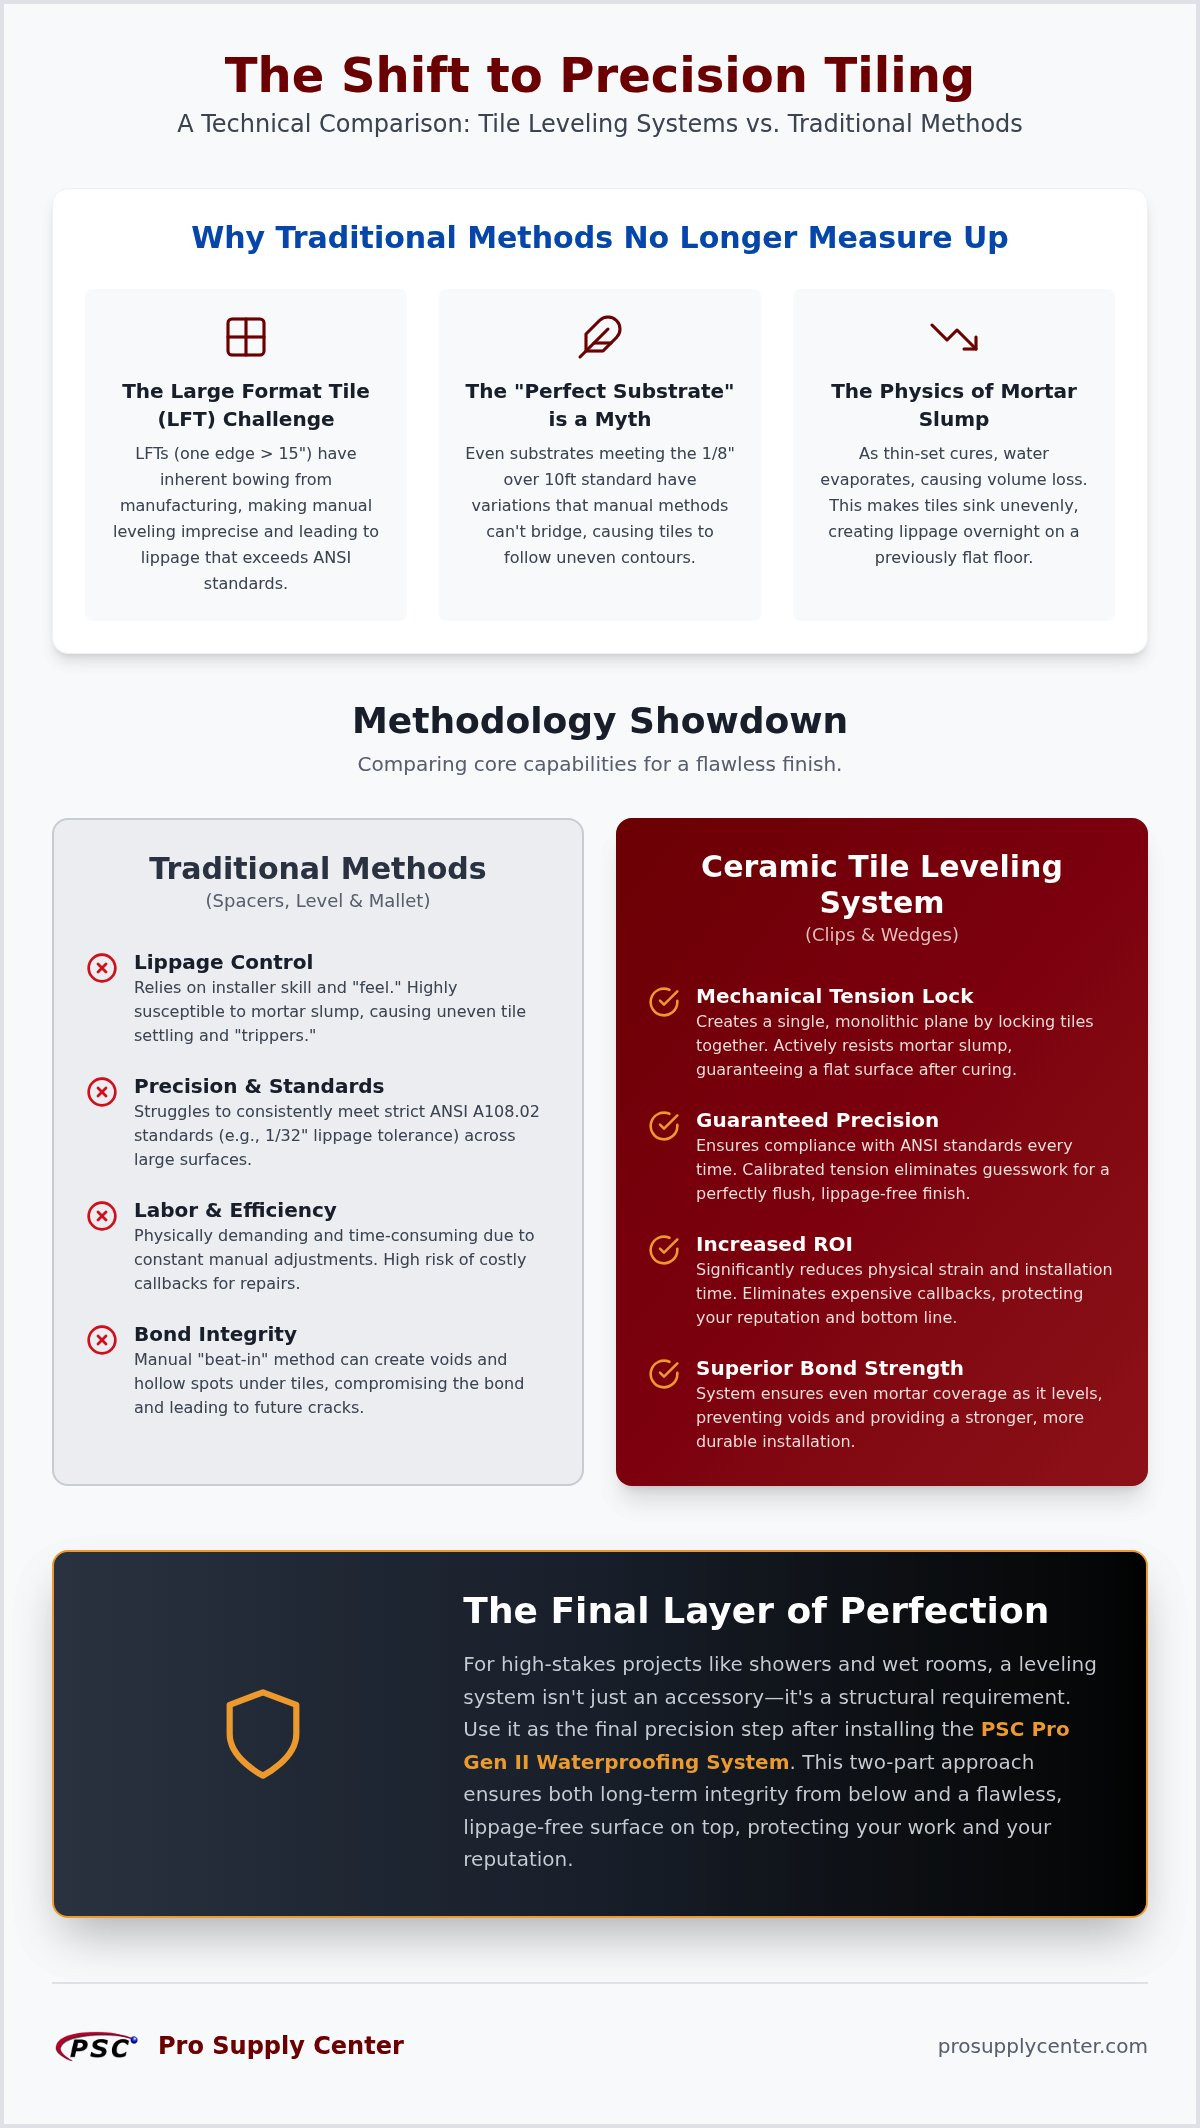
The tiling industry has moved beyond the era where a handful of plastic spacers and a keen eye were enough to guarantee a professional finish. Today, a Ceramic Tile Leveling System serves as a critical mechanical tensioning tool. While traditional spacers only manage the horizontal width of grout joints, these modern systems provide active vertical control. They lock adjacent tiles into a single, monolithic plane while the thin-set cures. This shift is essential because the margin for error in a tile leveling system vs traditional methods comparison has narrowed significantly. Manual leveling often falls short of strict ANSI standards, which dictate precise tolerances that are nearly impossible to maintain across a large floor using only manual pressure and a spirit level.
The Large Format Tile (LFT) Challenge
Industry standards in 2026 define Large Format Tiles (LFT) as any tile with at least one edge exceeding 15 inches. These tiles bring aesthetic appeal but present a physical challenge: inherent bowing. During the manufacturing process, large porcelain slabs often develop a slight crown or warp. If you use traditional methods, you're forced to rely on heavy back-buttering to "float" the tile into position. This manual adjustment is imprecise and labor-intensive. Without mechanical tension to pull the edges flush, the resulting lippage often exceeds the ANSI A108.02 standard. For tiles with grout joints narrower than 1/4 inch, the allowable lippage is often as little as 1/32 inch. Mechanical systems ensure you stay within these professional boundaries every time.
The Myth of the "Perfect Substrate"
Contractors rarely walk onto a job site with a perfectly flat subfloor. Even when a substrate meets the standard requirement of 1/8 inch variation over 10 feet, it's still uneven enough to cause issues with modern, rigid tiles. Traditional methods struggle to bridge these minor substrate flaws because the tile simply follows the contour of the floor. A mechanical system acts as a functional bridge. It uses the weight and rigidity of the surrounding tiles to force high points down and lift low points up until they align perfectly. This mechanical precision is especially vital when the tiling is the final layer of a high-stakes assembly, such as a shower floor installed over a PSC Pro Gen II Waterproofing System. It compensates for real-world conditions that manual tapping with a rubber mallet simply cannot resolve, ensuring the finish remains flat even if the underlying concrete or plywood has slight deviations.
Mechanical vs. Manual Leveling: A Technical Deep Dive
Understanding the technical gap in a tile leveling system vs traditional methods requires looking beneath the tile surface at the behavior of the mortar bed. Traditional methods rely on the installer's ability to set a tile and hope it stays put. Mechanical systems, however, create a structural lock. The clip-and-wedge mechanism functions by exerting simultaneous downward pressure on the high edge and upward tension on the low edge. This force doesn't just align the tiles; it holds them in a fixed position until the adhesive has fully crystallized.
The Physics of Mortar Shrinkage
Mortar slump, or curing shrinkage, is the primary reason why a floor that looks perfect at the end of the day can develop lippage by the next morning. Standard thin-set mortars contain a significant amount of water that must evaporate for the bond to harden. As this moisture leaves the mixture, the mortar bed loses volume and pulls the tile downward. In traditional installations, this pull is often uneven, causing individual tiles to sink at different rates based on the thickness of the mortar or the porosity of the substrate.
A Ceramic Tile Leveling System resists this gravitational pull by tying the tiles together into a continuous plane. The wedge-and-clip interface provides a mechanical advantage that transforms individual tiles into a unified surface, preventing any single piece from settling lower than its neighbors. This ensures that the precision you achieve during installation is the same precision the client sees after the floor has fully dried.
Manual Adjustment Limits
The traditional "beat-in" method involves using a rubber mallet to tap tiles into a level position. This technique is inherently inconsistent because it relies on human feel rather than calibrated tension. If an installer hits a tile too hard to correct a high spot, they risk "over-beating." This compresses the mortar too much and can create hollow spots or air pockets. These voids compromise the bond and lead to cracked tiles under heavy foot traffic later.
On large-scale projects, the physical fatigue of constant manual checking leads to technical errors. It's difficult to maintain the same level of focus and physical precision on the last tile of a 500-square-foot room as you had on the first. Mechanical systems remove the guesswork and the physical strain. They provide a repeatable, professional-grade result that manual methods cannot replicate over hundreds of square feet, making them the standard for modern, high-efficiency job sites.
Comparing Precision, Speed, and Durability
The debate over tile leveling system vs traditional methods often centers on the initial setup time. While it's true that traditional methods don't require placing clips, they demand constant, manual verification with a spirit level or straightedge. This manual process is reactive; you find a problem and fix it. In contrast, a mechanical system is proactive. By integrating the leveling mechanism into the layout process, you create a "set and forget" workflow that eliminates the need for mid-cure adjustments. In the tile leveling system vs traditional methods evaluation, the choice becomes clear when you factor in the cost of a single return trip to the job site.
Beyond speed, the "Callback Factor" is the most compelling reason to modernize your toolkit. Replacing a single lippage-affected tile after the grout has dried is a logistical nightmare. It requires grinding out grout, carefully prying the tile without damaging neighbors, and cleaning the substrate. The cost of labor and materials for one callback often exceeds the price of a professional leveling kit for an entire floor. Mechanical systems act as an insurance policy against these profit-draining repairs.
Installation Efficiency and ROI
A professional crew can see a significant reduction in time-per-square-foot once they master the clip-and-wedge rhythm. The primary gain is the reduction in mental fatigue. When the tool handles the precision, the installer focuses on layout and adhesive coverage. While professional grade abrasives remain essential for polishing factory edges or mitering corners, you'll spend less time grinding down high spots to hide installation errors. The ROI is found in consistency, allowing for more accurate job scheduling and higher profit margins per project.
The Professional Finish and ANSI Standards
The industry-standard requirement for lippage in grout joints narrower than 1/4 inch is 1/32 inch. A Ceramic Tile Leveling System ensures every joint meets or exceeds these ANSI standards. This compliance is critical in modern open-plan designs where grazing light from large windows or recessed LEDs highlights even the smallest deviations. A flat floor lasts longer in high-traffic areas where uneven tiles are prone to chipping when struck by heavy equipment. Uniform grout lines, achieved through integrated spacer-clips, provide the final professional touch that distinguishes your work from a DIY effort.
Implementation Guide: Transitioning Your Workflow
Adopting a mechanical workflow requires a shift in how you sequence your installation. In a tile leveling system vs traditional methods comparison, the biggest change is that you can't simply set the tiles and walk away. You must integrate the clips into the mortar bed as each tile is laid. For maximum stability, place your clips approximately 2 to 3 inches from each corner. This positioning ensures that the mechanical tension is applied where the tile is most susceptible to bowing or dipping. It's a disciplined approach that replaces the guesswork of traditional manual adjustments with a repeatable, technical process.
One of the most important habits to develop is the "clean as you go" rule. If thin-set mortar is allowed to squeeze up into the grout joint and harden around the base of the clip, the plastic won't break cleanly during removal. This leaves unsightly "stubs" protruding from the joint that are difficult to remove without damaging the tile edges. Keeping a small bucket of water and a stiff brush nearby to clear excess mortar from the clip area saves hours of corrective labor during the final clean-up phase.
Setting the Clips and Wedges
The volume of clips you need scales with the size of your material. For standard 12x24 tiles, two clips per long side are typically sufficient. However, for 24x48 large format planks, you should use at least three to four clips to manage the inherent bowing found in longer porcelain slabs. When you insert the wedges, always use specialized pliers rather than relying on hand strength. Pliers allow you to calibrate a specific tension level that remains uniform across the entire floor. This prevents the uneven pressure that often occurs with manual tightening and ensures the tile leveling system vs traditional methods efficiency gains are fully realized.
Removal and Clean-Up
The "Golden Rule" of removal is to wait for a full cure. Never attempt to remove clips until the mortar has hardened for at least 24 hours. Removing them too early can cause the tiles to shift or break the bond with the substrate. To remove the clips, use a rubber mallet or a heavy work boot to strike them sharply. The strike must always be delivered in the direction of the grout joint. Striking the clip from the side often causes it to snap above the break point, leaving plastic embedded in the joint. Once removed, the wedges can be collected and reused on your next project, while the disposable clips are discarded.
Maintaining a steady supply of consumables is vital for keeping your projects on schedule. You can buy professional-grade Ceramic Tile Leveling System clips and wedges here to ensure your toolkit is ready for high-volume installations.
Professional Grade Solutions: Maximizing ROI with Pro Supply Center
The final phase of a professional installation isn't just about aesthetic flatness; it's about structural synergy. When evaluating a tile leveling system vs traditional methods, contractors must consider how the floor finish interacts with the underlying layers of the assembly. Pro Supply Center provides a curated ecosystem where each component supports the next. By using a Ceramic Tile Leveling System as the final precision step, you ensure the integrity of the entire build. This is especially critical for national-scale commercial projects where consistency across thousands of square feet is a non-negotiable requirement for technical approval.
Contractors prefer PSC because our components are designed to withstand the high-stakes environment of a modern job site. Whether you are working on a single custom bathroom or a multi-unit residential development, having a reliable source for bulk supplies ensures that your workflow remains uninterrupted. This stability in your supply chain is a fundamental part of maintaining professional-grade quality across every project you touch.
The Waterproofing Connection
A perfectly installed waterproofing shower kit is only as effective as the tile finish on top of it. Proper drainage relies on a consistent, uninterrupted slope toward the drain. Traditional manual leveling methods often result in minor lippage that creates "micro-dams" on the floor surface. These small ridges interrupt the natural flow of water, leading to pooling and persistent dampness in the grout lines. Even with the superior protection of the PSC Pro Gen II Waterproofing System, standing water can eventually cause mineral buildup or aesthetic degradation. Using mechanical leveling ensures the surface remains perfectly flush, allowing the waterproofing membrane to perform its job without the interference of surface-level obstructions.
Selecting Your System Components
Consistency in material quality is why professional crews prefer PSC components over generic alternatives. When you select a Ceramic Tile Leveling System, the physical attributes of the plastic matter just as much as the layout. High-tensile plastic is used in our clips to prevent premature snapping under the pressure of the wedges. This reliability is a key differentiator in the tile leveling system vs traditional methods debate, as it eliminates the frustration of mid-install failures that stall progress and compromise the mortar bond.
Contractors can choose from various clip thicknesses to achieve specific grout widths while maintaining absolute vertical alignment. We recommend keeping the Ceramic Tile Leveling System as a core inventory item alongside your waterproofing supplies. This integrated approach reduces the risk of technical error and maximizes your ROI by delivering a flawless, lippage-free result that stands up to the scrutiny of modern lighting and high-traffic use.
Elevating Your Tiling Standards for 2026
The transition from manual adjustments to mechanical precision is a necessary evolution for any contractor aiming for high-volume efficiency. By analyzing a tile leveling system vs traditional methods, it's clear that the mechanical lock provided by clips and wedges is the only reliable way to counter mortar shrinkage and inherent tile bowing. This system doesn't just improve the visual finish; it protects the integrity of the underlying waterproofing and eliminates the financial risk of corrective callbacks. You've seen how these tools bridge the gap between imperfect substrates and a professional, lippage-free result.
Ready to optimize your workflow with contractor-grade durability? Upgrade your next project with the Ceramic Tile Leveling System from Pro Supply Center. Our components are specifically optimized for Large Format Tiles (LFT) and are available with national shipping on all tiling accessories. Taking the guesswork out of your installation allows you to focus on the craftsmanship that defines your reputation. You now have the technical roadmap to deliver a flawless, durable floor on every job site with total confidence.
Frequently Asked Questions
Do tile leveling systems actually save time on the job site?
Yes, mechanical systems save significant time by standardizing the installation workflow. Instead of stopping to check every tile with a straightedge, the installer sets the clips and moves forward. This "set and forget" approach reduces the mental and physical fatigue associated with manual leveling. When comparing a tile leveling system vs traditional methods, the reduction in labor hours on large format projects is often the deciding factor for professional crews.
Can I use a leveling system with natural stone tiles?
You can use these systems with natural stone as long as the material is calibrated to a consistent thickness. For uncalibrated stone, traditional methods are often necessary because the varying depths require manual floating in the mortar bed. However, for gauged porcelain or calibrated marble, the Ceramic Tile Leveling System provides the necessary tension to ensure a flush finish across the entire surface without technical error.
Why do my tile leveling clips keep snapping during installation?
Clips typically snap prematurely because of excess thin-set in the grout joint or improper tensioning. If mortar hardens around the base of the clip, it loses the flexibility needed to handle the wedge pressure. Ensure you clean as you go to keep the joints clear. Also, calibrate your pliers to apply consistent force rather than relying on maximum hand pressure, which can exceed the clip's tensile strength.
Are the wedges in a tile leveling system reusable?
High-tensile wedges are fully reusable across multiple projects. While the clips are designed to snap off and remain embedded below the grout line, the wedges are durable components meant to be collected after removal. This reusability makes the system a cost-effective long-term investment. You only need to replenish your supply of disposable clips for each new installation, while the wedges remain a permanent part of your professional toolkit.
How many clips do I need per square foot of tile?
The number of clips required depends strictly on the dimensions of your tile and the layout pattern. For a standard 24x24 inch tile, you'll typically use about four clips per tile to support each side. Larger planks or offset patterns may require more. Calculating your needs based on the total linear feet of tile edges is the most accurate way to ensure you have enough consumables for a national-scale commercial project.
Will a leveling system fix a floor that is not flat?
A leveling system is not a substitute for proper substrate preparation. While it bridges minor deviations, it cannot fix a floor that is significantly out of level or has major structural dips. You must still use self-leveling underlayment or a mud bed to achieve a flat substrate before installation. The system's primary function is to eliminate lippage between adjacent tiles, not to correct a failing subfloor or improper slope.
What happens if I remove the clips before the mortar is dry?
Removing clips before the mortar has reached a full 24-hour cure often results in project failure. If the adhesive is still green, the tension from the clips can actually pull the tiles out of alignment as you strike them. This creates the very lippage you were trying to avoid. Always wait for the thin-set to fully crystallize to ensure the tiles remain locked in their monolithic plane during and after the removal process.
Can I use these systems for wall tile installations?
These systems are exceptionally effective for wall installations, particularly with heavy large format tiles. Gravity naturally pulls wall tiles downward during the curing process, which can lead to sagging and uneven joints. Using a tile leveling system vs traditional methods on vertical surfaces provides the mechanical support needed to hold tiles in place. This ensures perfectly aligned grout lines and a flush finish from the floor to the ceiling without constant manual adjustment.


