

A surface-mount accessory is often the first point of failure in a high-use shower, leading to cracked tiles and compromised waterproofing. You've likely seen the results of poor adhesion or improper sealing: soap dishes that sag over time or, worse, allow moisture to seep behind the wall and rot the substrate. It's a frustrating setback for any professional aiming for a permanent, high-quality finish. Integrating a recessed ceramic soap dish is the most reliable way to ensure structural longevity and a seamless aesthetic that matches modern tile trends.
This guide provides the technical specifications and material insights needed to master the installation of these fixtures within advanced systems like the PSC Pro Gen II Waterproofing System. We'll address the common challenges of leaking and finish-matching while ensuring your projects meet the 2026 building code requirements for interior shower dimensions and safety standards. You'll learn the precise steps for achieving a leak-proof bond and how to select professional-grade ceramic options that outperform flimsy plastic alternatives. We'll walk through standard sizing, load-bearing requirements, and the specific adhesives that guarantee your storage solutions stay exactly where they belong for the life of the shower.
Key Takeaways
- Understand why high-density ceramic offers superior mold resistance and mortar adhesion compared to plastic or surface-mount alternatives in wet environments.
- Master the technical requirements for planning rough-in openings that accommodate a recessed ceramic soap dish without compromising the structural integrity of the wall.
- Learn how to integrate recessed fixtures directly into the PSC Pro Gen II Waterproofing System to prevent moisture penetration and substrate failure.
- Identify the professional standards for ergonomic placement and fixture coordination to ensure your shower layout is both functional and code-compliant.
What is a Recessed Ceramic Soap Dish?
A recessed ceramic soap dish is a specialized bathroom fixture designed to sit within a wall cavity rather than protruding from the tile surface. While the basic question What is a Soap Dish? usually brings to mind a simple countertop tray, the recessed version is a permanent architectural component. It integrates directly into the shower wall assembly, providing a streamlined profile that has remained a professional standard for decades. This classic design is prized for its "traditional utility," offering a clean look that works in both heritage renovations and contemporary builds.
Professionals prefer this design for its functional reliability. Unlike surface-mount accessories that take up valuable space, a recessed unit preserves the "elbow room" in compact shower stalls. This is particularly critical in smaller bathrooms where every inch of interior cross-sectional area counts toward comfort and code compliance. By moving the storage into the wall, you create a more open, safer environment for the user.
Recessed vs. Surface-Mount Ceramic Accessories
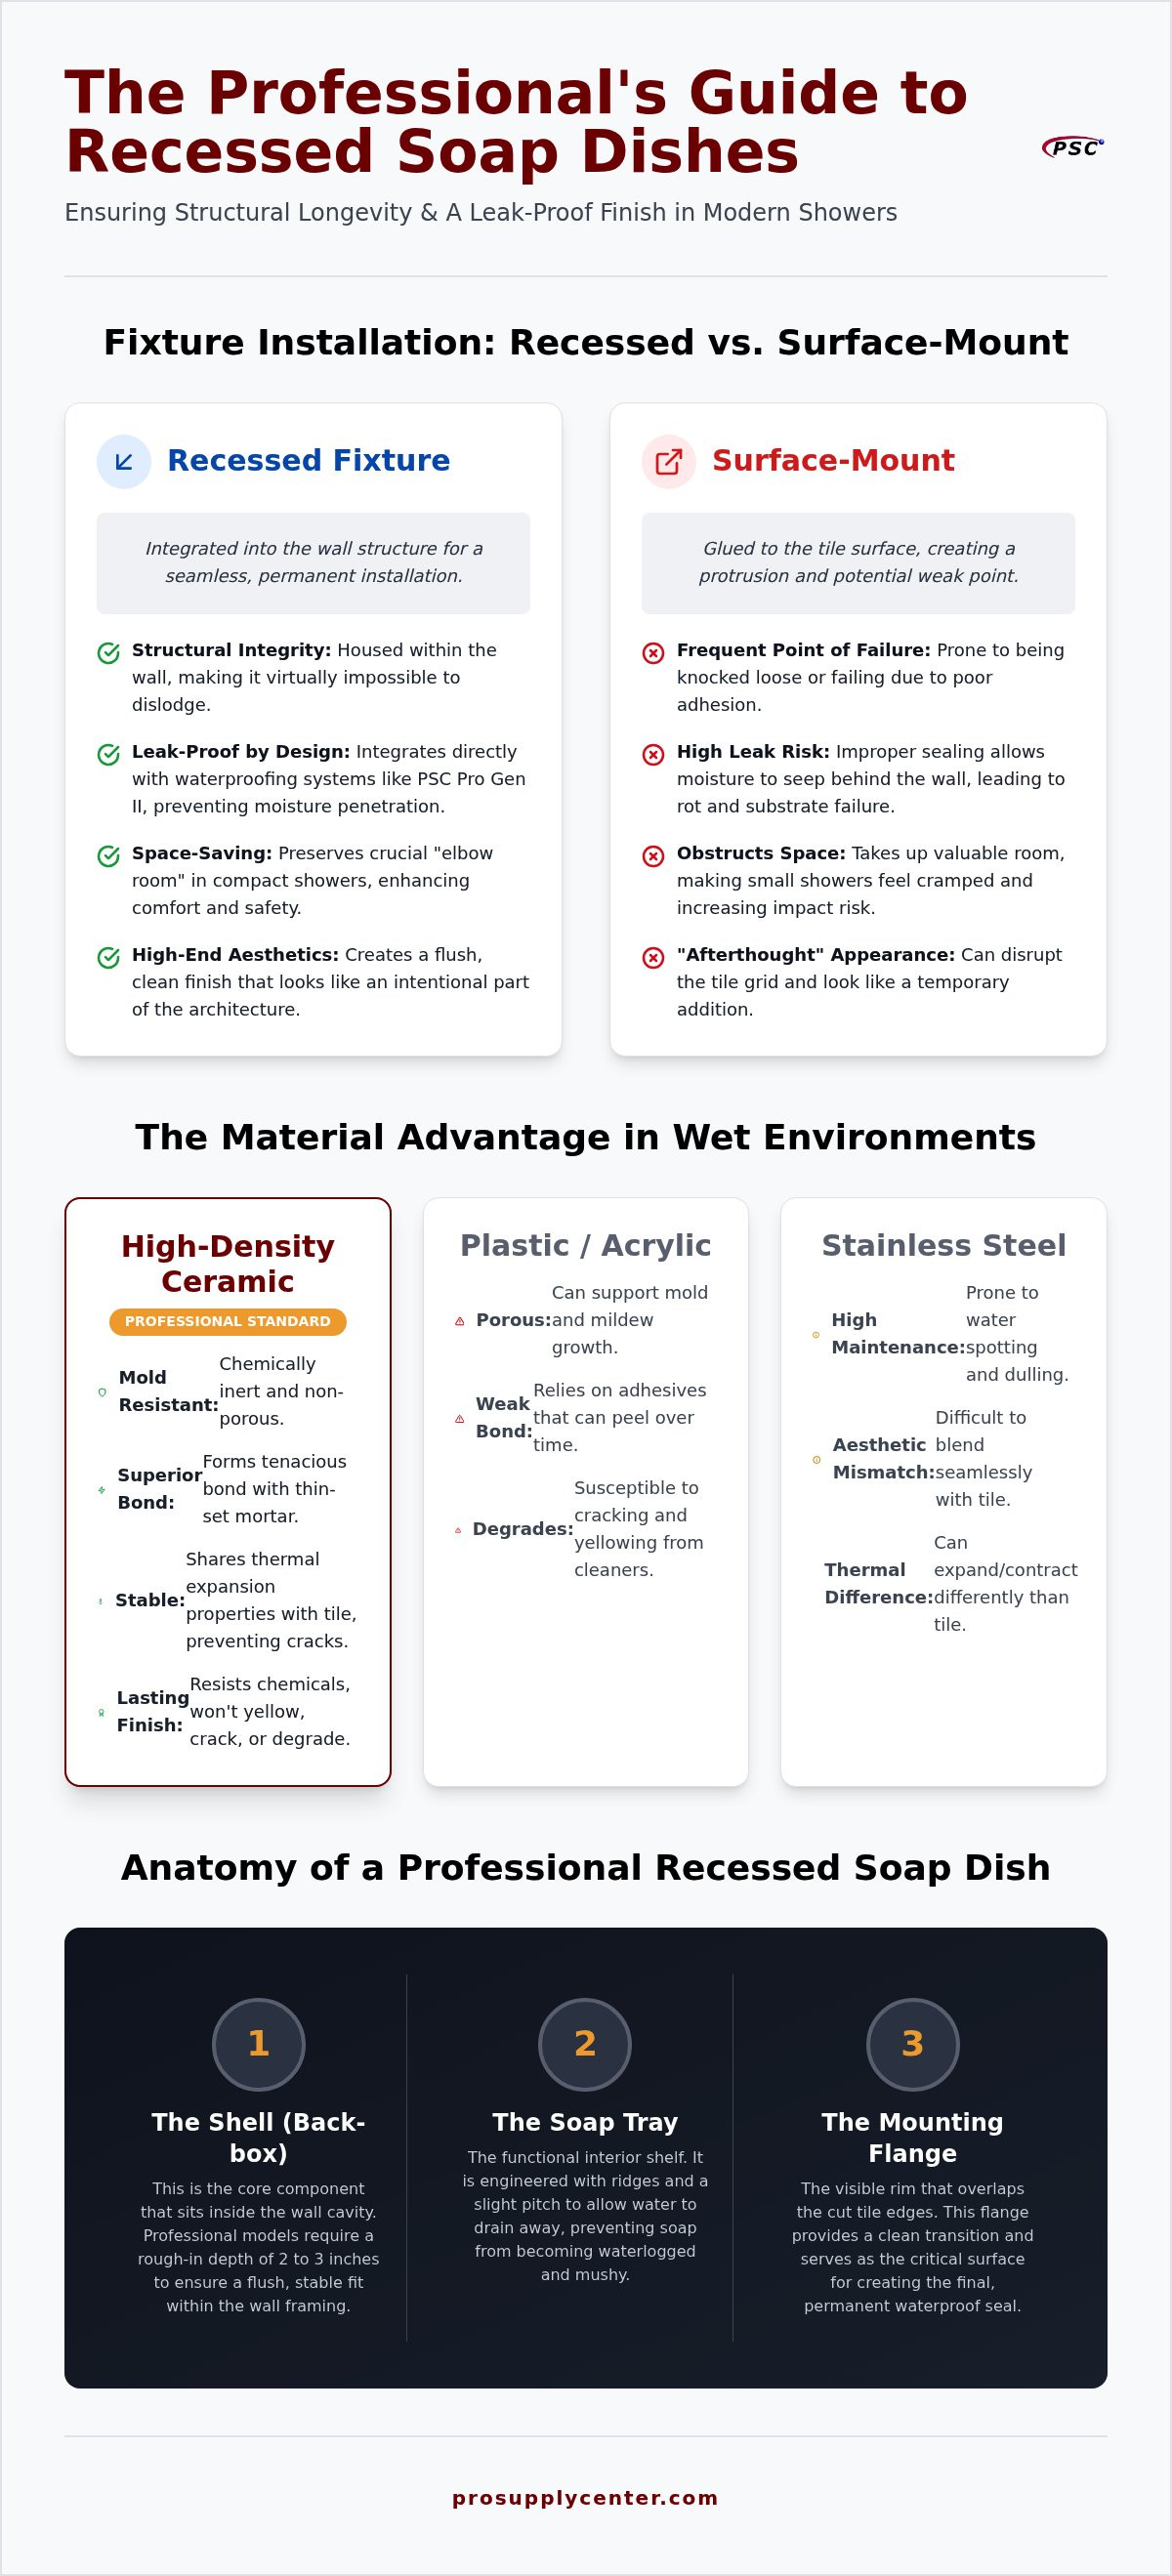
Surface-mount dishes are often glued to the face of the tile. Over time, these are prone to being knocked loose by accidental impact or failing due to poor adhesive coverage. A recessed ceramic soap dish offers a vastly different durability profile. Because the majority of the unit's mass is housed within the wall, it's virtually impossible to dislodge. The visual impact is also superior; the fixture creates a flush, high-end finish that blends into the tile grid rather than looking like a protruding afterthought. It's a structural solution that prioritizes long-term integrity over quick, temporary fixes.
The Anatomy of a Professional Soap Dish
Understanding the physical components is vital for a successful rough-in. A professional-grade recessed ceramic soap dish consists of three primary parts:
- The Shell (Back-box): This section sits inside the wall cavity. Most professional models require a rough-in depth of 2 to 3 inches to sit flush.
- The Soap Tray: The interior shelf often features ridges or a slight pitch to allow for water drainage, preventing soap from becoming waterlogged.
- The Mounting Flange: This is the visible rim that overlaps the cut tile edges. It provides a clean transition and serves as the critical surface for the final waterproof seal.
Material density is the final piece of the puzzle. High-fire ceramic is used because of its extreme density. This ensures the fixture resists water absorption and chemical cleaners, preventing the mold growth often seen in porous or plastic alternatives. When integrated with a system like the PSC Pro Gen II, these components form a unified, leak-proof barrier that lasts for the life of the tile installation.
The Material Advantage: Why Ceramic Wins in Wet Environments
Selecting a recessed ceramic soap dish is a decision rooted in material science rather than just aesthetics. In the high-moisture environment of a shower, materials like plastic or acrylic often fail because they are chemically reactive or porous. Ceramic is chemically inert, meaning it won't support the growth of mold or mildew. It also withstands the aggressive chemical cleaners required to maintain a sanitary space. This durability ensures the fixture won't yellow, crack, or degrade after years of daily exposure to steam and soap residue.
A critical advantage for the installer is bond compatibility. Thin-set mortar, the standard adhesive for modern tile systems, forms a tenacious mechanical and chemical bond with the back of a ceramic fixture. Plastic inserts often rely on silicone or specialized adhesives that can peel over time. Because ceramic shares a similar thermal expansion coefficient with the surrounding tile and grout, the risk of hairline cracks forming at the joints during temperature shifts is significantly reduced. This stability is vital for maintaining the integrity of the waterproof seal over the long term.
Ceramic vs. Plastic and Stainless Steel
While stainless steel is durable, it's prone to water spotting and requires constant maintenance to prevent a dull appearance. Glazed ceramic offers a permanent, non-porous surface that sheds soap residue effortlessly. It also allows for perfect aesthetic integration. When you match the sheen and texture of the wall tile, the result is a cohesive, high-end look that feels like part of the original architecture. Even when planning for accessibility, following ADA guidelines for bathroom accessories is more straightforward when using materials that provide consistent grip and visibility without the slipperiness of polished metal.
Contractor Grade vs. Retail Grade Ceramics
Not all ceramic is created equal. Contractor-grade units are distinguished by their weight and density. A denser fixture resists water absorption better than the lighter, air-pocked versions often found in big-box retail aisles. Professional-grade options also feature consistent flange flatness. A warped flange creates gaps that are difficult to caulk and prone to leaking. When selecting professional-grade ceramic soap dishes, verify that the color matches industry-standard whites, bones, or biscuits. This ensures a seamless transition with the tile and a professional finish that retail-grade products rarely achieve.
Technical Specifications: Sizing and Planning the Rough-In
Success in installing a recessed ceramic soap dish depends entirely on the precision of the rough-in phase. Unlike surface-mount accessories that allow for minor adjustments during final placement, a recessed unit requires a dedicated cavity that must be planned before the first tile is set. Standard industry dimensions for these fixtures typically fall into three categories: 5x5, 6x6, and 4x6 inches. While the 5x5 remains the residential standard, larger master bathrooms often utilize 6x6 variations to maintain visual scale with large-format tiles.
Depth is a critical factor that is often overlooked. Most professional-grade dishes require a cavity depth between 2.5 and 3.5 inches. Before cutting into your substrate, verify that no plumbing vent pipes or electrical conduits reside in the target stud bay. If you're working on an exterior wall, you must also account for the displacement of insulation, which can impact the home's thermal envelope. Weight bearing is equally important; a ceramic dish is a heavy component that must be supported by the substrate and mortar bond to prevent sagging or bond failure over time.
Standard Size Reference for 2026 Projects
The 5x5 standard is the go-to for most tub-to-shower conversions and standard hall baths. It fits comfortably within a single tile height in many layouts. The 6x6 jumbo models provide additional shelf space for larger bottles and are better suited for showers over 48 inches wide. If your storage needs exceed a single bar of soap and a bottle, consider upgrading to a recessed ceramic niche. These larger units provide multiple tiers of storage while maintaining the same flush-mount benefits as a traditional dish.
Planning the Wall Cavity
When planning the opening in your cement board or foam backer system, the rough-in should be roughly 1/4 inch larger than the back-box of the dish. This allows for a proper bed of thin-set mortar. If the desired location lands directly over a wall stud, you'll need to install horizontal blocking above and below the opening to maintain structural integrity. This blocking provides a solid surface for the backer board edges and the dish itself.
Substrate thickness must be calculated accurately. Most installations use 1/2-inch backer board; however, the addition of a waterproofing membrane and thin-set can add another 1/8 to 1/4 inch of depth. To ensure the mounting flange sits perfectly flat against the finished tile, use a ceramic tile leveling system during the surrounding tile installation. This prevents lippage, which is the primary cause of unsightly gaps or "rocking" fixtures that are difficult to seal effectively.
Installation Integration with Waterproofing Systems
The most common failure point in a tiled shower is not the tile itself, but the penetrations where accessories are installed. When you cut into a waterproofed wall to install a recessed ceramic soap dish, you create a potential path for moisture to reach the wall cavity. Professional installation requires a continuous, unbroken barrier that transitions from the main wall membrane into the recessed opening. Without this integration, water can bypass the tile and rot the wooden framing, leading to structural damage that is expensive to remediate.
The installation process follows a specific sequence to maintain the integrity of the waterproofing shower kit components. First, cut the substrate 1/4 inch larger than the fixture's back-box and ensure horizontal blocking is secure. Next, apply the PSC Pro Gen II Waterproofing System directly into the cavity, covering all five interior faces of the rough-in. Finally, the dish flange must be flashed to the wall membrane using a professional-grade sealant or thin-set to create a permanent, unified seal.
Integrating with PSC Pro Gen II Membrane
To achieve a leak-proof result, the membrane must be wrapped into the rough-in box. Cut the membrane in a "star" pattern at the opening, allowing the flaps to fold back into the cavity. Secure these flaps with thin-set, ensuring the corners are fully reinforced. This step is vital because it protects the exposed edges of the backer board from moisture wicking. Once the recessed ceramic soap dish is ready for placement, apply a bead of waterproof sealant at the flange-to-tile transition. This provides a secondary defense against water intrusion, keeping the underlying substrate dry even if the grout lines eventually develop hairline cracks.
Mortar and Adhesive Selection
Modified thin-set is the professional choice for bonding ceramic fixtures to waterproofing membranes. It provides the necessary flexibility to handle minor structural shifts and the chemical bond required for non-porous surfaces. Avoid using standard mastic or construction adhesives, as these often fail in high-moisture environments or lack the strength to hold the weight of a ceramic unit.
The "back-buttering" technique is mandatory for this application. Apply a consistent layer of thin-set to the entire back surface of the dish before pressing it into the cavity. This ensures 100% coverage and eliminates air voids where moisture could collect. After installation, allow the mortar to cure for at least 24 hours before grouting the perimeter. For the highest level of installation security, source your professional-grade shower accessories from a supplier that understands system compatibility.
Aesthetic and Ergonomic Selection Guide
The final phase of integrating a recessed ceramic soap dish involves precise positioning and visual coordination. While technical installation ensures a leak-proof result, the ergonomic placement determines the daily utility of the shower. The industry standard for soap dish height is typically between 48 and 54 inches from the finished floor. This range accommodates the majority of standing users, keeping essentials within easy reach without requiring excessive bending or reaching. For a cohesive design, coordinate the placement and finish of the dish with other high-end components, such as a linear shower drain for tile, to maintain a professional architectural aesthetic.
Color selection plays a significant role in the room's final feel. You must decide whether the fixture should blend into the tile grid or serve as a focal point. Matching the dish color exactly to the tile creates a minimalist, "disappearing" effect that emphasizes the space's volume. Conversely, choosing a contrasting tone, like a black dish against white subway tile, can provide a sharp, modern accent. Regardless of the color choice, a final inspection is mandatory. Ensure the dish has a slight forward pitch to allow for natural drainage. If the unit sits perfectly level, water will pool in the tray, leading to soap scum buildup and potential grout erosion.
Optimizing Shower Ergonomics
Effective placement requires avoiding the "splash zone." Position the recessed ceramic soap dish on a wall where it won't receive direct, constant spray from the showerhead. This prevents the soap from melting prematurely and reduces the frequency of cleaning. Accessibility should also be a priority. In shared bathrooms or those designed for universal access, consider installing multiple dishes at varying heights. A lower dish, placed around 15 to 18 inches above the floor, is ideal for seated users or for use as a footrest during shaving. This multi-dish configuration adds significant functional value to the project.
Finishing Touches and Grouting
The perimeter of the dish requires a specific grouting approach to ensure longevity. If the joint between the ceramic flange and the tile is 1/8 inch or larger, use sanded grout for added strength. For tighter joints, unsanded grout provides a smoother finish that won't scratch the glaze. However, the professional secret to a failure-free joint is the use of color-matched silicone. Instead of grouting the entire perimeter, leave the final transition joint open and fill it with a high-quality 100% silicone sealant. This creates a flexible, leak-proof joint that can handle the slight expansion and contraction of the wall assembly without cracking. Regular cleaning with non-abrasive agents will keep the high-fire glaze bright and sanitary for decades.
Master Your Next Professional Shower Installation
Integrating a recessed ceramic soap dish into a modern wet room is a technical task that requires more than just aesthetic consideration. It's about structural integrity. By choosing high-density ceramic over plastic alternatives, you ensure superior mortar adhesion and long-term resistance to mold and chemical cleaners. Success depends on the precision of your rough-in and the seamless integration of your fixture with a high-performance substrate. These choices prevent the common failures of sagging or detachment that plague lower-grade installations.
A leak-proof result is only possible when you flash the dish flange directly to a professional membrane system. This step prevents moisture from bypassing the tile and compromising the wall cavity. When you prioritize these technical specifications and ergonomic standards, you deliver a storage solution that is both functional and permanent. It's the difference between a temporary accessory and a structural component that lasts for the life of the shower.
Ready to upgrade your project specifications? Browse Professional Ceramic Soap Dishes and Waterproofing Supplies at Pro Supply Center. We provide contractor-grade components designed for full PSC Pro Gen II compatibility and offer nationwide shipping on all professional shower hardware. Start your next build with the confidence that your materials are engineered for performance.
Frequently Asked Questions
Can I install a recessed ceramic soap dish in an existing tiled shower?
Yes, but it is a technically demanding process. You must cut a precise opening through the existing tile and substrate without damaging underlying plumbing or electrical lines. The primary challenge is restoring the waterproofing integrity at the penetration. If you cannot properly flash the new opening to the existing moisture barrier, the risk of water intrusion behind the wall increases significantly. Most professionals recommend this installation during a full renovation.
What is the standard size for a recessed soap dish?
The industry standard for a recessed ceramic soap dish is typically 5x5 inches. Other professional variations include 6x6 jumbo models for larger master baths and 4x6 rectangular designs. These sizes are engineered to integrate with standard tile grids. When planning your rough-in, you must account for the mounting flange, which typically extends about 1/2 inch beyond the back-box to cover the cut tile edges.
Do I need to waterproof behind the soap dish?
Waterproofing is mandatory for any recessed wall penetration. You must apply a membrane, such as the PSC Pro Gen II Waterproofing System, to all five interior faces of the wall cavity before setting the fixture. This ensures that any moisture bypassing the grout or sealant is contained within the waterproofed box. This practice prevents water from reaching the wooden studs and causing structural rot or mold growth behind the tile.
How do I cut the tile to fit a recessed dish?
Use a continuous rim diamond blade on an angle grinder for the cleanest results. Mark the dimensions of the fixture's back-box on the tile, making the cut roughly 1/4 inch larger than the box to allow for a proper mortar bed. For the best finish, use a ceramic tile leveling system on the surrounding tiles. This ensures the mounting surface is perfectly flat, preventing the dish from rocking or sitting unevenly.
Can a ceramic soap dish be used with the PSC Pro Gen II system?
Yes, these fixtures are fully compatible and often included in a complete PSC Waterproofing Shower Kit. The ceramic material provides an ideal bonding surface for the modified thin-set used to secure the unit to the PSC Pro Gen II membrane. This combination creates a unified, leak-proof barrier that is far more durable than plastic inserts or surface-mount accessories that rely only on topical adhesives.
What is the best adhesive for a recessed ceramic fixture?
A high-quality modified thin-set mortar is the professional standard for securing a recessed ceramic soap dish. Unlike mastic or standard construction adhesives, modified thin-set is engineered to withstand constant moisture and provides a superior bond between the ceramic and the waterproofing membrane. It ensures the fixture remains permanently fixed and can support the weight of heavy bottles without sagging or bond failure over time.
How do I prevent water from pooling in the soap dish?
Proper drainage is achieved through the installation pitch. When setting the dish in the mortar bed, ensure the unit is tilted slightly forward toward the shower floor. While many professional models feature built-in drainage ridges, the overall unit must still have a subtle slope. If the dish is installed perfectly level or tilted backward, water will collect in the tray, leading to soap scum buildup and grout erosion.
Are ceramic soap dishes better than stainless steel niches?
Ceramic offers better bond compatibility with thin-set and grout compared to stainless steel. Metal niches can be difficult to seal at the transition points and are prone to water spotting and mineral deposits. Ceramic fixtures provide a classic, seamless look that matches the texture and sheen of your wall tile. They are also chemically inert, meaning they won't react with bathroom cleaners or support mold growth in wet environments.


