

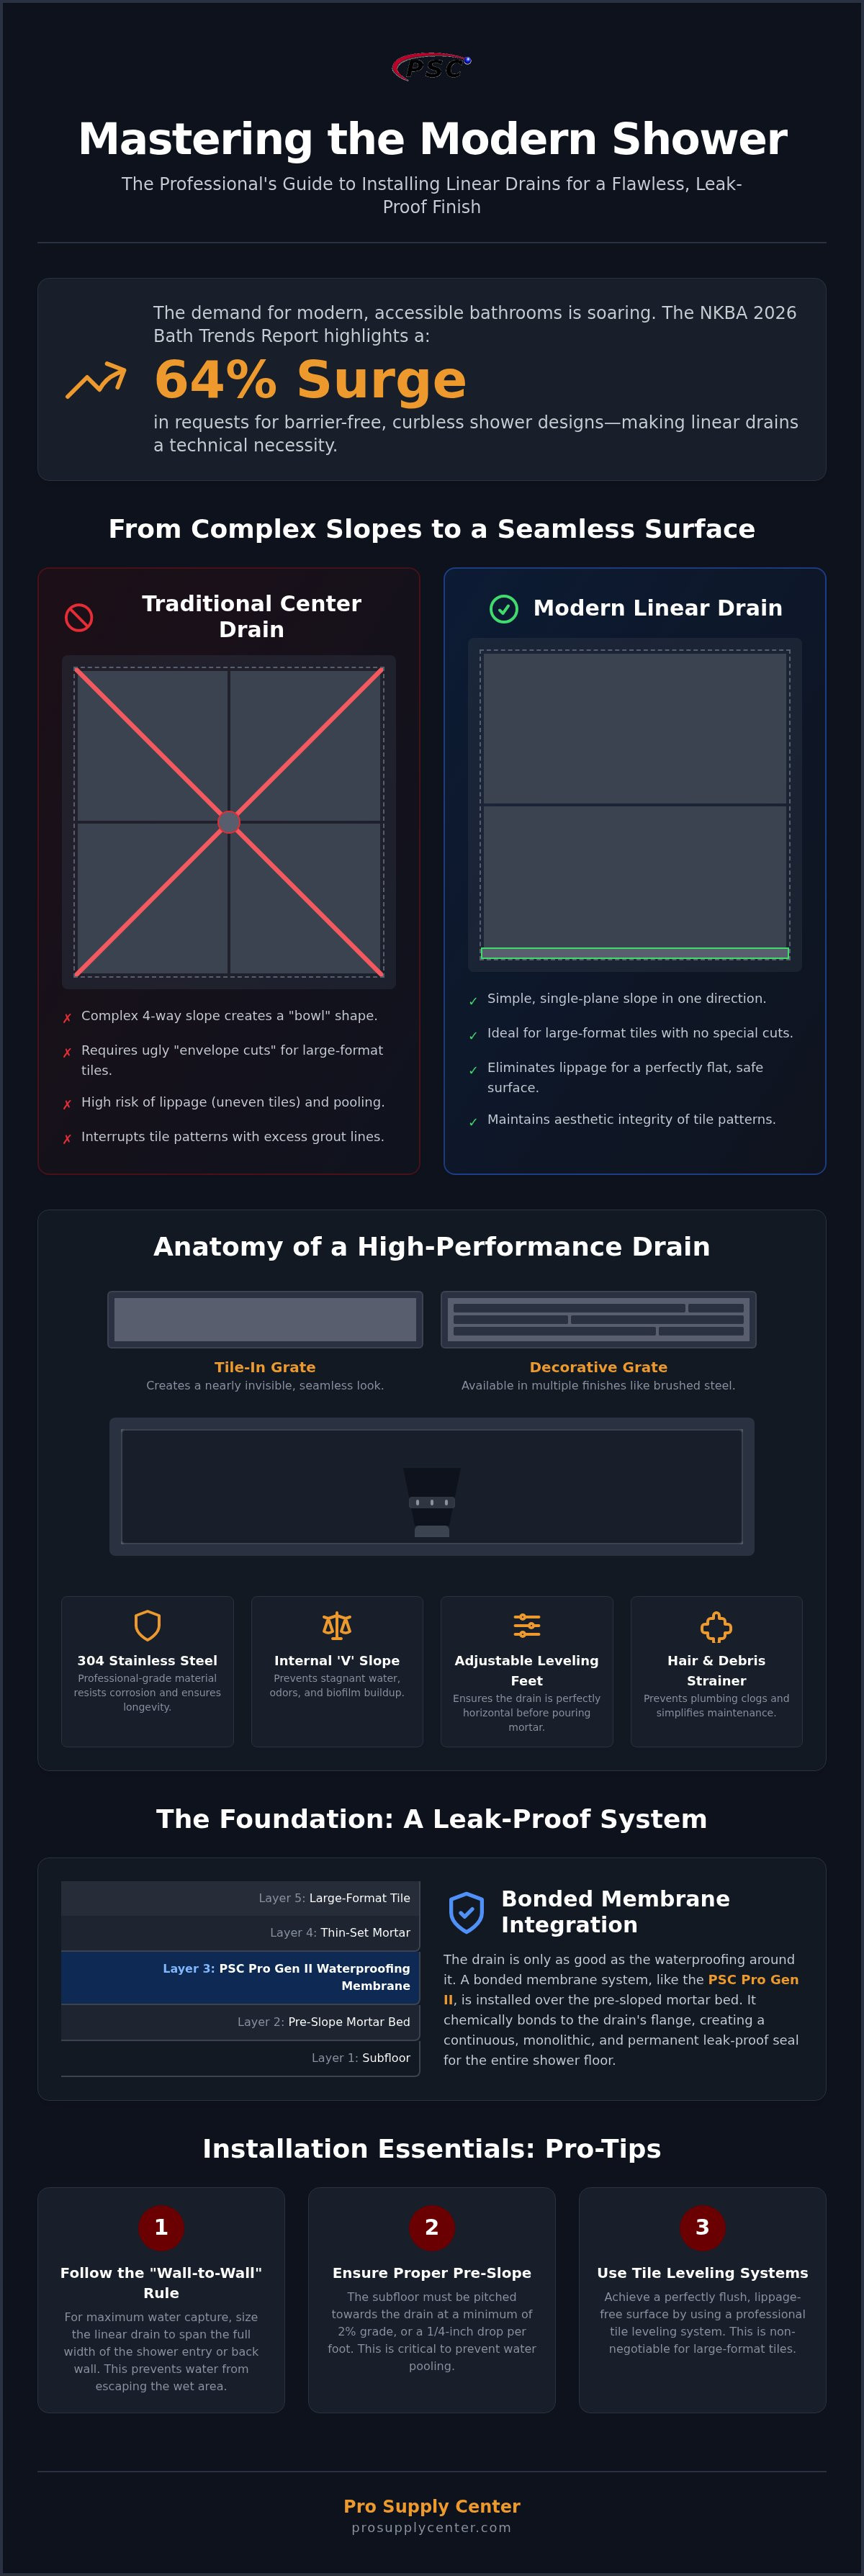
Attempting to install modern large-format tiles over a traditional four-way center drain is a guaranteed way to encounter lippage and drainage failure. While center drains require complex compound slopes, a linear shower drain for tile allows for a simplified single-plane pitch that handles water more efficiently. According to the NKBA 2026 Bath Trends Report, requests for barrier-free designs have surged to 64%, making these systems a technical necessity for the modern job site.
You likely understand that the aesthetic appeal of a curbless shower is only as good as the waterproofing beneath it. We'll help you master the transition from traditional methods to a professional-grade bonded system. This guide provides the technical steps to select, waterproof, and install a linear drain that ensures a flat, high-end finish without the risk of pooling or leaks.
We'll examine the critical role of the PSC Pro Gen II Waterproofing System in creating a moisture-tight environment. You'll also learn how to pair 304 stainless steel drains with tile leveling tools to achieve the precision your clients expect from a high-performance shower installation.
Key Takeaways
- Learn how a linear shower drain for tile simplifies floor sloping, allowing for the use of large-format tiles without the risk of lippage.
- Identify critical hardware features like internal V-sloping and adjustable feet that ensure efficient water flow and easy leveling during installation.
- Discover how to integrate bonded membranes like the PSC Pro Gen II system to create a permanent, leak-proof seal at the drain junction.
- Master the "wall-to-wall" sizing rule and the necessary pre-slope requirements to prevent water pooling and ensure a professional finish.
- Explore how to coordinate drain aesthetics with professional-grade accessories like integrated shower niches for a cohesive, spa-like bathroom design.
What is a Linear Shower Drain for Tile and Why Use One?
A linear shower drain for tile is a narrow, elongated trough that collects water along a single channel rather than a single point. This shift from traditional center drains represents a significant change in how modern showers are engineered. By moving the drainage point to the wall or the entrance, installers can replace the difficult four-way "bowl" slope with a simple one-way "plane" slope. This evolved form of linear drain technology allows for seamless floor transitions. It's the current industry standard for curbless and walk-in showers because it eliminates the physical barrier of a curb while maintaining superior water management.
Single-Plane Sloping vs. Traditional Center Drains
Traditional center drains require the floor to slope from all four corners toward the middle. When you're using large-format tiles, this geometry forces you to make diagonal "envelope" cuts across the tile to follow the pitch. These cuts are often unsightly and create multiple grout lines that interrupt the tile's natural pattern. A linear shower drain for tile solves this problem by requiring only a single slope in one direction. This configuration offers several technical advantages:
- Reduced Installation Time: You don't have to spend hours calculating and cutting complex compound angles.
- Elimination of Lippage: Large tiles are prone to vertical misalignment on four-way slopes. A single-plane slope keeps the surface flat.
- Aesthetic Integrity: You can run high-end porcelain or stone patterns right up to the drain without breaking the visual flow.
Installers often find that pairing this drainage style with a professional ceramic tile leveling system ensures the floor remains perfectly flush, which is critical for both safety and drainage efficiency.
Tile-In Grates vs. Decorative Metal Grates
Choosing the right grate is a balance between visual preference and material durability. Tile-in grates, often called "hidden" drains, are designed to accept a piece of the actual floor tile. This makes the drain nearly invisible, leaving only a small perimeter gap for water to enter. This is the preferred choice for minimalist designs where the focus is on the tile surface itself.
Alternatively, decorative metal grates provide a more structured look. Professional-grade options are typically available in brushed stainless steel, matte black, or gold finishes. Regardless of the style, 304-grade stainless steel is the professional minimum for any trough or grate. This material resists corrosion from harsh household cleaners and withstands the constant moisture of a shower. Many pros match these finishes with integrated shower niches to create a cohesive hardware theme that enhances the overall build quality.
Technical Anatomy of a High-Performance Linear Drain
A professional installation relies on the internal physics of the drain as much as the external tiling. A high-performance linear shower drain for tile features an internal "V" slope. This design ensures that water doesn't sit stagnant in the trough, which prevents the buildup of odors and biofilm. Without this internal pitch, the trough depends entirely on the volume of water to push debris toward the outlet, often resulting in poor hygiene and slow drainage. This is especially important in high-use environments where debris buildup can quickly compromise the system.
Adjustable leveling feet are another critical component for a successful build. These allow the installer to ensure the trough is perfectly horizontal before the mortar bed is poured. If the drain isn't level at the start, the finished tile surface will inevitably show gaps or unevenness. For a truly professional finish, you can browse our selection of shower drains to find models that include these precision-leveling features. These components work alongside the plumbing to ensure the system functions as intended from day one.
Accessibility for maintenance is a non-negotiable requirement. Professional-grade drains include integrated hair strainers and debris baskets made from 304 stainless steel. These catch hair and small objects before they enter the waste line, preventing clogs deep within the plumbing. Most kits also offer different outlet configurations. Vertical waste lines are standard for new construction, while horizontal side outlets are often preferred for renovations where floor depth is limited.
The Trough and Grate Construction
The durability of the unit depends on the gauge of the steel used. While residential-grade alternatives often use thin, stamped metal, professional units utilize heavy-duty 304-grade stainless steel. This material withstands the weight of the mortar and tile without warping. The flange serves as the critical bond point for waterproofing, providing the flat surface area needed to create a secure, permanent seal with the membrane. Most high-end systems also feature removable grates. These come with a lifting key that makes weekly maintenance simple, allowing you to clear the hair strainer without prying at the tile edge.
Certifications and Standards (cUPC)
Plumbing code compliance is mandatory for any legal renovation or new build. In North America, the cUPC certification serves as the primary standard for safety and reliability. cUPC certification indicates that a plumbing product meets the requirements of the Uniform Plumbing Code as verified by IAPMO. You must also ensure the drain's flow rate matches your shower head output. Most linear drains handle between 8 and 10 gallons per minute (GPM). If you're installing multiple high-flow shower heads, verify that the drain outlet can manage the total GPM to prevent flooding and water backup.
Waterproofing Integration: Bonded Membranes and the PSC Pro Gen II
The junction between the drain and the shower floor is the most common point of failure in wet room construction. Traditional clamping ring drains rely on a sub-pan and weep holes to manage water that penetrates the mortar bed. This method is often slow to dry and prone to clogs. In contrast, a linear shower drain for tile designed for bonded waterproofing stops moisture at the surface. By using a waterproofing shower kit, you ensure that every component, from the drain flange to the wall seals, is engineered to work together. This eliminates the chemical incompatibility risks that occur when mixing different brands or systems on a single job site.
The PSC Pro Gen II Waterproofing System provides a seamless barrier by bonding directly to the integrated flange of the drain. This creates a unified surface where water is immediately directed into the trough without ever reaching the substrate. Because the membrane is load-bearing and bonded, it provides the structural integrity needed to support large-format tiles without the risk of the waterproofing layer shifting or delaminating over time.
Creating a Leak-Proof Bond
Achieving a permanent seal requires a specific "sandwich" method. First, you apply a layer of modified thin-set to the drain flange. The waterproofing membrane is then embedded into the mortar, followed by another layer of thin-set to secure the tile. This process ensures the membrane is fully encapsulated and bonded to the metal or plastic flange. Pay close attention to corner transitions. Where the linear drain meets the wall, use pre-formed internal corners to prevent the membrane from stretching or tearing, which can occur with manual folding. A precise bond at these vertical-to-horizontal transitions is what separates a professional build from a DIY failure.
Linear Drains in Curbless (Barrier-Free) Designs
In curbless installations, the placement of the linear shower drain for tile is a strategic decision. Positioning the drain against the back wall allows for a continuous slope across the entire room. If you place it at the entrance, you must be more aggressive with the pitch to ensure water doesn't escape into the dry zone. The PSC Pro Gen II system is particularly effective here because it allows the waterproofing to extend past the shower area and onto the main bathroom floor. This prevents "wicking," where moisture travels through the grout or mortar bed into adjacent rooms. Ensuring the waterproofing is continuous across the threshold is the only way to guarantee a leak-proof curbless environment.
How to Install a Linear Shower Drain for Tile: Step-by-Step
Success starts with the rough-in plumbing and precise trough positioning. You must align the waste line so the trough sits exactly where the finished tile will end, whether that's flush against a wall or at the shower entrance. A linear shower drain for tile requires a stable, level subfloor to support the weight of the mortar and the drainage unit itself. Once the plumbing is connected, secure the trough using the adjustable feet to ensure it remains perfectly horizontal before any substrate is applied.
Setting the Substrate and Pre-Slope
Establishing the pitch is the most critical phase of the installation. You can use a traditional mortar bed or a waterproof shower base kit to create the necessary 1/4 inch per foot slope toward the drain. Unlike center drains, this slope is a single, flat plane. You must verify that there are no high spots or depressions that could cause water to pool. Always use a 4-foot level to verify that the slope is consistent and flat across the entire shower floor. If the substrate isn't perfectly flat, the large-format tiles will not sit correctly, leading to drainage issues and lippage.
Tiling and Leveling Around the Drain
Precision is mandatory when you begin the tiling process. Using a ceramic tile leveling system is critical near the drain trough to keep every tile edge flush. This prevents "toe-kick" hazards and ensures water moves across the tile-to-drain transition without obstruction. When setting your tile, ensure the finished surface sits approximately 1/16 of an inch higher than the drain frame. This small offset accounts for the natural settlement of the thin-set and ensures the drain never becomes the highest point in the shower.
Managing the expansion joint is the final technical hurdle. Do not fill the gap between the tile edge and the stainless steel trough with standard grout. Instead, use a high-quality 100% silicone sealant that matches your grout color. This allows for the different expansion rates of metal and ceramic, preventing cracks and maintain a flexible, water-tight seal. Once the sealant has cured, insert the hair strainer and the decorative grate to complete the assembly. For professional-grade results on your next project, shop professional shower drains and waterproofing accessories designed for long-term reliability.
- Step 1: Rough-in the waste line and secure the trough using adjustable leveling feet.
- Step 2: Pour the mortar bed to create a consistent 1/4" per foot pre-slope.
- Step 3: Bond the waterproofing membrane to the drain flange using the sandwich method.
- Step 4: Set the tile using a leveling system to maintain a flat plane.
- Step 5: Apply silicone to the expansion joint and install the final grate.
Selection Guide: Sizing, Maintenance, and Pro Supply Solutions
Selecting the right linear shower drain for tile requires balancing hydraulic capacity with the physical dimensions of the shower footprint. While the visual goal is often a seamless wall-to-wall look, the selection process must account for the thickness of the wall tile and the waterproofing membrane. Choosing contractor-grade hardware ensures that the drain doesn't just look professional on day one but continues to perform under the daily stress of high water volume and cleaning chemicals.
Sizing Your Drain Correctly
The industry standard for sizing is the "2-inch gap" rule. To achieve a near-custom fit, the drain trough should generally be 2 inches shorter than the total width of the shower wall. For example, in a 38-inch wide shower stall, a 36-inch drain is the ideal choice. This provides roughly one inch of clearance on either side, which is necessary to accommodate the vertical waterproofing layers and the thickness of the wall tile. Standard lengths typically include 24, 32, 36, and 48-inch options, though custom lengths are available for specialized luxury builds.
You must also consider the flow rate of your fixture. A standard linear shower drain for tile typically manages between 8 and 10 gallons per minute (GPM). If you're installing a high-output rain shower or a system with multiple body jets, verify that the drain's outlet diameter and trough depth can handle the combined GPM. In some cases, installing a larger outlet or a deeper trough is necessary to prevent water from overtopping the grate during heavy use.
Long-Term Maintenance and Care
Maintaining the finish of 304-grade stainless steel is straightforward but requires the right products. You should avoid using bleach or abrasive scouring pads, as these can strip the protective chromium layer and lead to surface tea-staining. Instead, use pH-neutral cleaners and a soft cloth to maintain the luster of the metal. To coordinate the look of your hardware, many professionals match the drain finish with integrated shower niches, creating a unified aesthetic across the wet zone.
- The Lifting Key: Always use the lifting tool provided in the kit to remove the grate. Prying with a screwdriver can scratch the finish or chip the surrounding tile.
- Monthly Strainer Check: Clearing the hair strainer is a five-minute task that should be performed monthly. This prevents debris from entering the waste line and ensures water flows freely into the "V" sloped trough.
- Silicone Inspection: Periodically check the silicone expansion joint between the tile and the drain frame. If the seal shows signs of peeling, remove it and re-apply a fresh bead of 100% silicone.
Pro Supply Center remains a preferred source for trade professionals because our systems are designed for real-world job site conditions. By providing complete kits that include integrated hair strainers and heavy-duty 304 stainless steel troughs, we help contractors avoid the common pitfalls of piecing together inferior components. Our focus is on the long-term integrity of the build, ensuring that your installation remains leak-proof and visually striking for years to come.
Mastering Your Next High-Performance Shower Build
Transitioning to a linear shower drain for tile is the most effective way to achieve a professional, curbless look while simplifying the floor pitch. By moving from a complex four-way slope to a single-plane design, you eliminate the need for unsightly diagonal cuts in your large-format tiles. It's a technical upgrade that improves both the speed of your installation and the final aesthetic result.
The integrity of your build depends on a unified system. Pairing contractor-grade 304 stainless steel hardware with the PSC Pro Gen II Waterproofing System ensures a leak-proof foundation that stands up to heavy daily use. We offer national shipping on all professional tiling supplies to keep your job site running smoothly. You've now got the technical framework to deliver a superior finish that combines modern design with functional reliability.
Shop Professional Linear Shower Drains and Waterproofing Kits at Pro Supply Center to secure the high-performance materials your next project requires. Start your build with confidence today.
Frequently Asked Questions
Do linear shower drains require a special p-trap?
Linear shower drains don't require a specialized p-trap and typically connect to a standard 2-inch waste line. Most professional-grade units are designed to fit the same plumbing infrastructure as a traditional center drain. You must ensure the p-trap is positioned correctly beneath the trough's outlet location, which may differ from your original center-drain layout. Always verify that your local plumbing code allows for the specific outlet size provided with your chosen drain kit.
Can I install a linear drain in an existing shower floor?
You can install a linear drain in an existing floor, but it involves a full teardown of the shower pan. The existing center waste line usually needs to be relocated to the wall or entrance to accommodate the trough. This process requires removing all tile and the mortar bed to establish a new single-plane slope. It's often more efficient to perform this upgrade during a complete bathroom remodel rather than as a standalone repair.
Where is the best place to put a linear drain in a shower?
The most common and technically efficient placement for a linear shower drain for tile is against the back or side wall of the shower. This allows you to pitch the entire floor in one direction toward the wall, creating a seamless look with a one-way slope. Another popular option is placing the drain at the shower entrance for curbless designs. Entrance placement requires a very precise pitch to ensure water doesn't escape into the main bathroom area.
Is a linear drain harder to clean than a square drain?
A linear shower drain for tile is actually easier to maintain than many traditional square drains. Most professional units include a removable grate and a 304 stainless steel hair strainer that catches debris before it enters the plumbing. You simply use a lifting key to remove the grate and clear the basket once a month. This accessibility prevents deep clogs and keeps the internal V-sloped trough free of biofilm and stagnant water.
Do I need a waterproofing kit to install a linear drain?
Using a dedicated waterproofing kit is the safest way to ensure a leak-proof installation. Systems like the PSC Pro Gen II are specifically designed to bond with the integrated flange of the drain trough. This creates a continuous, moisture-tight barrier from the floor to the walls. Piecing together components from different manufacturers increases the risk of chemical incompatibility and eventual bond failure at the critical drain-to-floor junction where most leaks originate.
Can I use large format tiles with a linear drain?
Yes, large-format tiles are the primary reason many professionals choose this drainage style. Because the floor only slopes in one direction, you don't have to make diagonal envelope cuts to follow a four-way pitch. This allows you to maintain the visual integrity of the tile pattern across the entire shower floor. It's important to use a tile leveling system during this process to prevent lippage between these larger, heavier porcelain or stone tiles.
How much slope is needed for a linear shower drain?
Most building codes mandate a minimum floor slope of 1/4 inch per foot toward the drain. This consistent pitch ensures that water moves efficiently across the single-plane surface and into the trough without pooling. For longer showers, you must calculate the total height difference from the furthest point to the drain to ensure your substrate is thick enough to accommodate the required slope while remaining flush with the adjacent bathroom floor height.


