

What if the most expensive mistake in your bathroom renovation isn't the tile choice, but a single drill hole placed three inches too low? It's a common anxiety for anyone tackling a high-end installation. You've invested in a quality build, yet the fear of piercing a waterproofed wall and causing a hidden leak often leads to safe but awkward layouts. You're right to be cautious. Inconsistent information about mounting heights frequently results in a cluttered shower where the soap dish is out of reach or the niche sits right where you'd naturally lean.
This shower accessory placement guide provides the exact industry standards and ergonomic heights required to create a functional, professional-grade space. You'll learn how to optimize your layout for daily use while maintaining the absolute integrity of your moisture barrier. We will examine verified heights for controls, rainfall heads, and grab bars. We also explain why planning your ceramic niches and soap dishes during the initial installation phase of the PSC Pro Gen II Waterproofing System is the only way to ensure a leak-proof, seamless finish that stands up to professional scrutiny.
Key Takeaways
- Learn why integrated shower niches should be installed between 38 and 48 inches from the floor to balance accessibility with structural drainage.
- Use this shower accessory placement guide to establish ergonomic mounting heights for towel bars and hooks that prevent reaching or slipping.
- Understand the technical risks of drilling into waterproofed walls and how to properly seal unavoidable penetrations with professional-grade sealant.
- Discover why planning the location of ceramic soap dishes and niches before applying the PSC Pro Gen II membrane is essential for maintaining waterproofing integrity.
- Identify the ideal locations for shower controls and grab bars to meet industry standards and ensure a safe, functional environment for all users.
Ergonomics and Waterproofing: The Foundations of Accessory Placement
Shower ergonomics is the science of arranging fixtures and storage to facilitate natural movement while prioritizing user safety. While many homeowners focus on aesthetics, a professional shower accessory placement guide must prioritize the technical relationship between hardware and the underlying waterproofing substrate. Adhering to general bathroom design principles ensures that every movement, from reaching for a razor to adjusting the water temperature, feels intuitive rather than hazardous. Poorly placed items don't just cause discomfort; they create slip hazards and awkward reach points that compromise the functionality of the entire space.
Planning these locations during the framing stage is a technical necessity rather than a design choice. If you decide to add a heavy ceramic niche or a weighted grab bar after the PSC Pro Gen II Waterproofing System is applied, you risk compromising the moisture barrier. Structural failure often occurs when accessories are mounted solely to tile or thin backer board without sufficient blocking. Proper planning ensures the weight is distributed directly into the studs, which preserves the long-term integrity of your grout and tile. Without this foresight, constant pressure on surface-mounted items can lead to hairline cracks in grout lines. These cracks allow moisture to seep behind the tile and eventually reach the subfloor, leading to costly structural rot.
The Concept of the 'Splash Zone'
Identifying high-moisture zones helps prevent premature wear on both your accessories and your tile joints. Accessories should ideally be positioned to avoid direct, constant water spray from the shower head. For instance, a ceramic soap dish placed directly in the stream will lead to "soap melt" and constant water collection. This eventually degrades the surrounding grout through persistent saturation and chemical breakdown from soap scum. Strategic placement involves locating storage niches on walls adjacent to the plumbing wall. This keeps them accessible while ensuring they remain sheltered from the primary water force, significantly reducing the risk of standing water within the niche cavity.
Structural Support and Stud Alignment
Heavy accessories require solid blocking behind the waterproofing layer to ensure they remain secure under pressure. It's essential to use a stud finder and mark your layout before the waterproofing membrane is installed. This allows you to install horizontal wood blocking between studs where niches or heavy dishes will sit. Balancing aesthetic symmetry with structural necessity is a hallmark of a professional build. You don't want to find yourself choosing between a perfectly centered niche and one that actually stays attached to the wall. Installing blocking early provides the freedom to place accessories exactly where ergonomics dictate without sacrificing the stability of the installation.
Strategic Placement for Integrated Components: Niches and Soap Dishes
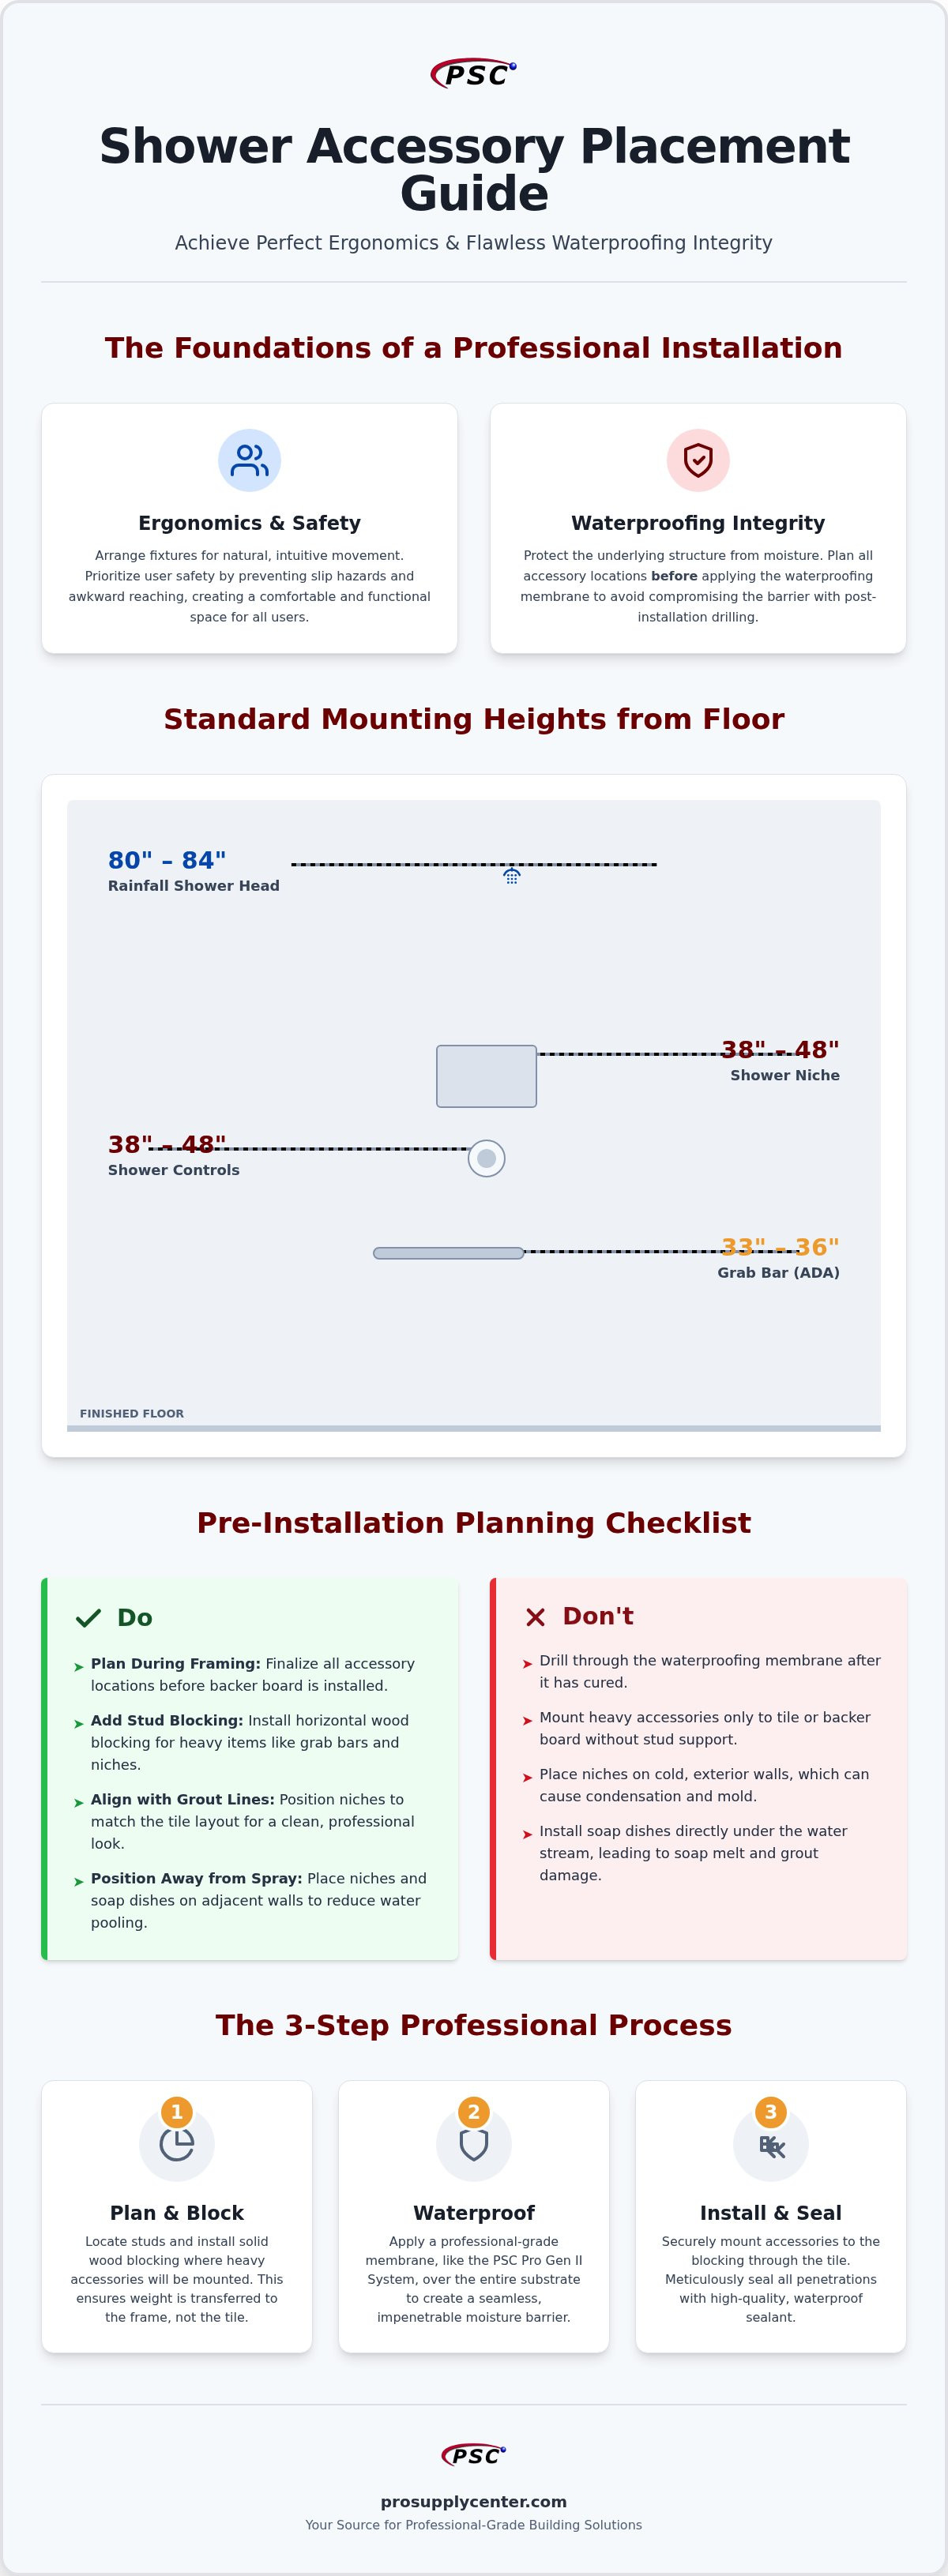
Integrated components provide a cleaner aesthetic and superior durability compared to retrofitted racks. For a professional result, the standard height for a shower niche is between 38 and 48 inches from the finished floor. This range positions products within easy reach for most adults without requiring excessive bending. To achieve a high-end look, you must align the niche edges with your tile grout lines. This requires calculating tile dimensions and layout before the first piece of backer board is cut. When the niche sits perfectly within the tile grid, it eliminates awkward "sliver" cuts that signal an amateur installation.
Wall choice is just as critical as height. Professionals generally advise against placing niches on exterior walls in cold climates. Removing insulation to fit a recessed component creates a thermal bridge, which can lead to condensation and mold growth behind the tile. In these scenarios, use the interior plumbing wall or a partition wall instead. Following this shower accessory placement guide and consulting ADA shower requirements ensures your layout remains accessible and safe for all users, regardless of their physical needs.
Sizing and Locating Your Shower Niche
When sizing your niche, measure your tallest shampoo bottle and add two inches of clearance. A common mistake is building a niche that's too short for liter bottles or pump-top containers. For shared bathrooms, consider installing multiple smaller niches or one vertical "stacked" niche to keep individual products organized. Placing the niche on the wall opposite the shower head keeps contents dryer and reduces soap residue buildup. This simple planning step extends the life of your products and keeps the shower looking tidy.
Recessed Soap Dishes vs. Surface Mounts
A recessed ceramic soap dish offers a more secure, leak-proof solution than a surface-mounted tray that relies on suction or adhesive. These components should be installed at a height of 36 to 48 inches. In smaller stalls, a corner-mounted dish maximizes elbow room and prevents accidental bumps. Regardless of location, the dish must be installed with a slight downward pitch toward the shower floor. A 1/4 inch per foot slope ensures water drains out of the dish rather than pooling. For a truly professional finish, choosing ceramic niches and soap dishes that complement your tile provides a seamless look that surface mounts can't replicate.
Standard Mounting Heights for Shower and Bathroom Hardware
Professional height standards are not mere suggestions; they are benchmarks for efficiency, safety, and comfort. While previous sections focused on integrated storage, surface-mounted hardware requires equal precision to ensure long-term utility. Adhering to a standardized shower accessory placement guide prevents the need for re-drilling, which is a critical mistake once your tile and waterproofing are finalized. For towel bars, 48 inches from the floor is the industry standard. This height provides enough clearance for full-sized bath towels to hang freely without touching the floor or baseboards. If you prefer towel hooks, mount them between 60 and 70 inches. This higher placement ensures that even oversized bath sheets remain elevated and dry.
Ergonomics extend beyond the shower stall to the rest of the bathroom. Toilet paper holders should be installed approximately 26 inches above the floor. For the most natural reach, position the center of the holder 8 to 12 inches forward from the front edge of the toilet bowl. For walk-in showers that include seating, shower benches should be mounted or built at a height of 17 to 19 inches. This range mirrors the height of a standard chair, making it easier for users to sit and stand without straining their joints. Precision here is vital for both comfort and the professional appearance of the finished room.
ADA and Universal Design Standards
Universal design prioritizes accessibility for everyone, regardless of age or physical ability. According to current standards, horizontal grab bars must be installed between 33 and 36 inches from the shower floor. This height provides the most stable leverage for users. Don't overlook the importance of vertical grab bars at entry and exit points. A vertical bar should be positioned near the shower door or opening to provide a secure handhold while stepping over a curb or onto a wet surface. These placements are essential for maintaining safety in high-moisture environments.
Customizing for Children and Tall Users
Standard heights should be adjusted when the primary users fall outside average height ranges. In a dedicated children's bathroom, lowering towel bars to 36 inches encourages independence and keeps towels off the floor. Conversely, if a user is over 6 feet tall, the shower head should be raised to at least 80 or 84 inches to provide adequate clearance. Use the "reach test" before final installation: have the user stand in the space and mimic their natural movements. This physical verification ensures that niches, bars, and controls are perfectly tailored to their specific reach, preventing the need for awkward stretching or bending during daily use.
Installation Integrity: Securing Accessories Without Compromising Waterproofing
Every hole you drill into a finished shower wall is a potential leak path. While this shower accessory placement guide provides the necessary layout standards, the technical execution of the installation determines the life of the wall. Puncturing a waterproofing membrane is a high-risk move required for surface-mounted bars and hooks. It requires surgical precision. Using a waterproofing shower kit for integrated storage is the best way to avoid drilling after the tile is set. If you must drill through porcelain or ceramic, always use a diamond-tipped core bit. Never use a hammer-drill setting. The impact can crack the tile or break the bond between the tile and the substrate.
Sealing Penetrations in the PSC Pro Gen II System
Maintaining the continuous barrier of the PSC Pro Gen II Waterproofing System is your first priority. To seal a penetration, inject a professional-grade, 100% silicone sealant into the pilot hole before you drive the anchor. Coat the anchor's body in sealant as well. This creates a waterproof gasket that stops moisture from traveling down the screw threads into the wall cavity. Keep an eye out for "blooming" grout or dark patches near your accessories. These are clear indicators that the waterproofing has been compromised and moisture is trapped behind the tile.
Surface-Mounted vs. Integrated Installation
Integrated niches are superior because they are flashed directly into the waterproofing membrane during the framing phase. They don't rely on mechanical fasteners that pierce the barrier. For items that must be surface-mounted, always aim for a stud. If a stud isn't available, use specialized anchors designed for tile and backer board. To achieve a professional, flush finish, use a Ceramic Tiles Leveling System during your tile layout. This prevents lippage around the niche or soap dish. If you want to ensure your next build is completely leak-proof, explore our PSC Waterproofing Shower Kits for a professional-grade foundation.
Professional Solutions: Integrated Systems for a Seamless Finish
Professional contractors prefer integrated shower components because they eliminate the vulnerabilities inherent in surface-mounted hardware. When you use ceramic niches and soap dishes designed to sit within the tile field, you create a monolithic structure that is far less likely to fail over time. This system-based approach reduces installation time by removing the need for post-tile drilling and the associated risks of membrane puncture. A cohesive shower accessory placement guide emphasizes that matching your storage solutions to your tile layout produces a high-end, intentional aesthetic that surface racks simply can't achieve.
Beyond aesthetics, a complete system ensures functional reliability. Using a Ceramic Tiles Leveling System during the installation of integrated components is essential to prevent lippage. Lippage occurs when the edge of a tile or niche sits higher than the adjacent surface, creating a "lip" that catches water and soap scum. By using leveling clips, you ensure that every transition between the wall tile and the niche border is perfectly flush. This methodical approach minimizes user error and guarantees that the accessories function exactly as intended without creating cleaning or safety issues.
The Role of the Tiling System in Accessory Placement
Precision in placement requires the right tools to execute the design. Utilizing a Ceramic Tiles Leveling System allows you to align niche borders perfectly with the surrounding grid. This level of detail is what separates a professional build from a standard renovation. Also, ensuring your shower drains are centered relative to your niches and controls provides a sense of visual balance and efficient water management. For the final finish, professional-grade abrasives are necessary to smooth any cut edges on the tile surrounding the niche. This attention to detail prevents sharp edges and ensures the transition between materials is seamless and safe for the user.
Final Inspection Checklist for Accessory Placement
Before the thin-set fully cures, a final inspection is mandatory to confirm the integrity of the build. Use this checklist to verify the success of your installation:
- Test the 'Flow': Pour water onto soap dishes and into niches to verify they have a sufficient pitch to drain properly toward the floor.
- Seal Verification: Double-check that all mechanical fasteners or penetrations are 100% sealed with professional-grade silicone.
- Ergonomic Confirmation: Perform a final reach test to ensure the placement matches the end-user's physical needs as outlined in this shower accessory placement guide.
- Alignment Check: Use a level to confirm that all bars, niches, and hooks are perfectly horizontal or vertical.
Following these final steps ensures that your shower is not only beautiful but also structurally sound and comfortable for daily use. A successful project depends on the harmony between professional-grade materials and precise, technical execution.
Mastering Your Shower Installation Layout
Achieving a high-end bathroom requires more than just aesthetic tile choices; it demands a technical approach to layout and structural integrity. By following this shower accessory placement guide, you ensure that every niche, soap dish, and grab bar serves its purpose without compromising your moisture barrier. The transition from a cluttered, poorly planned space to a professional-grade sanctuary depends on precise planning during the framing and waterproofing phases. Integrating your accessories directly into the wall substrate eliminates the risks associated with post-installation drilling.
Success on the job site comes down to using materials that perform under pressure. Utilizing contractor-grade waterproofing systems and seamless integrated ceramic components provides the foundation for a leak-proof build that lasts for decades. Build a professional-grade shower with the PSC Pro Gen II Waterproofing System today. We provide national shipping on all professional tiling supplies to ensure you have the right equipment for a successful installation. It's possible to create a space that balances ergonomics with long-term durability. With these standards and the right supplies in hand, you can complete your project with total confidence in both its form and its function.
Frequently Asked Questions
What is the standard height for a shower niche?
The standard height for a shower niche is between 38 and 48 inches from the finished floor. This range ensures that shampoo bottles and soaps are accessible to most adults without requiring excessive bending or reaching. When planning your layout, it's essential to align the niche with the tile grid to avoid awkward cuts. This placement should be finalized before installing the PSC Pro Gen II Waterproofing System to maintain a continuous, leak-proof barrier.
Where should a shower grab bar be placed for safety?
Horizontal grab bars should be installed between 33 and 36 inches above the shower floor to provide optimal leverage and stability. For entry and exit points, vertical grab bars are recommended to assist with balance when stepping over a curb. It's critical to mount these bars into structural blocking or studs rather than just the tile surface. This ensures the bar can support the user's full weight during a slip or fall.
How do I install a towel bar without ruining my waterproofing?
To install a towel bar without compromising your waterproofing, you must seal every penetration with 100% silicone sealant. Inject the sealant directly into the pilot hole and coat the anchor before driving it into the wall. This creates a waterproof gasket that prevents moisture from traveling behind the tile. For the best long-term results, this shower accessory placement guide recommends using integrated niches that don't require drilling through the moisture barrier.
Can I add a shower niche after the tile is already installed?
Adding a shower niche after the tile is installed is technically possible but highly discouraged because it compromises the waterproofing membrane. Cutting into a finished wall destroys the continuous barrier provided by systems like the PSC Pro Gen II. This creates a high risk of hidden leaks and structural rot. It's far better to plan your storage needs during the framing stage and use integrated ceramic niches that flash directly into the waterproofing layer.
What is the best height for a recessed soap dish?
The optimal height for a recessed soap dish is between 36 and 48 inches from the finished floor. This range keeps the soap within easy reach for both standing and seated users. If you have a small shower stall, consider a corner-mounted configuration to maximize elbow room. Ensure the dish is installed with a slight downward pitch to prevent water from pooling, which can lead to soap melt and grout degradation.
How far should the toilet paper holder be from the toilet?
A toilet paper holder should be mounted approximately 26 inches above the floor and 8 to 12 inches forward from the front of the toilet bowl. This distance aligns with natural human reach and prevents the need for uncomfortable twisting. Standardizing these measurements across your bathroom ensures a professional look and feel. Always verify the location with the primary user to account for specific accessibility needs or limited mobility.
Should shower accessories be centered on the wall or the tile pattern?
Shower accessories should always be centered on the tile pattern rather than the wall itself to avoid sliver cuts and maintain visual symmetry. A professional shower accessory placement guide prioritizes the tile grid because it defines the visual lines of the room. Using a Ceramic Tiles Leveling System helps ensure that integrated niches and dishes sit flush within the pattern, creating a seamless, high-end finish that looks intentional and structurally sound.
How do I prevent water from pooling in my shower niche?
To prevent water from pooling in a shower niche, you must install the bottom shelf with a slight downward slope of 1/4 inch per foot toward the shower floor. This ensures that gravity pulls moisture out of the cavity and toward the drain. Without this pitch, standing water can saturate the grout and eventually compromise the waterproofing substrate. Using integrated ceramic niches simplifies this process as they are often pre-formed for efficient drainage.


