

The integrity of a commercial flooring project is often decided at the wall base, where the choice between individual sections and a continuous roll determines the long-term success of the installation. Choosing a 4 inch cove base roll is not just an aesthetic preference; it is a strategic decision to eliminate the structural and hygienic failures inherent in seamed transitions. In high-traffic environments, every seam is a potential point of failure where moisture can penetrate or adhesive can give way, leading to costly repairs and project delays.
You understand that a professional finish requires more than just a clean line. It demands a bond that withstands constant cleaning and heavy foot traffic without peeling or warping. This guide provides the technical roadmap to mastering these installations, ensuring you select the right material for your specific floor type and estimate your needs with precision. We will cover the critical differences between vinyl and rubber options, the logistics of site preparation, and the exact adhesive applications required for a permanent, professional-grade result that maintains its bond for years to come.
Key Takeaways
- Understand why a 4 inch cove base roll is the preferred standard for high-hygiene environments like healthcare and commercial kitchens by eliminating vulnerable seams.
- Identify the critical performance differences between cost-effective vinyl and premium vulcanized rubber to select the right material for your specific floor type.
- Master accurate material estimation by measuring every wall surface and incorporating a 5-10% waste factor to avoid mid-project delays.
- Learn professional installation standards, including specific adhesive selection and surface preparation, to ensure a permanent, failure-proof bond.
- Implement long-term maintenance protocols that prevent trim discoloration and protect the aesthetic integrity of your wall-to-floor transitions.
What is a 4 Inch Cove Base Roll and Why Does Format Matter?
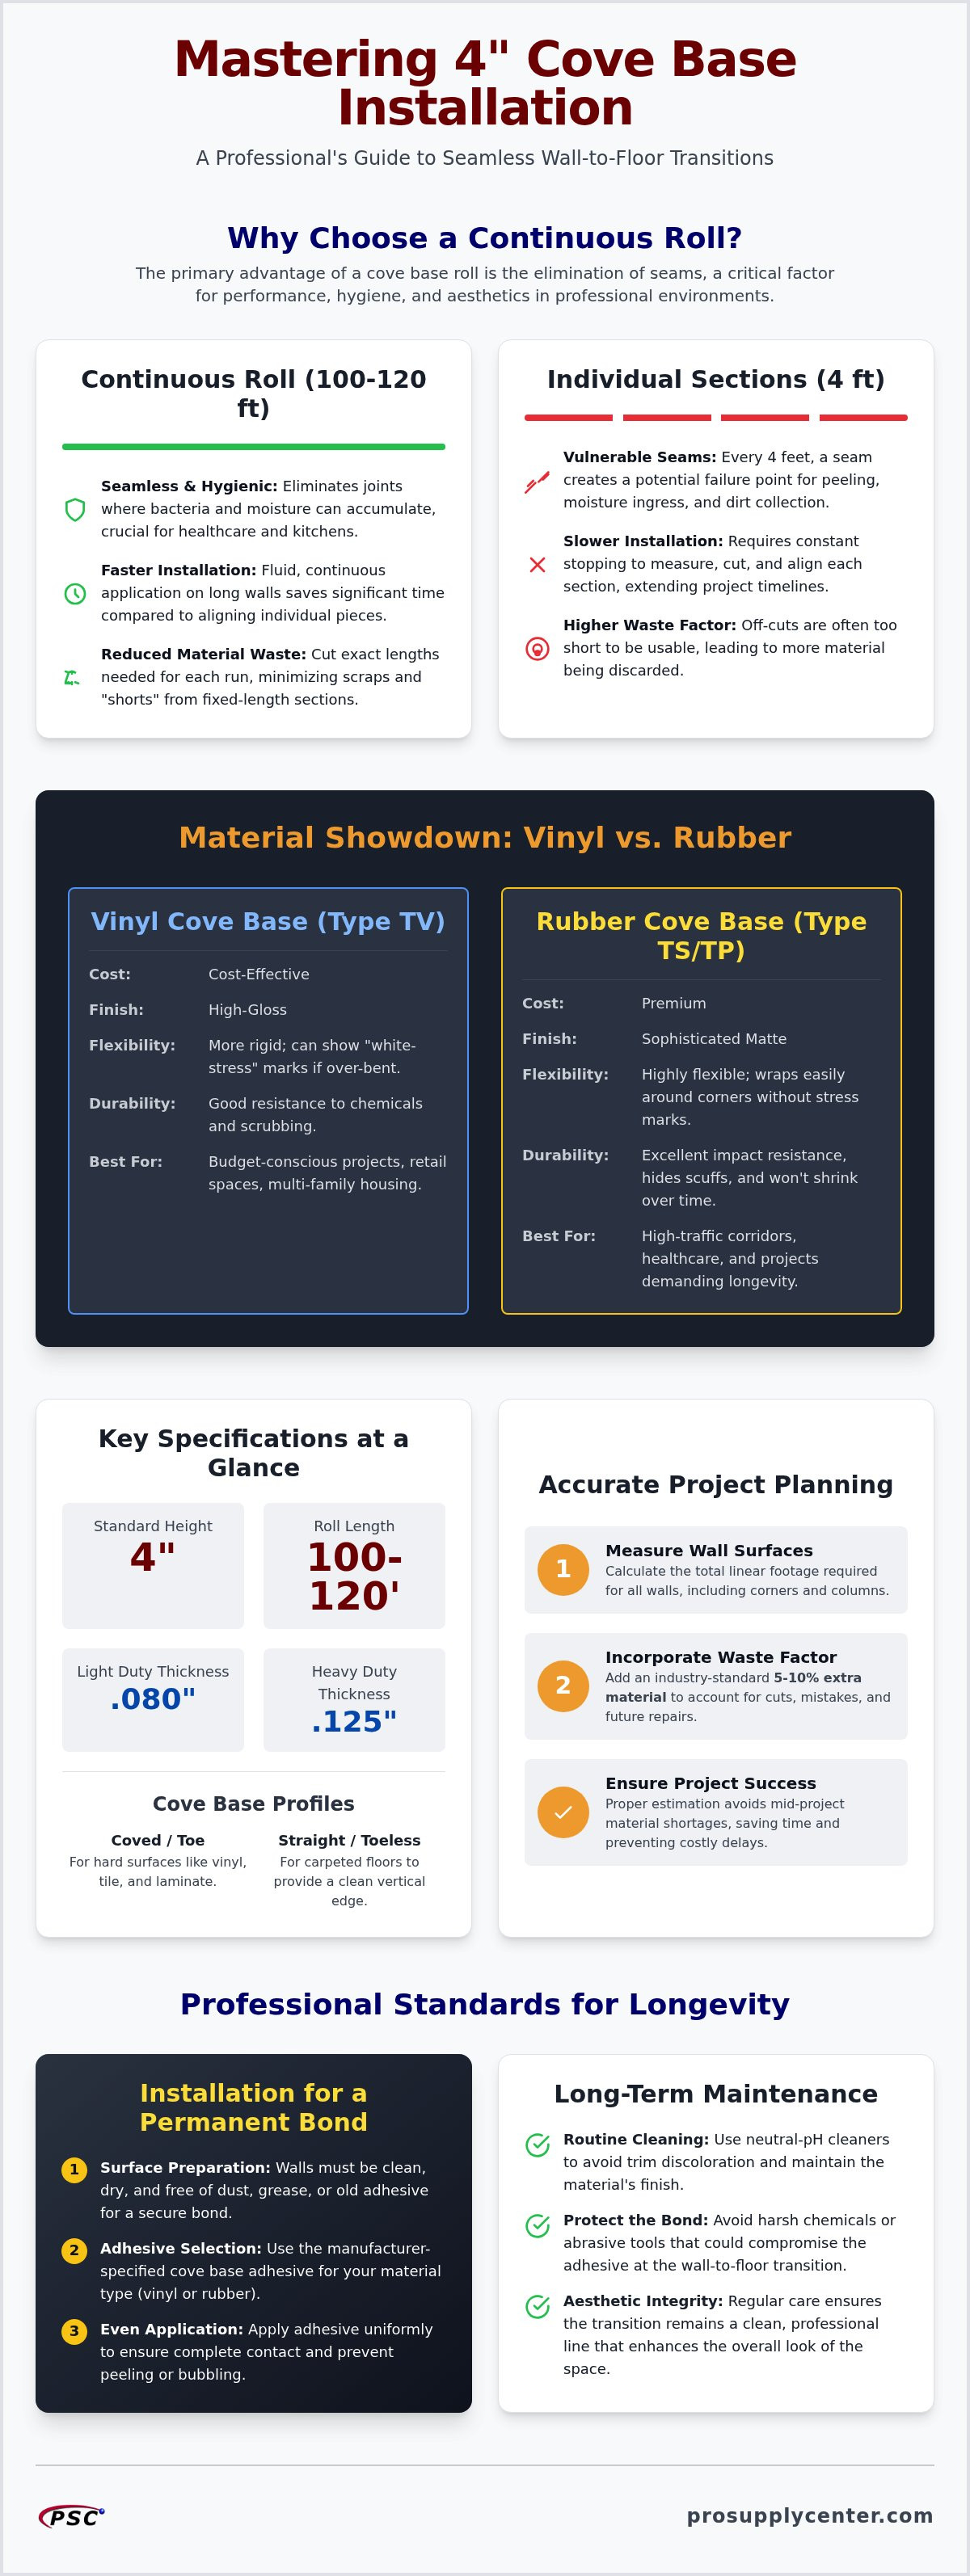
A 4 inch cove base roll is a continuous length of professional grade wall molding, typically sold in spans of 100 to 120 feet. This format serves as a heavy duty barrier between the floor and the wall, providing a durable seal that protects the underlying structure. When you understand what a baseboard is in a technical context, you realize its function isn't just decorative; it's a structural necessity. Professionals choose between two primary thicknesses: .080 inches for residential or light commercial use, and .125 inches for heavy duty environments where impact resistance is mandatory.
The profile of the 4 inch cove base roll also dictates its compatibility with different flooring types. A "coved" or "toe" profile features a curved bottom edge that sits flush against hard surface flooring like vinyl, laminate, or tile. This curve hides expansion gaps and prevents moisture from seeping under the wall. Conversely, "straight" or "toeless" profiles are used primarily with carpet, providing a clean vertical finish without a protruding lip that might interfere with the pile.
The Functional Purpose of 4-Inch Height
The 4-inch height provides a significant protective barrier against industrial mops, floor scrubbers, and heavy foot traffic. In rooms with standard 8-to-10 foot ceilings, this height offers a balanced visual transition that feels proportional. Beyond aesthetics, many local building codes require a minimum height for wall bases in commercial kitchens and medical facilities. For contractors working with the PSC Pro Gen II waterproofing system in wet rooms, a 4-inch base ensures the transition from the waterproofed floor to the wall remains protected and easy to sanitize.
Rolls vs. Sections: A Performance Comparison
The primary reason to specify a roll over individual sections is the elimination of seams. In healthcare settings, every seam is a potential harbor for bacteria and pathogens. By using a continuous 4 inch cove base roll, you create a monolithic surface that is much easier to maintain. This format also increases installation speed on long corridors. Installers can apply adhesive and roll out the base in one fluid motion, which eliminates the time spent aligning edges every four feet. Additionally, rolls reduce material waste. You can cut exactly what you need for each wall run, keeping your waste factor low and avoiding the "shorts" or scraps common with 4-foot sections.
Material Science: Rubber vs. Vinyl Cove Base Rolls
Selecting the correct material for a 4 inch cove base roll requires an understanding of how different polymers behave under stress. The ASTM F1861 Standard Specification provides the technical framework for these choices, classifying wall bases by Type (material) and Style (profile). Most professional projects utilize either vinyl (Type TV) or rubber (Type TS or TP), each presenting a different balance of durability, flexibility, and cost.
Vinyl is a thermoplastic PVC material known for its cost-effectiveness and high-gloss finish. It's a non-porous surface that resists harsh chemical cleaners, making it a reliable choice for standard commercial environments. However, vinyl's rigidity can be a drawback during installation. It doesn't wrap around corners as easily as rubber and can develop permanent "white-stress" marks if over-bent. For those looking for professional results on a budget, exploring quality vinyl and rubber trim options ensures you find a material that matches your project's environmental needs.
Rubber represents the premium tier of wall base. Thermoset vulcanized rubber (Type TS) is chemically cured during manufacturing, which prevents the material from shrinking over time. It features a sophisticated matte finish that effectively hides scuffs and wall imperfections. Thermoplastic rubber (Type TP) offers a middle ground, blending the flexibility of rubber with some of the cost-saving benefits of vinyl. These materials are often preferred when the project requires a seamless transition in high-traffic corridors.
Vinyl Cove Base: Pros and Cons
Vinyl is favored for its lower price point and vast color availability. It stands up well to frequent scrubbing in high-turnover areas like retail spaces or multi-family housing. On the negative side, it becomes brittle in cold temperatures, making winter installations more difficult. It's the ideal choice for budget-conscious projects where a clean, uniform look is required but extreme durability isn't the primary concern.
Rubber Cove Base: The Professional Standard
Rubber is the gold standard for healthcare and education environments. Its superior "memory" allows the 4 inch cove base roll to retain its shape even after years of impact from equipment and foot traffic. While the initial material cost is higher, rubber is easier to manipulate around outside corners without the need for heat. This flexibility allows it to conform to irregularities in the drywall, creating a tighter seal that prevents moisture intrusion behind the base.
Planning and Estimating Your 4 Inch Wall Base Project
Accurate material estimation is the difference between a profitable job and a project stalled by supply shortages. When you calculate requirements for a 4 inch cove base roll, you must measure every individual wall face rather than relying on the general room perimeter. This granular approach accounts for the small returns and alcoves that floor plans often overlook. Subtract the width of door frames and built in cabinetry from your total linear footage to avoid over-ordering, but always remember that corners require specialized handling that consumes more material than a standard straight run.
A standard 5-10% waste factor is the industry baseline for professional installations. This extra footage covers the material lost during miter cuts or when wrapping corners. If your project involves complex architecture with numerous outside corners, lean toward the 10% margin. Logistics also play a role in your planning. Standard rolls are typically available in 100 or 120 foot lengths. Choosing a 120 foot roll for long corridors allows you to maintain a continuous, seam free run, which is a primary functional advantage of the roll format. Batch your orders to ensure all material comes from the same dye lot; even slight variations in pigment can become visible once the trim is installed under commercial lighting.
The Math of a Seamless Installation
To convert room dimensions into roll quantities, total your linear footage and divide by the roll length. For a standard 1,000 square foot commercial space (roughly 25 by 40 feet), the perimeter is 130 linear feet. If the space has two 3 foot door openings, your net footage is 124 feet. Applying a 10% waste factor brings your total to 136.4 feet. In this scenario, purchasing two 100 foot rolls is more efficient than attempting to piece together shorter sections. These calculations ensure your installation aligns with the ASTM F1861 industry standard for resilient wall base applications.
Inventory and Site Conditions
Site preparation begins long before the first bead of adhesive is applied. You must acclimate every 4 inch cove base roll to the installation environment for 24 to 48 hours. This process allows the material to stabilize at the room's service temperature, preventing post installation shrinkage or expansion. While the material acclimates, inspect the walls for flatness. High spots or "waves" in the drywall can create gaps that standard adhesive application won't bridge. Identifying these areas early allows you to plan for extra adhesive or wall repair. Ensure your subfloor is ready for the finish with Professional Tile Leveling Systems to guarantee the cove base toe sits perfectly flush against the floor surface.
Professional Installation Standards for Cove Base Rolls
Successful installation of a 4 inch cove base roll begins with mechanical preparation of the wall surface. You must remove all remnants of old adhesive, dust, and oils to ensure a permanent chemical bond. For high-volume commercial projects, pail adhesive applied with a notched trowel or a multi-hole applicator is the most efficient choice. For smaller repairs or tight spaces, cartridge adhesives provide better control. Regardless of the delivery method, the goal is 100% adhesive transfer between the wall and the trim.
Achieving a professional finish requires deliberate toe compression. As you press the base into the wall, apply firm downward pressure to ensure the coved bottom edge seals tightly against the flooring material. This prevents gaps where dirt and liquids can accumulate. This sealing step is particularly vital when completing a Waterproof Shower Installation where the wall base acts as the final moisture barrier.
Mastering Corners: Scribing vs. Wrapping
Inside corners require a scribing technique for a perfect fit. Instead of trying to force a continuous roll into a 90-degree angle, you should miter one side and overlap the other to prevent gaps. For outside corners, wrapping the 4 inch cove base roll is the standard approach. Use a gouging tool to remove approximately half the thickness from the back of the material along the corner line. This prevents the material from bunching or "bridging" at the corner. If you're working with vinyl, a heat gun can safely soften the material for tighter radii, but be careful not to scorch the finish.
Adhesive Application and Roll Management
For a 4-inch base, use a nozzle with a 3-hole configuration to distribute the adhesive beads evenly across the vertical surface. Respect the "open time" specified by the manufacturer; the adhesive must reach a tacky state before you press the material into place. Once the base is set, use a hand roller to eliminate air pockets. Roll from the center outward to ensure the adhesive spreads uniformly. This mechanical pressure is the only way to guarantee the long-term integrity of the bond.
Ready to start your next project? Source professional-grade cove base trim and adhesives to ensure a failure-proof installation.
Maintenance and Long-Term Performance of 4-Inch Trim
Maintaining the aesthetic and structural integrity of a 4 inch cove base roll requires a systematic approach to cleaning and periodic inspections. In commercial environments, the wall base is subjected to constant mechanical stress and chemical exposure. Selecting the wrong cleaning agent can lead to premature fading, surface degradation, or adhesive failure. For rubber materials, avoid petroleum-based solvents or harsh acids. These chemicals can leach the plasticizers from the material, which causes it to become brittle or develop a chalky appearance over time.
Scuff marks from rubber-soled shoes or equipment wheels are common in high-traffic corridors. You can usually remove these using a soft cloth dampened with a neutral cleaner or a specialized melamine sponge. Avoid abrasive scouring pads; these can permanently dull the finish of vinyl or rubber. If you notice edges pulling away from the wall, don't wait for the entire section to fail. You can often repair these loose spots by re-injecting a small amount of cartridge adhesive behind the base and rolling it firmly back into place to restore the bond.
UV resistance is another critical factor for long-term performance. While modern materials are designed to resist fading, installations in areas with large windows or direct sunlight exposure may show signs of aging faster. Rubber typically offers superior UV stability compared to standard vinyl. This makes it the preferred choice for sun-drenched lobbies or retail storefronts where color consistency must be maintained over several years of exposure.
Commercial Cleaning Compatibility
Neutral pH cleaners are essential for maintaining the finish of rubber cove base. High-alkaline detergents can leave a film that attracts dirt or causes the material to lose its matte sophistication. Be mindful of wax buildup at the floor-to-wall junction. When floors are stripped and waxed, the chemicals can splash onto the base, creating a yellowish crust if they aren't wiped away immediately. Additionally, ensure that automatic floor scrubbers are operated at a safe distance. The aggressive rotating brushes can chip the toe of the base if they make direct contact during a cleaning cycle.
When to Replace vs. When to Repair
Identifying when a 4 inch cove base roll has reached the end of its lifecycle is critical for facility management. Vinyl that has become stiff, brittle, or shows "white-stress" marks at the corners usually requires a full replacement. While patching small sections is possible, a full room refresh is often more cost-effective for large-scale roll installations. This ensures color uniformity and restores the hygienic seal across the entire perimeter. If your current trim is showing signs of failure, you can explore the full range of Cove Base - Vinyl & Rubber Trim at Pro Supply Center to find a durable replacement.
Achieving a Permanent, Professional Finish
Mastering the installation of a 4 inch cove base roll is a matter of technical precision and material knowledge. By selecting the appropriate rubber or vinyl composition for your environment and adhering to strict surface preparation standards, you eliminate the common failures of peeling and moisture intrusion. The seam-free advantage of the roll format is only fully realized through accurate measurement and deliberate corner management. These professional-grade details transform a standard wall-to-floor transition into a durable, hygienic barrier that withstands the rigors of any commercial space.
The success of your build depends on the quality of your supplies. Shop Professional Cove Base Rolls and Trim at Pro Supply Center to access trade-grade vinyl and rubber options designed for long-term performance. We provide national shipping for commercial projects and offer expert-selected construction supplies to help you complete every job with confidence. With the right planning and professional-grade materials, you can ensure your next project results in a seamless and resilient finish that stands the test of time.
Frequently Asked Questions
Can I install 4 inch cove base roll over existing baseboard?
No, you shouldn't install new trim over existing material. You must remove existing baseboards to ensure a flat, clean surface for the adhesive. Installing over old trim prevents the 4 inch cove base roll from sealing properly against the wall and floor. This results in gaps that trap dirt and moisture, compromising the hygiene of the space. Always strip the wall down to the drywall and remove old glue before applying new material.
Is rubber or vinyl cove base better for a commercial kitchen?
Rubber is the superior choice for commercial kitchens due to its heat resistance and durability. While vinyl is cost-effective, rubber handles the temperature fluctuations and heavy-duty cleaning chemicals common in food service environments much better. It also maintains its seal against the floor more effectively under constant foot traffic. For high-hygiene areas, a continuous rubber roll minimizes seams where bacteria might otherwise accumulate and compromise the installation.
How many linear feet are typically in a 4 inch cove base roll?
Standard 4 inch cove base rolls are typically sold in lengths of 100 or 120 feet. These long formats are designed to cover extensive wall runs without the need for frequent joints. When planning your project, check the specific roll length provided by the manufacturer to calculate your total material needs. Always include a 5-10% waste factor to account for corner trimming and miter cuts during the installation process to avoid delays.
What is the difference between cove base with a toe and toeless base?
A cove base with a toe features a flared bottom edge that curves outward to cover the gap between the wall and the floor. This coved profile is ideal for hard surfaces like tile or vinyl because it creates a sanitary seal. Toeless base, often called straight base, lacks this flare and is used primarily with carpeted floors. The straight profile allows the carpet to sit flush against the wall without the obstruction of a protruding lip.
Do I need a special adhesive for 4 inch rubber cove base rolls?
Yes, rubber cove base often requires a high-performance acrylic or solvent-free adhesive specifically formulated for rubber polymers. Unlike vinyl, which is more porous and easier to bond, rubber has a denser composition that needs a stronger initial tack. Always verify the adhesive compatibility with the specific material type, such as Type TS or TP, to prevent the base from pulling away or shrinking after the installation is complete.
How do I handle outside corners when using a continuous roll?
To wrap an outside corner, you must gouge the back of the material along the corner line. Use a specialized cove base gouger to remove about half the thickness of the material without cutting through the face. This allows the 4 inch cove base roll to bend sharply around the corner without bunching or bridging. For vinyl, applying a small amount of heat can soften the material to help it conform to the corner radius properly.
Can cove base rolls be used in wet areas like bathrooms or showers?
Yes, cove base rolls are excellent for wet areas because the continuous format eliminates vertical seams where water could penetrate. When integrated with a system like the PSC Pro Gen II waterproofing, the cove base provides a durable finishing touch that protects the wall base from moisture. Ensure you use a waterproof adhesive and compress the toe firmly against the floor to create a tight, sanitary seal that prevents water from reaching the wall cavity.
How long should I let the cove base acclimate before installing?
You should acclimate the material for at least 24 to 48 hours in the room where it will be installed. The rolls must be removed from their packaging and allowed to reach the service temperature of the environment. This prevents the material from expanding or contracting after it has been glued to the wall. Proper acclimation is a critical step in ensuring the long-term stability of the adhesive bond and preventing seam separation.


