

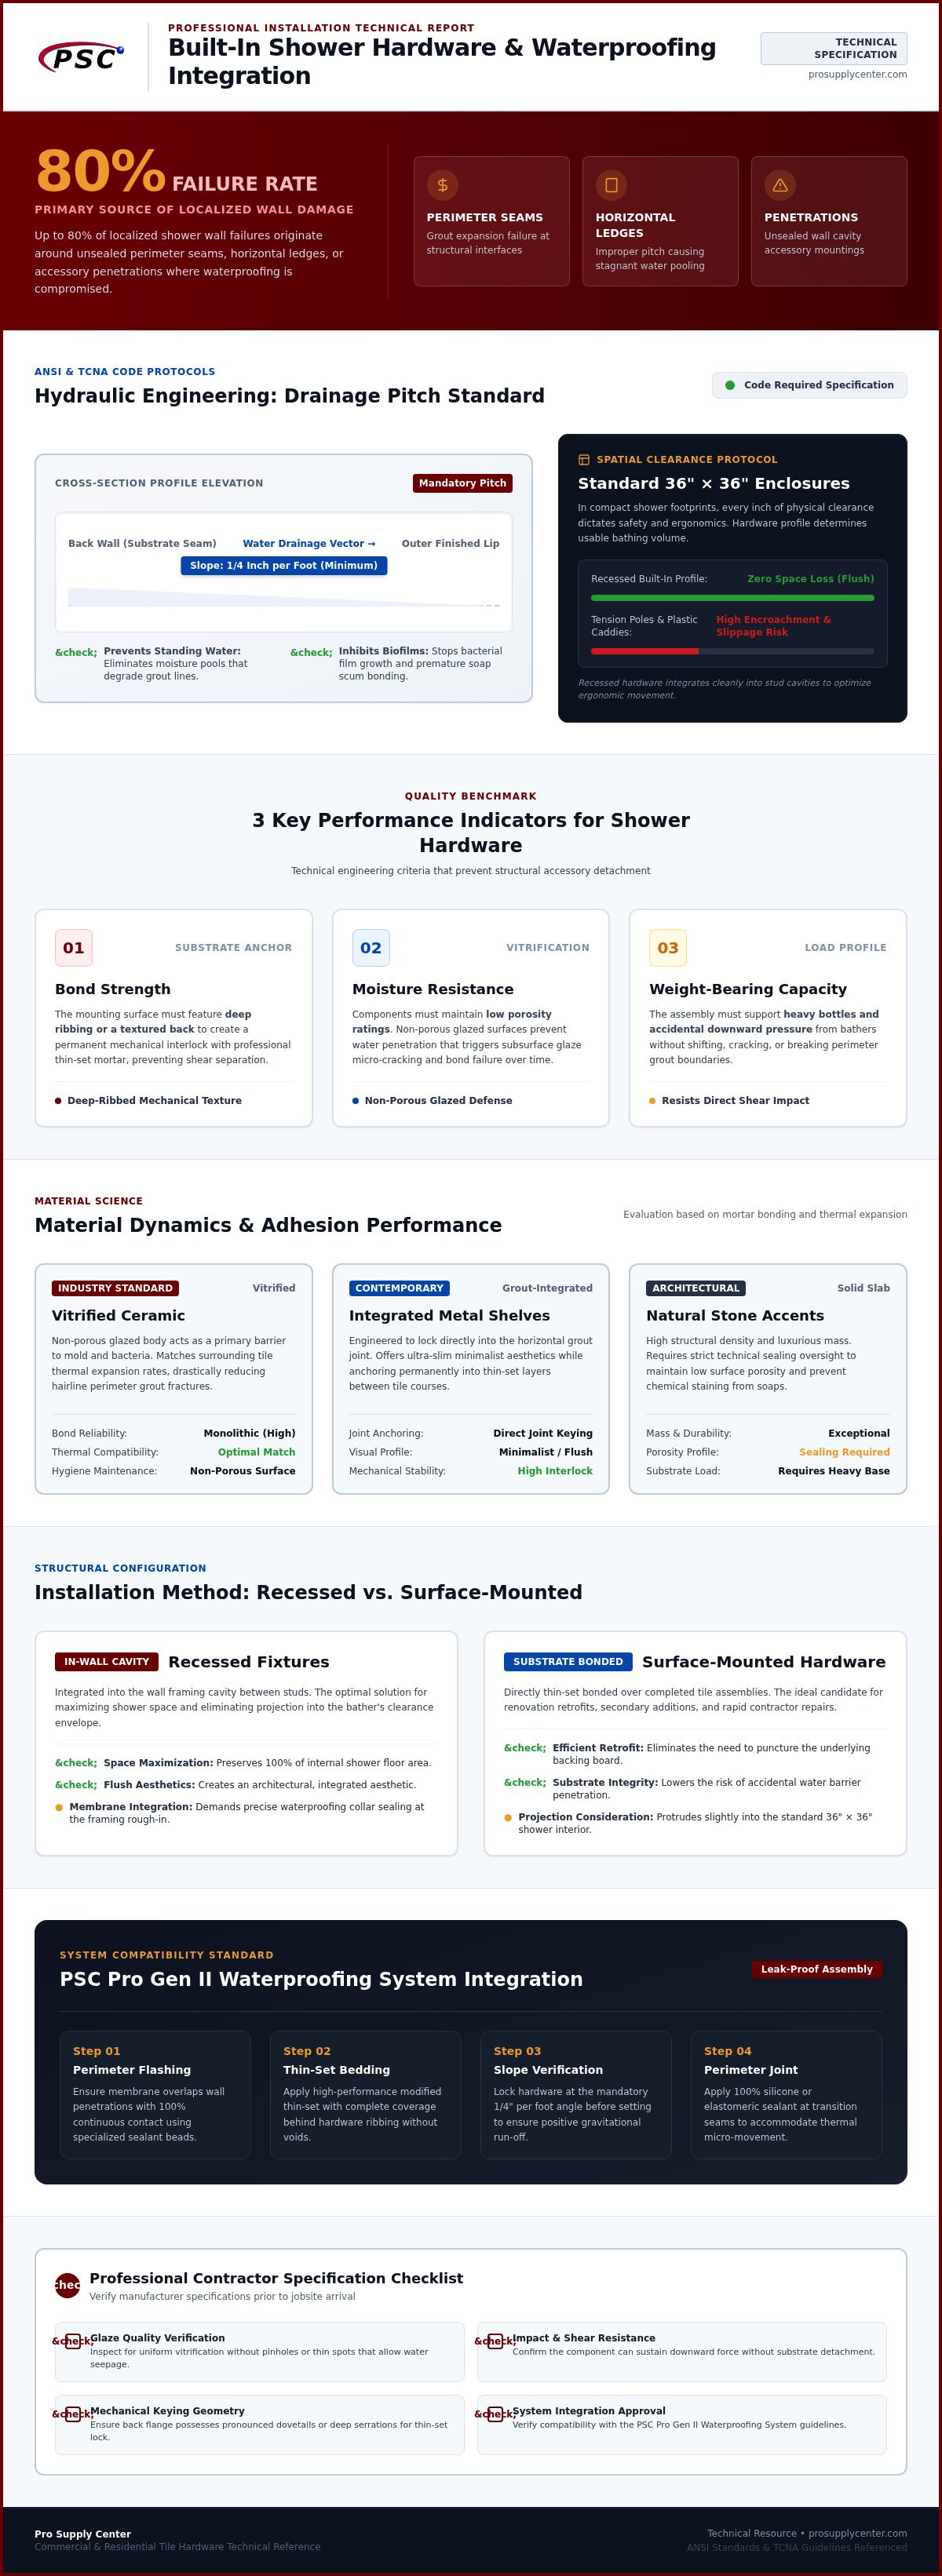
Up to 80% of localized shower wall failures originate around unsealed perimeter seams, horizontal ledges, or accessory penetrations where the waterproofing was compromised. It's a sobering statistic for any contractor or homeowner planning a renovation. You likely recognize that a built-in shower soap dish is more than a simple convenience; it is a critical point of contact that must be integrated perfectly into your tile assembly. Choosing the wrong hardware or failing to seal the penetration correctly can lead to hidden rot and framing degradation behind your tile.
This guide provides the technical roadmap you need to master the selection and installation of professional-grade soap dishes. We'll bridge the gap between aesthetic choices and structural integrity by looking at how these components integrate with high-performance systems like the PSC Pro Gen II Waterproofing System. You'll learn the essential ANSI standards for recessed hardware, the critical requirement for a 1/4-inch per foot slope to prevent standing water, and how to choose between traditional ceramic insets or modern grout-integrated shelves. We'll provide the specific knowledge required to ensure your finished project is both durable and leak-proof.
Key Takeaways
- Understand why a built-in shower soap dish is superior to aftermarket alternatives for long-term durability and structural stability.
- Compare the functional benefits of ceramic, stone, and integrated metal hardware to match your specific tile aesthetic and performance requirements.
- Evaluate the trade-offs between recessed fixtures for maximizing space and surface-mounted options for efficient repair or retrofit projects.
- Learn how to integrate hardware with the PSC Pro Gen II Waterproofing System to prevent moisture penetration and ensure a leak-proof installation.
- Utilize a professional contractor checklist to verify manufacturer specifications for glaze quality and impact resistance before purchase.
The Functional Role of a Built-In Shower Soap Dish
A built-in shower soap dish is a permanent storage solution integrated directly into the tile wall assembly. Unlike temporary accessories, these fixtures are either recessed into the wall cavity or surface-bonded using professional-grade thin-set mortar. Trade professionals prioritize these units because they eliminate the common failure points of suction cups and tension poles, which often slip or degrade over time. In a standard 36-inch by 36-inch shower enclosure, every inch of movement matters. A recessed built-in shower soap dish provides essential utility without encroaching on the bather's physical space, significantly improving the ergonomics of small enclosures.
Hygiene is another critical factor in the professional selection process. Aftermarket plastic caddies often trap moisture against the tile surface, creating stagnant environments where mold and soap scum thrive. A well-constructed ceramic or metal dish follows the functional design and drainage mechanics of soap dishes, ensuring that water sheds away from the soap bar. This prevents the buildup of bacterial film and makes the shower environment much easier to maintain over years of daily use.
Permanent vs. Temporary Shower Storage
Durability remains the primary differentiator between professional hardware and retail-grade caddies. Plastic storage units often fail due to mechanical fatigue or UV degradation within a few years. A vitrified ceramic dish lasts for decades without losing its structural integrity or finish quality. While the initial installation requires more labor, the long-term cost-benefit analysis favors integrated hardware. You avoid the recurring expense of replacing flimsy organizers and the potential for surface scratches caused by shifting metal racks. Integrated accessories provide a cohesive, high-end finish that defines a modern professional renovation.
Key Performance Indicators for Shower Hardware
Selecting the right hardware involves evaluating specific technical criteria that affect the longevity of the installation. You should look for these three key performance indicators:
- Bond Strength: The mounting surface of the dish must feature deep ribbing or a textured back to ensure a strong mechanical bond with the thin-set mortar.
- Moisture Resistance: Professional ceramic components must have low porosity ratings. This prevents water absorption that can lead to glaze cracking or bond failure over time.
- Weight-Bearing Capacity: The unit should be capable of supporting the weight of heavy bottles and resisting accidental pressure without shifting or cracking.
These indicators ensure the accessory functions as a reliable part of the overall build. Selecting hardware that meets these standards is the first step toward a successful, leak-proof installation.
Comparing Materials: Ceramic, Stone, and Integrated Metal
Selecting a built-in shower soap dish requires a technical evaluation of how the accessory interacts with the tile and the underlying waterproofing. Material science dictates the longevity of the installation. While aesthetics matter, the bond strength and porosity of the material are the primary factors that prevent failure. Professionals must understand how different materials expand, contract, and adhere to standard thin-set mortars to ensure the integrity of the build remains intact over decades of use.
Ceramic: The Traditional Professional Choice
Ceramic remains the industry standard because of its vitrified body and non-porous glazing. This glaze acts as a primary defense against bacterial growth and mold, as it doesn't allow moisture to penetrate the accessory. From an installation standpoint, ceramic offers the most reliable bond. When you use a high-quality thin-set, the ceramic-to-ceramic interface creates a monolithic structure that is highly resistant to shifting. Many contractors prefer these units because they match the thermal expansion rates of the surrounding tile, which reduces the risk of grout cracking at the perimeter.
Adhering to the Tile Council of North America guidelines on installing shower accessories is essential when working with these materials. These standards emphasize the importance of proper substrate bonding and ensuring a positive slope for drainage. If you are planning a complete renovation, integrating these accessories with a high-performance PSC Pro Gen II Waterproofing System ensures a leak-proof result.
Metal and Composite Alternatives
Stainless steel and aluminum have gained popularity in minimalist designs. These materials offer a sleek profile, but they present unique technical challenges. Stainless steel must be 304-grade or higher to resist the corrosive effects of soaps and cleaning chemicals. Unlike ceramic, metal doesn't form a chemical bond with thin-set. It typically relies on mechanical anchoring, such as tabs that slot into the grout joint. You must also account for thermal expansion; metal expands at a different rate than ceramic tile, which can stress the surrounding grout if the joints are too narrow.
Natural stone is another option, though it is often less practical for soap dishes. Stone is naturally porous and requires consistent sealing to prevent water ingress. If the seal fails, water can migrate through the stone and weaken the bond to the wall. For most high-traffic showers, a vitrified ceramic or a high-grade metal insert provides a more predictable, maintenance-free outcome. By focusing on materials with low porosity and high bond compatibility, you protect the wall cavity from moisture damage.
Recessed vs. Surface-Mounted: Design and Utility Trade-offs
Deciding between a recessed or surface-mounted built-in shower soap dish is a choice between installation labor and functional space. A recessed unit sits within the wall cavity, keeping the shelf flush with the tile. A surface-mounted dish is bonded directly to the face of the tile, protruding into the shower area. While both options provide permanent storage, the structural preparation and the impact on the bather's range of motion differ significantly. Professionals often select the mounting style based on whether the project is a new build or a targeted repair.
The Recessed Advantage: Maximizing Square Footage
Recessed fixtures are the preferred choice for small walk-in showers and alcove tubs where floor space is at a premium. By utilizing the 3.5-inch depth of a standard 2x4 wall stud bay, you create storage without shrinking the usable shower area. This design requires advanced planning during the framing stage. You must ensure the opening is placed between studs and clear of any vertical plumbing lines or electrical runs. To satisfy TCNA standards and prevent bacterial film buildup, the bottom sill of a recessed built-in shower soap dish must have a positive pitch of at least 1/4-inch per foot toward the drain. This ensures that water doesn't pool in the back corners of the cavity.
Surface-Mounting for Efficiency
Surface-mounted hardware is the most efficient solution for retrofit projects or quick bathroom updates. Since these units don't require you to cut into the wall, you don't risk compromising the existing waterproofing membrane or the vapor barrier. This makes them a safer choice for minor repairs where the original wall construction is unknown. The success of a surface-mount installation depends entirely on the bond strength. You'll need a professional-grade thin-set or a high-tack epoxy to secure the accessory to the tile. To make these dishes feel integrated rather than like an afterthought, contractors often align the dish with the horizontal grout lines of the surrounding tile, creating a visual flow that mimics a custom build.
Cleaning and maintenance requirements also vary by design. Recessed units are aesthetically minimalist, but they can accumulate soap scum in the interior corners if they aren't sloped correctly. Surface-mounted dishes are easier to scrub because they are fully exposed, but the perimeter bond site is a common area for mold growth if the grout isn't maintained. Regardless of the mounting style, choosing a vitrified ceramic or high-grade metal fixture ensures the accessory won't degrade under the constant moisture of a daily shower environment.
Waterproofing Integration: Protecting the Integrity of the Build
The most critical phase of installing a built-in shower soap dish is the intersection between the hardware and the waterproofing membrane. Every penetration in the wall assembly represents a potential failure point where moisture can bypass the tile and compromise the framing. Professionals don't rely on topical sealants or caulk alone. Instead, they utilize a system-based approach where the accessory becomes an extension of the primary water barrier. Integrating your hardware with the PSC Pro Gen II Waterproofing System ensures that the entire shower enclosure remains hermetically sealed, even at complex transition points.
Failure often occurs due to capillary action at the edge of the dish. If the grout line between the tile and the accessory cracks, water is pulled behind the dish through surface tension. To prevent this, the waterproofing must be flashed correctly behind the flange of the hardware. This creates a secondary defense that directs moisture back toward the drain rather than allowing it to saturate the wall cavity. According to industry data, up to 80% of localized shower wall failures originate around unsealed penetrations; a proper flashing detail is your best defense against long-term structural rot.
Sealing Recessed Niches and Dishes
Sealing a recessed built-in shower soap dish requires meticulous attention to corner management. Whether you're using liquid liners or sheet membranes, all seams must maintain a minimum 2-inch bonded overlap to satisfy ANSI A108.13 standards. Pre-formed corners and waterproof bands are essential for managing the three-way transitions inside a recessed cavity. These components eliminate the need for complex folds in the membrane, which can create bulk and interfere with tile leveling. When using waterproofing shower kits, ensure that the niche or dish is fully wrapped and tied into the field membrane before any tile is set.
Vapor Barriers and Steam Shower Considerations
Steam showers present a higher technical challenge. In these environments, vapor drive can push moisture through standard ceramic bodies and grout joints at a molecular level. Built-in hardware in a steam room requires a dedicated vapor barrier that exceeds standard liquid membrane specifications. You must integrate your accessories with professional shower installation components designed to handle high-temperature, high-humidity cycles. This often involves applying a specialized sheet membrane specifically rated for steam applications to ensure the wall assembly doesn't trap condensation behind the accessory.
Ensure your build is protected by selecting the right professional-grade waterproofing supplies for your next project.
Selecting Professional-Grade Shower Accessories for Longevity
The final phase of a successful installation involves a rigorous quality assessment of the hardware itself. A professional contractor doesn't treat a built-in shower soap dish as a decorative afterthought; it's a functional component that must withstand decades of moisture and physical impact. High-quality ceramic accessories are differentiated by their manufacturing standards, specifically the vitrification process which dictates the material's density. When evaluating manufacturer specifications, you should prioritize impact resistance and glaze hardness. A superior glaze prevents the micro-fissures that lead to staining and bacterial colonization over time.
Before the final set, a critical inspection of the drainage geometry is mandatory. As established in previous sections, TCNA guidelines require a positive pitch of 1/4-inch per foot. You should verify this slope with a small level or by observing water runoff during a test. If the dish sits perfectly level, water will inevitably pool, leading to chronic soap scum buildup and potential grout failure at the base. Choosing specialized hardware over generic big-box options ensures that the piece is engineered with these drainage requirements in mind.
Quality Indicators for Ceramic Hardware
Physical weight and thickness serve as reliable proxies for material density. A professional-grade ceramic dish feels substantial because it has been fired at higher temperatures to achieve a low-porosity state. You should also examine the back of the accessory. Superior units feature deep, aggressive ribbing or a textured back. This is not a design choice; it's a technical requirement to maximize the mechanical bond with the thin-set mortar. Smooth-backed alternatives are prone to delamination under the weight of heavy bottles or accidental pressure from the bather.
Sourcing for Success
Pro Supply Center curates a specific selection of ceramic soap dishes and niches that are tested for compatibility with high-performance waterproofing systems. Big-box retailers often stock consumer-grade accessories that may have inconsistent sizing or inferior glazes that crack under thermal stress. Sourcing from a specialized supplier allows you to manage lead times for custom niches and ensures you have access to expert technical support. This expertise is vital when you need to match hardware thickness to specific tile profiles or ensure that your chosen accessory integrates seamlessly with the PSC Pro Gen II Waterproofing System. Reliability in the build begins with the quality of the components you source.
Finalizing Your Professional Shower Installation
A successful shower project depends on the seamless integration of high-performance hardware and a robust moisture management system. By prioritizing vitrified ceramic or 304-grade stainless steel, you ensure your built-in shower soap dish resists bacterial growth and thermal stress for decades. Remember that technical details, such as maintaining a 1/4-inch per foot drainage pitch and ensuring a 2-inch membrane overlap, are what separate a professional build from a localized failure. These small adjustments protect your wall cavity from the rot often caused by unsealed penetrations.
Pro Supply Center provides an expert-vetted selection of hardware specifically designed for compatibility with the PSC Pro Gen II Waterproofing System. Our supplies are trusted by contractors for national-scale projects because we prioritize functional reliability over aesthetic trends. When you source professional-grade components, you'll gain the confidence that your installation will perform under pressure. Browse Professional Ceramic Soap Dishes at Pro Supply Center today to find the right utility for your next build. Your commitment to these technical standards ensures a durable, leak-proof result you can stand behind.
Frequently Asked Questions
Is it better to have a recessed or surface-mounted soap dish?
Recessed dishes are superior for maximizing square footage in small enclosures because they sit flush within the wall cavity. Surface-mounted options are better suited for retrofit projects where you don't want to cut into existing waterproofing. Professionals choose based on the project scope. If you are building from scratch, a recessed built-in shower soap dish offers a more integrated finish without encroaching on the bather's range of motion.
How do I ensure my built-in soap dish doesn't leak?
Ensuring a leak-proof installation requires a positive pitch of at least 1/4-inch per foot toward the drain to prevent pooling. You must also flash the waterproofing membrane correctly behind the accessory flange. Using a system-based approach, like integrating the dish with a bonded membrane, creates a continuous barrier. This prevents capillary action from pulling moisture into the wall cavity through cracked grout lines at the perimeter bond site.
Can I install a ceramic soap dish over existing tile?
You can install a surface-mounted ceramic dish over existing tile using a high-bond epoxy or specialized thin-set. However, you cannot install a recessed built-in shower soap dish without removing the tile and cutting into the wall substrate. Retrofitting a recessed unit into an existing shower is risky because it usually compromises the original waterproofing membrane. For minor updates, a surface-bonded accessory is the most efficient professional choice.
What is the standard height for a shower soap dish?
The standard mounting height for a shower soap dish typically sits between 38 and 48 inches above the finished floor. This range aligns with ADA reach standards and ensures the accessory is accessible for most users. If the shower includes a bench, the dish should be placed lower, approximately 15 to 18 inches above the seat. Always verify the bather's height preference before the final set to ensure the placement is ergonomic.
Do built-in soap dishes require special waterproofing?
Built-in accessories require meticulous waterproofing at the transition points where the hardware meets the wall. Standard cement backer board is water-durable but not waterproof. You must apply a topical liquid or sheet membrane that meets ANSI A118.10 standards around the entire perimeter of the dish. This ensures that any water bypassing the grout is directed back into the shower pan rather than into the wall studs or framing.
How do I clean a recessed ceramic soap dish effectively?
Clean a recessed ceramic dish using non-abrasive, pH-neutral cleaners and a soft nylon brush to remove soap scum buildup. Avoid using harsh steel wool or abrasive pads that can scratch the vitrified glaze. If the dish was installed with the correct 1/4-inch per foot slope, water should drain naturally, reducing the frequency of deep cleaning. Periodically check the grout joints for cracks to ensure the underlying waterproofing remains protected.
What thin-set should I use for ceramic shower accessories?
Use a high-performance, polymer-modified thin-set mortar that meets ANSI A118.15 standards for ceramic shower accessories. These mortars provide the superior bond strength and sag resistance required to hold heavy ceramic components in place during the curing process. For surface-mounted hardware, an epoxy-based adhesive may be used to achieve a permanent bond on non-porous tile surfaces. Always follow the manufacturer's mixing instructions to ensure maximum adhesion and durability.
Can I use a soap dish with the PSC Pro Gen II system?
Yes, ceramic soap dishes and niches are fully compatible with the PSC Pro Gen II Waterproofing System. The system's sheet membrane and liquid liners are designed to wrap into recessed openings, creating a hermetic seal. By using PSC-specified bands and pre-formed corners, you can maintain a continuous water barrier around any built-in accessory. This integration is essential for ensuring the long-term structural integrity of high-moisture shower environments and preventing mold growth.


