

A leveling clip can’t correct a floor that wasn’t properly prepared before the first tile went down. That’s why professional tile leveling tools work best as part of a complete installation approach, not as a shortcut for fixing an uneven substrate. If lippage is creating trip hazards, affecting grout joints, or forcing you to redo work, traditional spacers alone may not provide the control the job requires.
The right system can help keep adjacent tiles in plane while mortar cures and support a cleaner finish. Results depend on choosing compatible clips, wedges, caps, or other components for the tile and layout, then using them as directed. Large-format tile calls for particular care because tile warpage can make height differences more noticeable.
This guide covers the factors behind lippage control, how common leveling systems compare, and what to consider when selecting tools. It also explains how substrate preparation, mortar, tile placement, and waterproofing fit into the process, so you can work toward a flatter finish and fewer call-backs for floor-height issues.
Key Takeaways
- Choose professional tile leveling tools to suit the tile format, joint width, and installation conditions, rather than relying on one system for every job.
- Understand how disposable clips work with reusable wedges or caps to apply pressure and help align neighboring tile edges.
- Compare wedge and spin-down systems for your application, including the handling needs of wall tile and delicate surfaces.
- Check and prepare the substrate before setting tile. A leveling system helps align tiles but won’t correct a substantial floor dip.
- Plan the tile installation around the waterproofing layer, taking care not to puncture the PSC Pro Gen II Waterproofing System when placing clips.
The Mechanics of Lippage: Why Professional Leveling Systems are Essential
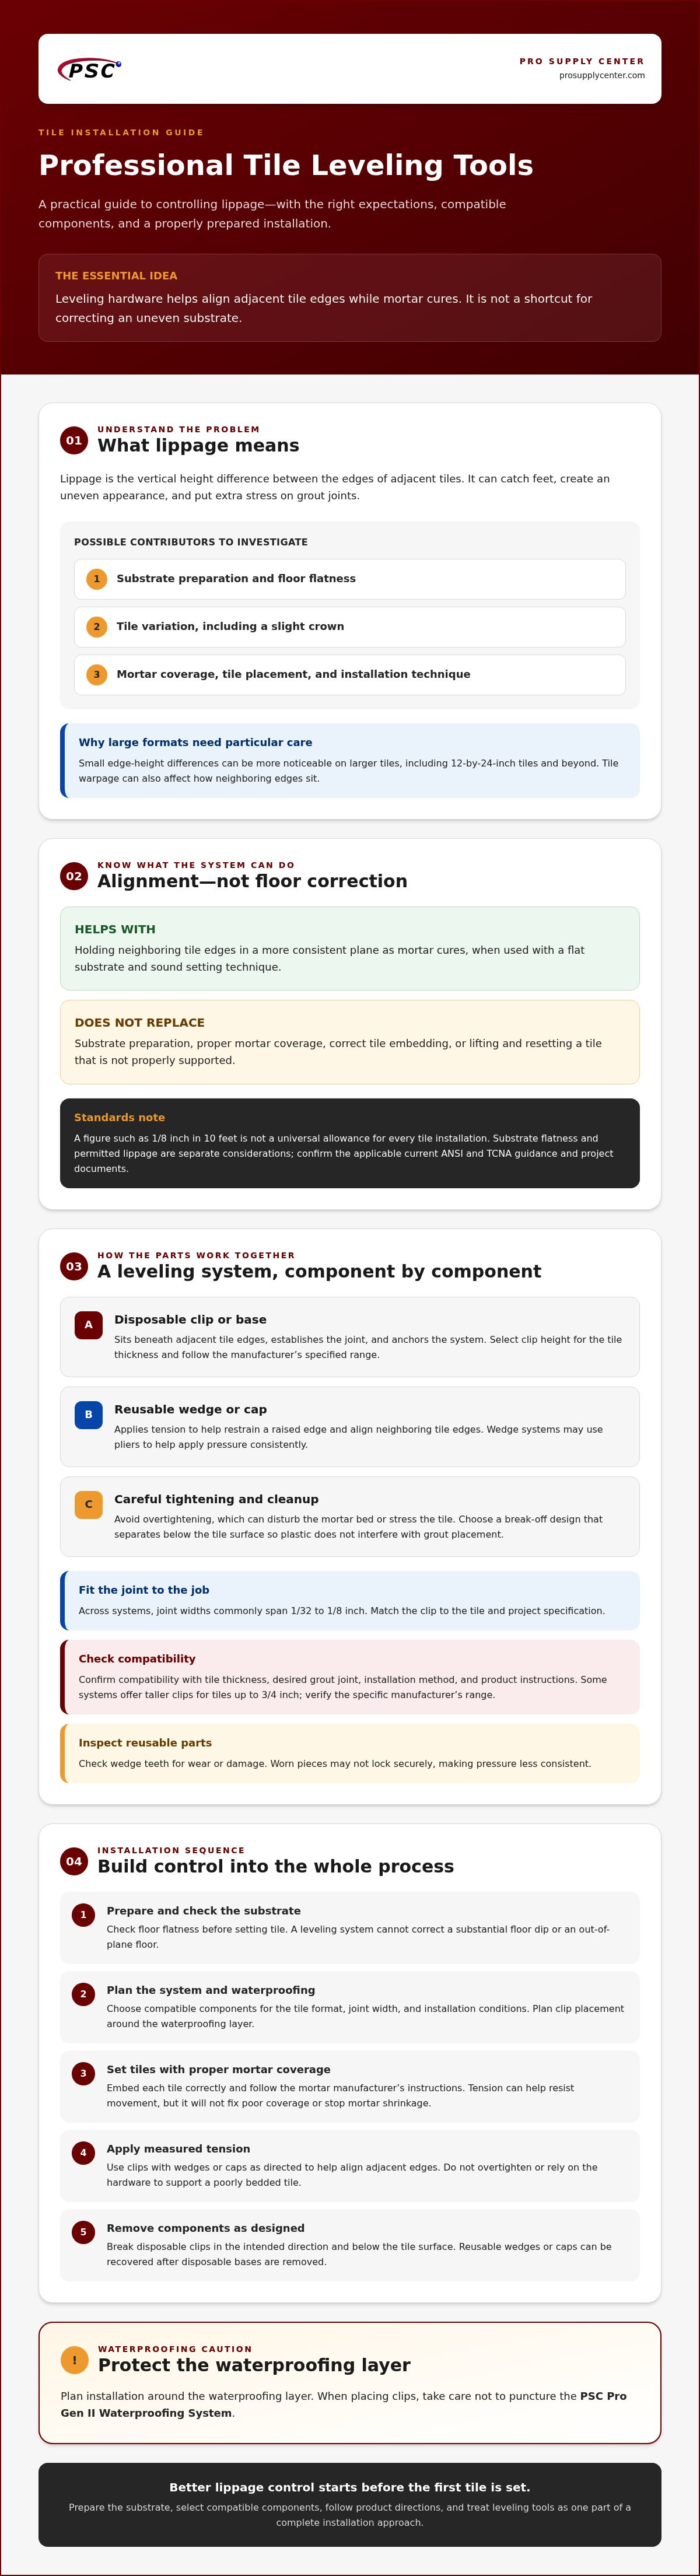
A floor can look aligned while mortar is wet, then reveal uneven tile edges as the installation settles. Lippage is the vertical height difference between the edges of adjacent tiles. It can catch feet, create an uneven appearance, and put extra stress on grout joints. The cause may involve substrate preparation, tile variation, mortar coverage, or installation technique, so consider the whole setting process when diagnosing a problem.
Tile varies by material, manufacture, and surface characteristics. For a basic overview of what are tiles, see the encyclopedic reference. For installers, the practical point is that tile edges may not sit in the same plane naturally. Larger formats, including 12-by-24-inch tiles and beyond, make small differences more noticeable. Some tiles have a slight crown, or subtly raised center, so neighboring edges can sit at different heights even when the layout is carefully set. Traditional spacers establish joint width, but they don’t apply force to align tile faces.
ANSI Standards for Floor Flatness
A figure such as 1/8 inch in 10 feet should not be treated as a universal allowance for every tile installation. Substrate flatness requirements and permitted lippage are separate considerations, and the applicable criteria depend on the tile, installation method, and project documents. Before work begins, confirm the current ANSI and TCNA guidance and the commercial specification governing the job. A leveling system can help align adjacent tiles, but it can’t correct an out-of-plane floor or replace substrate preparation.
The Physics of Tensioning
A typical leveling system uses a clip or post at the joint and a reusable wedge or cap to apply controlled tension. As the component tightens, it restrains a raised edge and helps bring neighboring tile edges into a more consistent plane. This supports relative alignment; it doesn’t replace lifting, resetting, or properly supporting a tile with mortar.
Even contact matters. With proper mortar coverage, mechanical tension can help hold tiles in position while the thin-set cures. Mortar can settle or shift during installation, and moisture loss is part of the curing process. A leveling system can help resist movement, but it won’t stop shrinkage or fix poor coverage. Follow the mortar manufacturer’s instructions, embed each tile correctly, and avoid overtightening, which can disturb the bed or stress the tile. Used with a flat substrate and sound setting technique, professional tile leveling tools offer more control than spacers alone, especially across large-format tile edges.
Core Components of a Professional Tile Leveling System
A leveling system is only as reliable as its components working together. Disposable clips or bases establish the joint and anchor the system. Reusable wedges or caps apply pressure, and many wedge systems use pliers to help apply that pressure consistently. Check that every component is compatible with the tile thickness, desired grout joint, and installation method. The Tile Council of North America’s lippage guidance also underscores that leveling hardware is one part of controlling edge height, not a substitute for sound installation practice.
Disposable Clips and Base Plates
The clip sits beneath adjacent tile edges, with its exposed section setting the spacing. Choose its height for the tile thickness. Some systems offer standard and taller clips for tiles up to 3/4 inch, but confirm the specific manufacturer’s range. Joint widths commonly span 1/32 to 1/8 inch across systems. Select a width that matches the tile and project specification, not simply the clip that’s easiest to stock.
Break-off design matters during cleanup. A clip should separate below the tile surface so plastic doesn’t remain in the grout joint and interfere with grout placement. The plastic needs enough strength to hold tension during curing, with a predictable break point when struck in the intended direction. Brittle clips can snap early; overly tough or poorly designed clips may leave stubs. Keep clips dry and handle them according to the product instructions.
Reusable Wedges and Caps
Wedges slide into the clip and maintain pressure. Caps on other system designs perform a similar tensioning role. Reusable components can be practical for high-volume work because they can be recovered after the disposable bases are removed. Inspect wedge teeth regularly. Worn or damaged teeth may not lock securely, making pressure less consistent. Sort reusable pieces into labeled containers by system and size, and keep them clear of mortar and job-site debris.
Tensioning Pliers and Consistent Pressure
Hand placement can vary from tile to tile, especially across a large floor. Pliers designed for a compatible wedge system help contractors apply repeatable tension and work efficiently across repeated placements. They don’t automatically prevent overtightening: excessive force can stress the clip or disturb the mortar bed. Set the tool as directed by its manufacturer, and check tile alignment as you go rather than relying on tension alone.
For a practical starting point, compare the ceramic tile leveling system options with your tile thickness, grout-joint plan, and preferred tensioning method before selecting hardware for a job.
Comparing Leveling Technologies: Wedge Systems vs. Spin-Down Caps
Wedge-and-clip and spin-down systems both help hold tile edges in alignment, but they apply tension differently. The right choice depends on the tile surface, whether you’re working on a floor or wall, crew workflow, and the system’s removal method. For a broader view of professional installation standards, consult the National Tile Contractors Association (NTCA) alongside the product manufacturer’s instructions.
Wedge Systems: A Practical Choice for Floor Work
Wedge systems are widely used on floors because compatible pliers can apply repeatable pressure across many tile placements. That can make them efficient during the mortar’s open time, particularly on larger layouts where hand-tightening each wedge can slow the crew and increase fatigue. Pliers don’t guarantee a flatter result. Use the adjustment recommended for the system, and don’t force a wedge so tightly that it shifts the tile or disrupts the mortar bed.
“Maximum PSI” isn’t a useful target unless a manufacturer provides a specific rating and procedure. The practical goal is controlled, consistent tension. Leveling hardware helps with tile alignment, while professional grade abrasives are a separate consideration for appropriate finishing tasks. Neither replaces correct setting technique.
Spin-Down Systems: Controlled Adjustment
Spin-down systems use a reusable cap that threads or turns onto a disposable base, depending on the design. Their gradual adjustment can be useful on vertical installations, where tile movement under gravity needs close attention, and on delicate or polished surfaces where a tool slipping against the face is a concern. Open-cap designs may also leave the joint visible for checking spacing, though visibility and surface protection vary by system. Use any protective shields specified by the manufacturer.
Removal differs by design. Wedge systems generally require breaking the disposable clip in the manufacturer’s specified direction. Spin-down systems may call for removing the cap first, then breaking or releasing the base. Clear excess mortar from the joint before it hardens, and follow the system’s instructions to avoid leaving plastic where grout must go.
Compare costs by job, not just by package. Estimate the disposable clips or bases needed for the tile layout, then factor in reusable wedges or caps that can be recovered and used again. Account for reusable parts that are lost, damaged, or worn across multiple jobs. This gives a more useful cost-per-square-foot comparison than treating every component as a one-time expense. For professional tile leveling tools, crew speed, surface sensitivity, and recovery of reusable hardware all affect a system’s practical value.
Installation Mastery: Using Leveling Tools with Large Format Tiles
Large-format tile can make installation errors more noticeable. A leveling system can help align neighboring edges, but it can’t flatten a poorly prepared substrate or support a tile that lacks adequate mortar contact. Check the floor with a straightedge before setting tile. A 1/2-inch dip needs correction using an appropriate substrate-preparation method, not by bridging it with tightened clips. Forcing tiles down can leave unsupported areas or disturb the mortar bed.
For large-format tile, follow the mortar manufacturer’s instructions for trowel selection, ridge direction, and embedment. Back-buttering adds mortar to the tile’s back to help achieve coverage. Coverage requirements depend on the installation conditions: 95% is commonly specified for wet areas and exterior installations, but don’t assume that applies universally to every floor. Check the current applicable standard and project specification, then lift tiles periodically to verify coverage and collapse of the mortar ridges. Leveling hardware can restrain movement, but it can’t compensate for inadequate coverage.
Strategic Clip Mapping
There’s no reliable one-size-fits-all clip count for a 24-by-48-inch tile or a 48-by-48-inch porcelain slab. Clip quantity and placement depend on the leveling system, tile thickness and dimensions, substrate, and manufacturer’s instructions. Plan a consistent layout before spreading mortar. Place clips along shared edges, including near corners where needed to limit edge movement or “winging,” while following the system’s spacing and setback guidance.
For a project of 500 square feet or more, estimate clip needs from the tile layout, not area alone. Count the shared joints in the installation plan, apply the system’s clip-spacing guidance, and add an allowance for cuts, breakage, or layout changes. Confirm the required quantity with a dry layout or installation takeoff before ordering.
Removal and Clean Up
Remove clips only after the mortar has set enough to hold the tiles without shifting. The correct wait varies with mortar, site conditions, and system instructions, so “after 24 hours” isn’t a universal rule. Follow the product directions. For break-off clips, use the specified kick-off method, generally in line with the grout joint, rather than striking across it. The wrong direction can leave plastic below the tile edge.
Before mortar hardens, clear squeeze-out from joints and around clip bases without disturbing tile support. After removing the clips, inspect each joint for plastic remnants. Clean joints are essential for proper grout placement. Select large-format tile leveling tools that suit your tile dimensions and system requirements before starting the installation.
Maximizing Efficiency: Integrating Leveling with PSC Pro Waterproofing
A flat tile finish depends on the layers beneath it. In a shower, substrate preparation, waterproofing, mortar, tile, and leveling hardware must work as a coordinated assembly. A membrane provides waterproofing, but it doesn’t automatically create a flat tile-setting surface. Prepare the substrate and preserve the planned drainage slope before installation. Install the PSC Pro Gen II Waterproofing System before tile, and plan clip placement to avoid puncturing the membrane.
Waterproofing shower kits organize components for a shower assembly, but the installer must still prepare a suitable, properly sloped base. Leveling clips align neighboring tile edges; they don’t form the shower pan or correct its pitch. Treat those as separate requirements during layout and setting.
Leveling in Wet Environments
Confirm that the thin-set mortar is suitable for the membrane and tile assembly, and follow the mortar, membrane, and leveling-system manufacturers’ instructions. The PSC Pro Gen II Waterproofing System allows modified thin-set mortar, but check compatibility for the exact products and application. Set clips in the mortar without driving them through or damaging the waterproofing layer. On shower floors, keep checking the intended slope toward the drain as tiles are adjusted. A level-looking surface isn’t the goal if it prevents proper drainage.
Plan drain and other integrated shower components before setting tile. Their placement affects cuts, transitions, and the finished layout, while the membrane’s continuity remains essential beneath the tile. Professional tile leveling tools can help control tile-edge alignment, but they can’t replace correct waterproofing, mortar coverage, or slope.
Coordinate the Materials Before Installation
Pro Supply Center supplies ceramic tile leveling systems alongside the PSC Pro Gen II Waterproofing System and shower components. Sourcing related materials from one provider can help contractors coordinate product selection and job planning. Confirm delivery timing rather than assuming it. Review assembly requirements and quantities before work begins, so the waterproofing, setting materials, tile, and leveling components are ready for their respective steps.
View professional tile leveling systems at Pro Supply Center and compare options for your installation requirements.
Build a Flatter Finish on Every Tile Project
A lippage-free installation starts before the clips go in. Prepare a flat substrate, choose a leveling system that suits the tile and layout, and apply consistent tension without relying on hardware to correct problems beneath the tile. For large-format installations, verify mortar coverage and keep the project’s waterproofing requirements in view, especially in wet areas.
The right professional tile leveling tools support better edge alignment, but dependable results come from the complete installation process. Choose components suited to repeated job-site use, and select materials with your tile, mortar, and project specifications in mind. Pro Supply Center offers ceramic tile leveling systems alongside the PSC Pro Gen II Waterproofing System, helping contractors coordinate materials from waterproofing through tile placement.
Browse Professional Tile Leveling Systems and Components to compare options for your next project. Careful preparation and a well-matched system can help you work toward a cleaner finish and more confident handoff.
Frequently Asked Questions
Do I really need a tile leveling system for small tiles?
Not always. Small tiles may be manageable with correctly sized spacers and careful setting. A leveling system can still help where tile edges vary, the layout makes lippage more visible, or consistent alignment is difficult. Check that the system is compatible with the tile size and thickness, especially for mosaics or sheet-mounted tile. Avoid applying excess tension, which can shift small pieces or disrupt the mortar bed.
Can I reuse the clips from a professional leveling kit?
Usually, the clip or base is disposable and designed to break away after the mortar cures. The wedge or cap is typically the reusable part, provided it’s recovered intact and remains compatible with the system. Inspect reusable components for cracked bodies, worn teeth, or damaged threads before the next installation. Follow the manufacturer’s instructions, since component design and reuse guidance vary between professional tile leveling tools.
How long should I wait before removing tile leveling clips?
Remove clips only after the mortar has set enough to hold the tiles without movement. There isn’t one waiting period that suits every installation; mortar type, temperature, humidity, tile, and substrate can affect setting time. Follow the mortar and leveling-system manufacturers’ directions rather than assuming a fixed 24-hour wait. Removing clips too early can shift tile edges, while leaving them until mortar hardens around them can complicate cleanup.
Will a leveling system fix a subfloor that isn’t flat?
No. A leveling system helps align adjacent tile edges, but it won’t correct a dip, hump, or structural movement in the substrate. Check floor flatness before spreading mortar and prepare the surface using a method appropriate for the substrate and tile installation. Trying to bridge a substantial low spot with extra mortar or clip tension can leave uneven support and compromise the tile setting. Start with a suitable, prepared base.
What is the difference between a tile spacer and a leveling system?
A spacer sets the gap between tiles, helping maintain a consistent grout-joint width. A leveling system also uses components that apply pressure across neighboring tile edges to help keep them aligned while mortar cures. Neither tool replaces substrate preparation or proper mortar coverage. Spacers may be sufficient for some installations, while a leveling system can offer added control with larger tiles or layouts where edge-height differences are more noticeable.
Do professional leveling systems work with natural stone?
They can, if the specific system is suitable for the stone’s thickness, format, and surface. Polished or delicate stone may need protective shields or plates to reduce the risk of marking, and tension should be applied carefully to avoid stressing the material. Check the leveling-system and stone installation instructions before use. Test the setup on a sample or inconspicuous area if surface sensitivity is uncertain.
How do I prevent thin-set from clogging the leveling clips?
Use only enough mortar to achieve the required coverage, and keep the clip openings and grout joints clear as you set each tile. If thin-set squeezes into the joint, remove the excess while it’s still workable without disturbing tile support or the clip. Don’t wait for mortar to harden around the base. Check and clean joints as you progress so clips can break away properly and grout has adequate space.
Can leveling tools be used on wall tile installations?
Yes, many systems can be used on walls if the manufacturer lists them as suitable for vertical installation and the components match the tile. Wall tile can slide under its own weight, so follow the system’s tensioning directions and use appropriate temporary support where needed. Work in manageable areas, check alignment frequently, and make sure the mortar is suitable for the tile and wall assembly.


