

What if the tile on your shower wall isn’t the layer keeping water out? Tile and grout can resist water, but they aren’t waterproof. A reliable shower wall waterproofing system depends on the layers behind the finish working together to manage water and protect the wall assembly.
Leaks can start at corners, niches, valve openings, or the wall-to-base transition. A membrane alone doesn’t make a complete assembly. Its connections, penetrations, and installation details matter just as much.
This guide explains how the layers work together, which junctions need careful attention, and how to compare a complete system with individual products. Before choosing an option such as the PSC Pro Gen II Waterproofing System, check the current product documentation for approved substrates, compatible components, and application requirements. The goal is to choose based on documented compatibility, not assumptions about products that happen to fit together.
Key Takeaways
- Assess the substrate, waterproofing layer, seams, penetrations, and tile finish as parts of one coordinated assembly.
- Compare sheet membranes, liquid-applied membranes, and waterproof backer products by their installation requirements and compatible detailing.
- Before installation, use current manufacturer documentation to confirm that system components and the selected substrate are compatible.
- Plan transitions and penetrations before tiling, and follow product-specific sequencing and curing requirements.
- Evaluate the shower wall waterproofing system, including PSC Pro Gen II, against your project requirements and its current instructions.
What a Shower Wall Waterproofing System Does, and What Tile Cannot Do
A shower wall is repeatedly exposed to water and moisture, so its protection can’t depend on the visible finish alone. A shower wall waterproofing system is the coordinated set of materials and details that manages water across the wall assembly. Depending on the system, it may include a suitable substrate, a waterproofing layer, treated seams and penetrations, and a tile finish. Each part has a role, and the assembly must be installed as specified.
Water-resistant and waterproof aren’t interchangeable terms. Water-resistant materials can limit water exposure under certain conditions. A waterproofing layer is intended to prevent water from passing through the protected assembly when correctly installed. The distinction is described in Waterproofing. Check product documentation for each material’s intended use and compatibility. Don’t assume two products work together simply because both are used in showers.
Why tile and grout alone do not waterproof shower walls
Tile is the finished surface, not a replacement for the specified waterproofing layer. Grout fills joints, but joints, changes in plane, and openings around fixtures can still provide paths for moisture, depending on the materials and installation. Water that gets behind the finish may accumulate within the wall assembly.
The waterproofing layer behind or within the finished wall assembly is intended to manage that exposure and protect the materials beyond it. Tile, grout, backer products, and membranes have different properties and roles. Follow the selected system’s instructions rather than treating any one material as a universal substitute for another.
What continuity means in a shower wall assembly
A continuous shower wall waterproofing assembly maintains the specified water-management layer across connected surfaces and treats every joint, opening, and transition according to the system’s instructions.
Continuity takes planning wherever the wall meets another surface or the waterproofing layer changes direction. Corners, niches, valve openings, and the wall-to-base transition need compatible detailing so the water-management layer remains connected. The method depends on the selected system, so confirm the required materials and sequence before covering the work with tile.
Before starting, confirm that the substrate is approved for the system and that the membrane, seam treatments, and other details are compatible. Use current manufacturer documentation for surface preparation, application, and sequencing. A finished wall can look complete while concealing a break in the assembly, so plan and inspect the waterproofing details before tiling.
The Layers and Components That Make a Shower Wall Waterproofing System
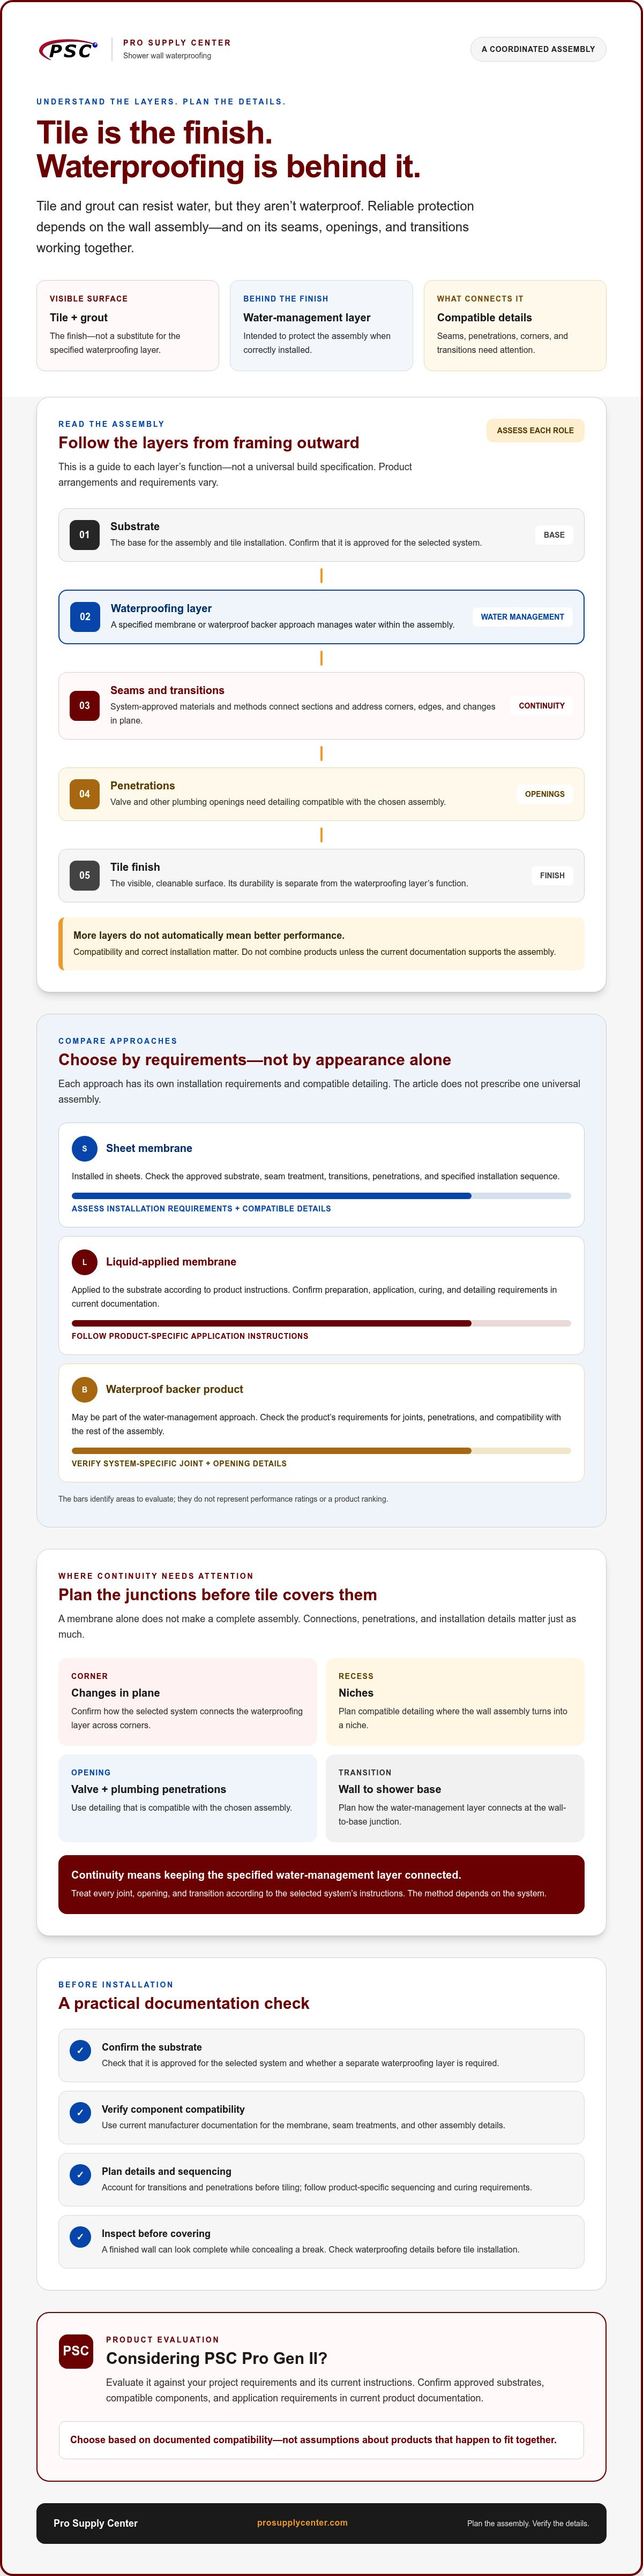
Assess a shower wall waterproofing system by following the layers from framing outward. The arrangement varies by product. Some systems use a separate substrate and membrane, while others may use a waterproof backer product as part of the water-management approach. Use this sequence as a guide to each layer’s function, not as a universal build specification.
- Substrate: Provides the base for the assembly and tile installation. Confirm that it’s approved for the system and whether it requires a separate waterproofing layer.
- Waterproofing layer: The specified membrane or waterproof backer approach manages water within the assembly. Sheet membranes are installed in sheets; liquid-applied membranes are applied to the substrate according to product instructions.
- Seams and transitions: System-approved materials and methods connect membrane sections and address corners, edges, and changes in plane.
- Penetrations: Openings for valves and other plumbing need detailing compatible with the chosen assembly.
- Tile finish: Provides the visible, cleanable surface. Finish durability is separate from the substrate’s moisture resistance and the waterproofing layer’s function.
These are functions, not a direction to combine every product. A sheet-membrane assembly and a liquid-applied assembly may use different substrates, seam treatments, and application steps. A waterproof backer product may also have specific requirements for joints and penetrations. More layers don’t automatically mean better performance. Compatibility and correct installation matter. For product-specific context, see this professional shower waterproofing system reference.
Substrate, waterproofing layer, and tile finish
Separate three questions as you compare materials: Is the substrate suitable for the installation? What provides the waterproofing? Will the tile finish meet the project’s appearance and maintenance needs? A moisture-resistant substrate isn’t automatically a complete waterproofing assembly. Check current manufacturer instructions to see whether an additional membrane is required, which surfaces it must cover, and how it connects to adjoining details.
Seams, corners, niches, and plumbing penetrations
Flat wall areas are only part of the job. Corners change plane, niches create inside corners and edges, and valve openings interrupt the wall surface. Each detail needs the treatment specified for the system. Improvising with an unapproved sealant or mixing products can leave compatibility uncertain. Shower drains and niches are also part of the broader water-management plan, as discussed in this professional shower hardware guide.
Before choosing materials, compare the manufacturer’s approved substrates, seam and penetration details, and installation sequence. Pro Supply Center supplies waterproofing systems and related shower components. Review its waterproofing and shower supplies as options to evaluate against your project and current product documentation.
Choosing a Shower Wall Waterproofing System: Compare Complete Assemblies
Compare complete assemblies, not just membrane materials. A sheet membrane, liquid-applied membrane, or waterproof backer approach may suit a project, but the right choice depends on the approved substrate, the details required at seams and openings, and the installation steps you can follow. A product label alone doesn’t confirm that separate materials are compatible.
Compare approaches by installation requirements
Sheet membranes are installed in sections, so check how the instructions specify joining sheets and treating corners. Liquid-applied membranes are applied to the substrate using the method and coverage stated by the manufacturer. Integrated waterproof backer approaches may combine functions, but still need clear instructions for joints, penetrations, and transitions. No approach is automatically the most durable or easiest to install in every project.
| Selection criterion | What to compare | Product-specific value |
|---|---|---|
| Substrate | Approved substrate types and required surface preparation | Verify in current instructions |
| Application | Sheet installation, liquid application, or integrated backer approach | Verify sequence and conditions |
| Seams and details | Required overlaps, seam treatments, corners, and penetration methods | Verify approved materials and methods |
| Setting materials and drain | Compatibility with the membrane, tile-setting materials, and drain connection | Verify documented compatibility |
| Curing and inspection | Required curing time and checks before covering the assembly | Verify in current instructions |
Resolve compatibility before selecting products
Read the written instructions for each proposed component. Confirm that the substrate, membrane, seam treatment, drain, and setting materials are approved for use together. Then check surface preparation, application conditions, sequencing, curing, and inspection steps. If the documentation doesn’t clearly answer a compatibility question, don’t assume the products can be combined.
Selection rule: Evaluate documented assembly compatibility, not isolated product labels. The waterproofing shower kit guide offers broader context for comparing kit contents and system requirements. Pro Supply Center supplies waterproofing shower kits and the PSC Pro Gen II Waterproofing System. Review current manufacturer documentation to determine whether a product fits your project. You can also explore waterproofing system options as part of that evaluation.
How to Plan Shower Wall Waterproofing Details Before Tile Installation
Begin tile work only after the waterproofing plan is clear. Use this sequence to align product selection, surface preparation, and detail work. The shower wall waterproofing system determines the approved materials and installation steps, so follow its current instructions rather than relying on a generic sequence.
- Select the system. Identify the products and assembly approach before preparing the walls.
- Confirm compatibility. Check that the substrate, waterproofing materials, detail components, drain connection, and setting materials are approved for use together.
- Prepare surfaces. Follow the manufacturer’s requirements for substrate condition and preparation.
- Detail transitions. Treat seams, corners, openings, and connections to adjacent shower surfaces using the specified materials and method.
- Inspect before tile. Check coverage and details, then follow the system’s instructions for testing, repairs, and waiting periods.
- Install tile. Proceed only when the specified inspection steps are complete and the assembly is ready according to its instructions.
Plan wall-to-base transitions, corners, and penetrations
Map the details before applying the waterproofing layer. Mark each change of plane, pipe opening, niche, and connection between the wall and adjoining shower surfaces. These locations may need different treatment from a flat wall area. Confirm the approved materials and sequence for every transition in the selected system’s documentation. If an opening or connection isn’t clearly addressed, resolve the question before covering it.
Inspect the waterproofing before covering it
Use a pre-tile check to catch missed areas while they’re still accessible. Confirm that the specified coverage is complete and that seams, corners, niches, plumbing openings, and transitions have been treated as instructed. Look for visible gaps, damage, or incomplete details, and consult the manufacturer’s guidance on corrections. Don’t assume every system uses the same test, waiting period, or repair method.
- Are all required wall areas covered according to the product instructions?
- Are seams and changes of plane treated with the specified materials?
- Are niches, valve openings, and other penetrations detailed as directed?
- Is the wall-to-base transition complete and connected as required?
- Have required testing, inspection, repair, and waiting steps been completed?
Pre-tile inspection principle: Cover the waterproofing only after checking its continuity and details against the selected system’s instructions.
For your project, review waterproofing system options and confirm each product’s current documentation before installation.
When to Consider PSC Pro Gen II for a Shower Wall Project
The PSC Pro Gen II Waterproofing System is an option from Pro Supply Center to evaluate for a shower project. Check how its documented requirements fit the actual wall assembly rather than assuming the product name alone confirms suitability. A system approach can help organize a review of related materials and details, but it doesn’t replace compatibility checks or careful installation, and it doesn’t promise a leak-proof result.
What to verify in PSC Pro Gen II product documentation
Before purchasing, review the current manufacturer documentation and confirm that it addresses the planned wall application. Check the approved substrates and requirements for seams, plumbing penetrations, corners, niches, and transitions to adjoining surfaces. Also verify which components are included and which, if any, must be selected separately. Don’t infer specifications, certifications, warranties, or performance claims that aren’t stated in current product documentation.
Compare the instructions with the project conditions. A suitable system must match the substrate and layout, and its specified materials and installation sequence must be clear before work begins. If the documentation doesn’t resolve a compatibility question, seek clarification from the manufacturer or supplier before ordering or combining products.
A practical next-step checklist for contractors and renovators
Record the details that affect system selection, then use them to check the product documentation. This can help you identify gaps before materials arrive or the wall is covered.
- Identify the wall substrate and confirm whether the documentation approves it for the intended application.
- Note the shower layout, including corners, niches, and connections to adjacent surfaces.
- Mark plumbing openings, such as valve penetrations, and confirm the specified detailing method.
- Record the planned tile finish and verify the required setting materials and sequence.
- List the system components you expect to need, then compare that list with confirmed kit contents and manufacturer instructions.
- Resolve unclear requirements before purchase and installation instead of filling gaps with assumptions.
These checks help you decide whether PSC Pro Gen II fits the project and which additional components may need consideration. Use current documentation as the basis for that decision, then explore PSC Pro Gen II waterproofing and Pro Supply Center’s related waterproofing supplies.
Build Confidence Into Your Next Shower Project
A reliable shower wall waterproofing system depends on more than choosing a membrane. The substrate, waterproofing layer, seams, penetrations, and transitions must work as a compatible assembly. Tile is the finish, so inspect the waterproofing details before covering them and follow the selected manufacturer’s current instructions for preparation, installation, and required checks.
Compare complete systems by their approved substrates, application methods, detailing requirements, and documentation. For PSC Pro Gen II, verify that the current instructions address your wall application and project conditions, and confirm which components are included before purchase. These checks support an informed selection without relying on assumptions about compatibility.
Pro Supply Center offers the PSC Pro Gen II Waterproofing System, waterproofing shower kits, shower drains, and related installation supplies. Review Pro Supply Center's waterproofing supplies and compare the options with your project requirements. Use a clear plan and current product documentation to prepare for installation.
Frequently Asked Questions
Is tile itself waterproof enough for shower walls?
No. Tile is a finish material, and grout joints or openings around fixtures can allow moisture to pass or collect behind the finished surface. Tile and grout may resist water, but they aren’t a substitute for the specified waterproofing assembly. The wall’s protection depends on the waterproofing layer and its details, installed according to the selected system’s instructions.
What does a shower wall waterproofing system include?
A shower wall waterproofing system typically coordinates a suitable substrate, a waterproofing layer or approved waterproof backer approach, treatments for seams and transitions, and compatible details at plumbing openings. Tile and setting materials complete the assembly but don’t replace its waterproofing function. Components vary by system, so check current manufacturer documentation for approved substrates, required detail materials, and installation sequence.
Can you waterproof shower walls without removing the existing tile?
Sometimes a coating or overlay may be possible, but don’t assume it will create a reliable waterproof assembly over existing tile. Suitability depends on the product instructions, the tile’s condition, surface preparation, and how edges, fixtures, and transitions can be connected. An overlay may also leave existing moisture damage hidden. Confirm that the proposed method is approved for the actual surface and project conditions before proceeding.
How do you waterproof corners and seams in a shower wall?
Use the seam and corner treatments specified for the selected waterproofing system. The method can differ between sheet membranes, liquid-applied products, and other assemblies, so don’t substitute materials or assume one sealing method fits all. Plan inside and outside corners, wall-to-base transitions, niches, and plumbing openings before installation. Follow the manufacturer’s instructions for preparation, application, overlap, and any required curing.
Do shower walls need waterproofing behind tile?
Yes. Shower walls need a continuous water-management layer behind or within the finished assembly, as specified for the chosen system. Construction varies, and some approved products may combine functions, so don’t assume every wall uses the same materials. Verify whether the substrate itself provides the required waterproofing or needs an additional layer, then follow the current product instructions for connected details.
Can different waterproofing products be combined in one shower system?
Only if current product documentation confirms that the specific materials are compatible for the intended assembly. Check the substrate, membrane, seam treatments, drain connection, and tile-setting materials as a group. Similar product descriptions or intended uses don’t prove that components work together. If the instructions don’t clearly address a combination, ask the manufacturer or supplier before installation rather than relying on an assumption.
What should you check before tiling over a waterproofed shower wall?
Before tiling, check that the required areas are covered and that seams, corners, niches, plumbing openings, and wall-to-base transitions follow the system instructions. Look for visible gaps or damage, and complete any manufacturer-required inspection, testing, repairs, or waiting periods. Confirm that the waterproofing is ready to receive the specified setting materials. Don’t cover unresolved details, because they’re harder to inspect once tile is installed.


