

A single jagged edge on a high-end porcelain slab can cost you more in wasted material and lost labor than your entire inventory of cutting tools. When you're working with dense, modern materials, the margin for error is non-existent. You've likely dealt with the frustration of a diamond blade that loses its edge halfway through a bathroom install or a hole saw that wanders across a polished surface, ruining the aesthetic. Selecting professional grade abrasives for tile is a technical necessity for any contractor who prioritizes functional reliability and a clean finish over constant tool replacement.
We understand that your reputation depends on the precision of your final cuts and the durability of your work. This 2026 guide provides the practical knowledge you need to master the selection and application of high-performance abrasives, ensuring chip-free results on every installation. We'll break down the specific diamond tools required for hard porcelain, explain how to prevent bit wandering during critical penetrations, and outline the methodical steps for polishing exposed edges to a factory-level standard. By the end of this article, you'll have a clear framework for choosing the right equipment to speed up your workflow and eliminate material waste.
Key Takeaways
- Identify the critical differences in diamond concentration and bond hardness that define professional grade abrasives for tile when working with high-density porcelain.
- Select the appropriate diamond blades and polishing pads for specific wet or dry applications to ensure chip-free miter joints and professional finishes on exposed edges.
- Match abrasive bond types to your specific material, learning why dense porcelain requires softer bonds to prevent tool glazing and maintain cutting speed.
- Implement professional maintenance techniques, such as blade dressing and precise RPM management, to extend the service life of your tools and reduce material waste.
- Enhance the final aesthetic of PSC Waterproofing Shower Kits by using precision abrasives to create custom, expert-level finishes that match the quality of the underlying system.
Understanding the Role of Professional Grade Abrasives in Modern Tiling
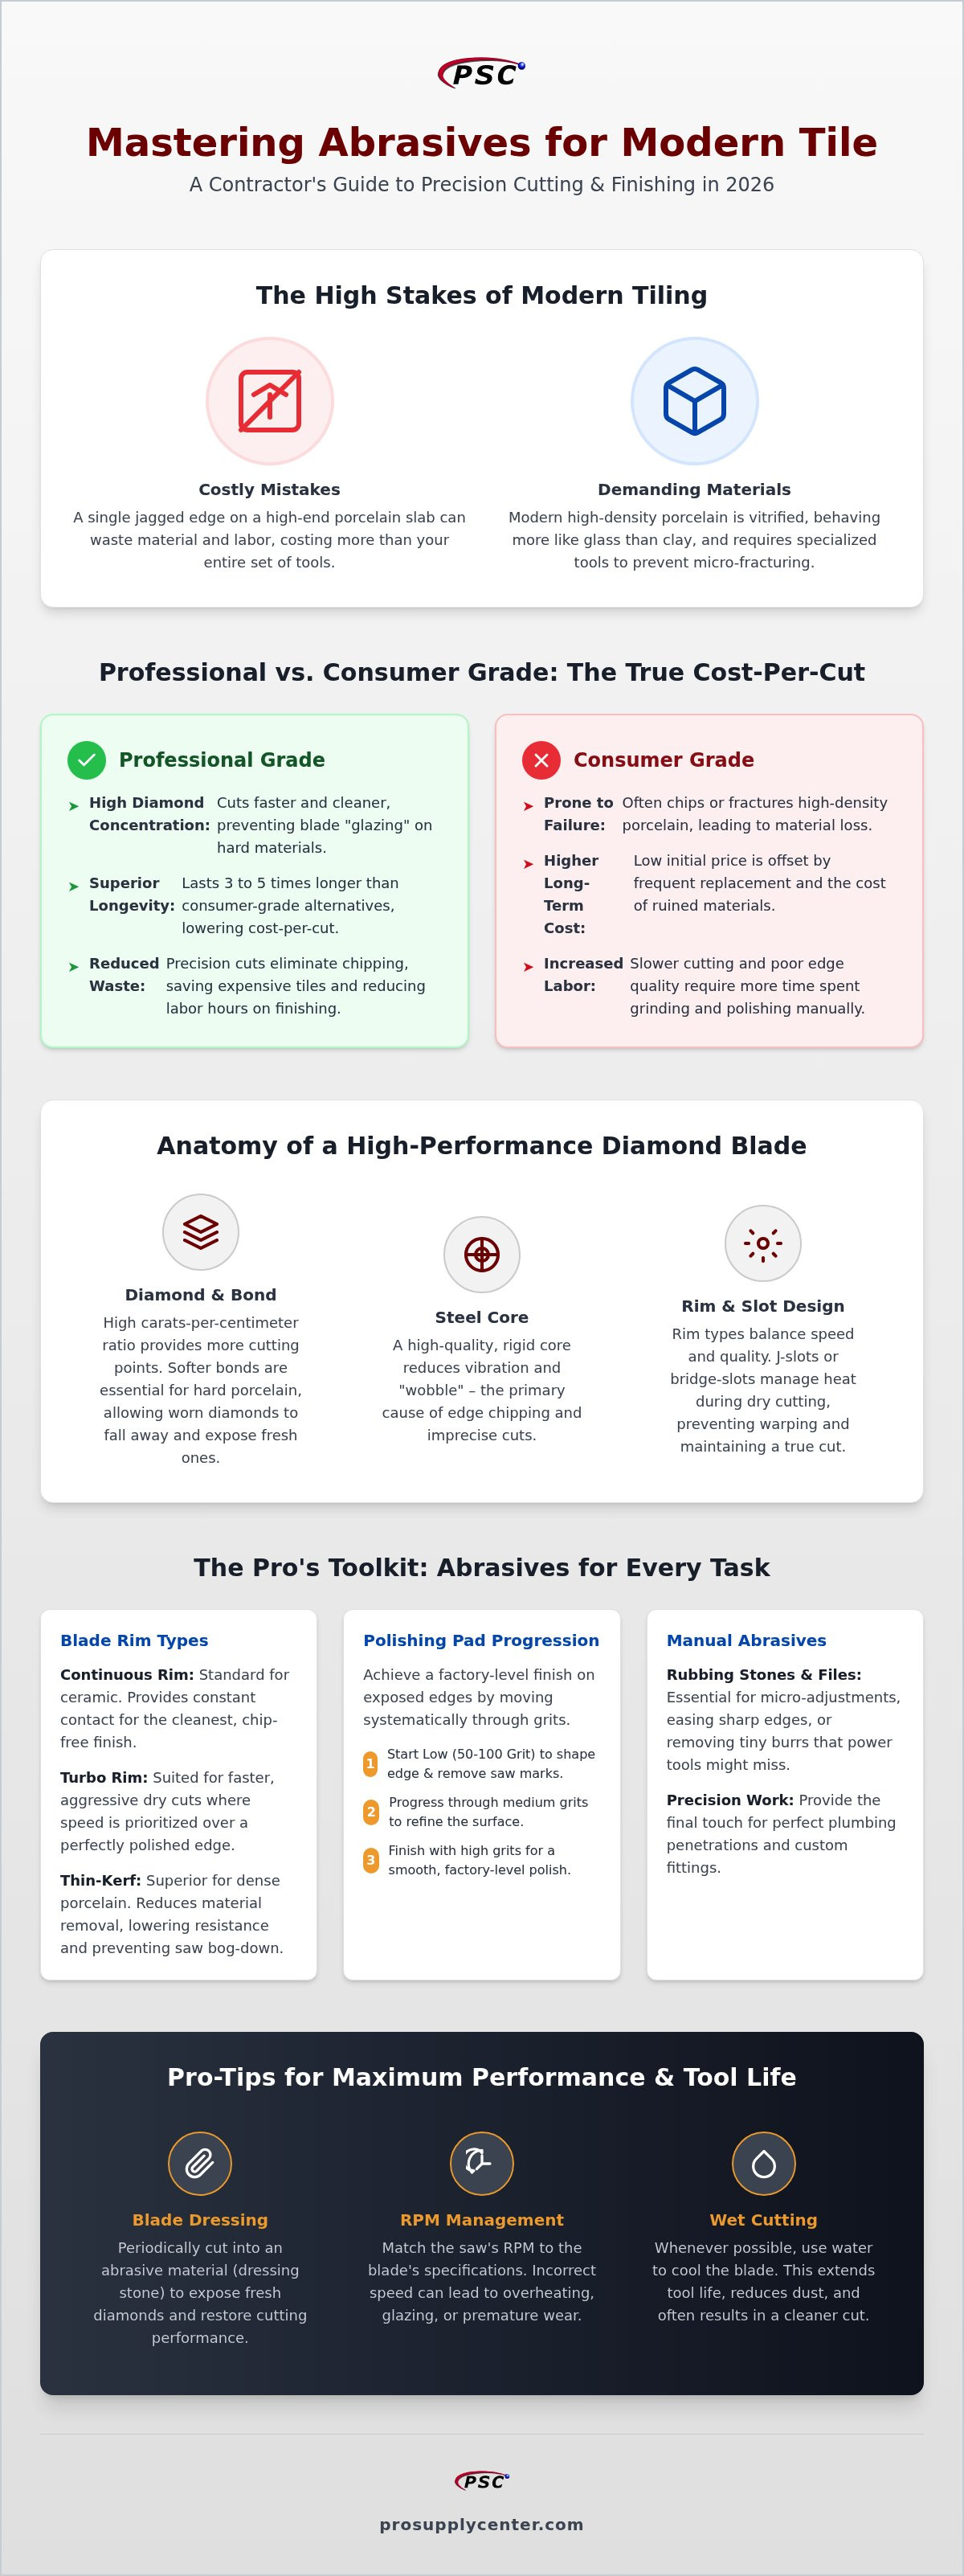
Professional grade abrasives for tile aren't just commodity items; they're precision instruments engineered for specific material densities. These tools feature a high concentration of synthetic diamonds suspended in a metallic bond designed to wear away at a controlled rate. While standard retail options might cut basic ceramic, they often fail on 2026-spec high-density porcelain. Modern porcelain is vitrified to a level where it behaves more like glass than clay. Using the wrong abrasive causes micro-fracturing along the cut line, which compromises grout joint integrity and creates jagged edges that are impossible to finish professionally.
The relationship between cut quality and the underlying structure is direct. Precision cuts ensure that tiles fit tightly and predictably. This reduces mechanical stress on the PSC Pro Gen II Waterproofing System, as properly fitted tiles don't require excessive thin-set to bridge gaps or hide errors. When your cuts are clean, the entire installation remains stable, preventing the stress fractures that often lead to moisture intrusion or material failure over time.
The Anatomy of a High-Performance Diamond Blade
A blade's effectiveness depends on the balance between grit size and diamond concentration. Professional grade abrasives for tile use a higher carats-per-centimeter ratio, providing more cutting points in contact with the material. This prevents the blade from "glazing" over when it hits hard porcelain. A high-quality steel core is also vital for reducing vibration. Excessive wobble is the primary cause of edge chipping. For most finish work, a continuous rim blade is the standard for chip-free results, while turbo rims are better suited for faster, aggressive dry cuts where speed is prioritized over a polished edge.
Why "Big Box" Abrasives Cost More in the Long Run
Contractors should evaluate tools based on the cost-per-cut rather than the initial price tag. Professional abrasives typically last three to five times longer than consumer-grade alternatives. If a cheap blade chips a single high-value porcelain plank, the "savings" on that tool disappear instantly. Beyond material waste, time is your most expensive resource. A professional blade cuts faster and cleaner, significantly reducing the labor hours spent on grinding or polishing edges manually. Finishing a project faster with fewer ruined tiles is the most reliable way to maintain your profit margins on a demanding job site.
Essential Abrasive Categories for Professional Tile Installations
Successful tile installation requires a layered approach to material management. While a primary cut gets the tile to size, achieving a factory-level finish on modern porcelain or stone demands a specialized kit. Utilizing professional grade abrasives for tile allows you to move from rough sizing to fine detailing without risking material failure. Each tool category serves a specific functional purpose in the workflow, from managing heat during cuts to smoothing out plumbing penetrations. Beyond power tools, manual abrasive files and rubbing stones are essential for micro-adjustments, allowing you to ease sharp edges or remove tiny burrs that a large saw might miss.
Diamond Blades: Selecting the Correct Rim and Bond
Selecting the right blade rim is a matter of balancing speed against edge quality. Continuous rim blades are the standard for ceramic because they provide constant contact, which is essential for a chip-free finish. For high-density porcelain, thin-kerf blades are often superior. These reduce the volume of material being removed, which lowers resistance and prevents the saw from bogging down. To manage the high temperatures generated during dry cutting, look for J-slot or bridge-slot designs. These laser-cut patterns allow the steel core to expand and contract without warping, maintaining a true cut even during extended use on hard materials.
Polishing Pads: Achieving a Factory Edge
Polishing pads are used to finish exposed edges, miter joints, and bullnose profiles. The process relies on a systematic grit progression. You generally begin with a 50 or 100-grit pad to shape the edge and remove saw marks. From there, you move through 200, 400, and 800 grits to eliminate scratches. For a high-gloss finish that matches the original tile surface, pads up to 3000-grit are used. Wet pads are usually preferred for shop work to eliminate dust and keep the diamonds cool, while dry pads offer practical convenience for on-site adjustments. Consistent pressure and steady RPM are the keys to avoiding "waves" in the finished profile.
Hole Saws and Core Bits for Precision Openings
Plumbing penetrations require specialized bits to handle the vitrified surface of modern tiles. Vacuum-brazed diamond bits are ideal for dry drilling because the diamonds are bonded directly to the surface, allowing for aggressive cutting without water. Sintered bits, where the diamonds are embedded throughout the metal matrix, are better for high-volume commercial use but often require constant lubrication. To prevent the bit from "walking" across a polished tile, start the hole at a 45-degree angle. Once the bit has bit into the surface, slowly rotate the drill to a 90-degree position. This method ensures clean, centered openings for shower valves and drains, especially when used with professional grade abrasives for tile sourced for durability. These precise openings ensure a professional fit for all fixtures within your shower installation.
Matching Abrasives to Material: Porcelain, Ceramic, and Stone
Material density dictates your abrasive choice. Porcelain is vitrified and extremely hard, which requires a soft-bond matrix. If the bond is too hard, the diamonds won't expose properly, and the blade will simply bounce off the surface. Professional grade abrasives for tile solve this by using a bond that erodes at a rate consistent with the material's resistance. Conversely, ceramic tile has a softer body but a brittle glaze. For these, you need a stable, continuous rim blade that prioritizes chip control over aggressive stock removal. Balancing speed and precision is the only way to keep high-value glazes intact during the final stages of an install.
Glass tile presents a unique challenge in 2026 installations. It requires ultra-fine grit abrasives to prevent shattering. Using a standard porcelain blade on glass will almost certainly cause micro-cracking. Specialized glass blades feature a much higher diamond grit count, often between 200 and 300 grit, to ensure the cut is more of a grind than a rip. This prevents the glass from splintering along the cut line, which is especially important for mosaic sheets and decorative accents.
Tackling Large Format Porcelain (LFP)
LFP is a major trend, often coming in thicknesses as low as 3mm. These slabs are under significant internal tension. If your abrasive causes vibration, the slab can crack across its entire width. Dampening the cut with water and using a high-quality bridge-saw blade is non-negotiable. Precision here is vital because LFP is often paired with a ceramic tile leveling system to ensure perfectly flat transitions. If the edges are chipped or the cut isn't square, the leveling system will highlight those flaws rather than hide them. Using a thin-kerf blade reduces the pressure on the slab, significantly lowering the risk of structural failure.
Abrasives for Natural Stone and Terracotta
Natural stone like granite or marble is porous. During the abrasive process, you must manage the slurry carefully to prevent the stone from absorbing grey residue. When working with light-colored marble, professional grade abrasives for tile with resin bonds are superior to metal bonds that might cause staining. For a professional finish, follow a strict grit sequence. Start with 50-grit for shaping, move to 400-grit for a honed look, and finish with 3000-grit for a high-polish shine. Terracotta requires a coarser approach to avoid clogging the diamond matrix with clay dust, which can quickly glaze over a fine-grit blade.
Maximizing Tool Life and Cut Quality: Professional Standards
To accurately calculate your overhead, you must look at the cost-per-cut metric. A cheaper blade might seem like a bargain at the register, but if it only survives ten cuts through vitrified porcelain before glazing over, your actual expense is much higher than a premium tool that lasts for hundreds. Professional grade abrasives for tile are built to endure, but their lifespan is directly tied to how you manage the mechanics of the cut. Efficiency on the job site isn't just about speed; it's about making every diamond count.
Proper RPM management is the first step in preserving your investment. Faster speeds generate excessive heat, which causes the metallic bond to melt over the diamonds, a process known as glazing. If your blade starts to slow down or spark, it's time for the dressing technique. Run the blade through a dedicated dressing stone or a piece of soft, abrasive brick. This removes the glazed metal and exposes a fresh layer of diamonds. Additionally, always optimize your water flow for wet-cutting. The water shouldn't just sit on the tile; it needs to hit the point of contact to flush away the slurry. Slurry is abrasive and will prematurely wear down the steel core if it isn't cleared away.
Let the tool do the work. Applying excessive pressure doesn't speed up the cut; it only increases the likelihood of the blade wandering or the tile cracking. Maintain a steady, consistent feed rate and let the diamonds grind the material at their own pace. For the best results and the lowest cost-per-cut, you can find professional grade abrasives for tile that are specifically engineered for high-density materials.
Troubleshooting Common Cut Issues
If you notice your saw is making curved or "wandering" cuts, the steel core has likely lost its tension due to overheating. Once a core is fatigued, the blade will never cut straight again and should be retired. Bottom-edge chipping in porcelain is another common frustration. This usually indicates that your feed rate is too fast or your blade is dull. If the top of the cut is clean but the bottom is jagged, try slowing your pass or dressing the blade to sharpen the diamonds. When you see segments beginning to thin or show signs of loss, stop using the tool immediately to avoid material damage or injury.
Job Site Safety with High-Speed Abrasives
Silica dust management is a critical aspect of modern contracting and mandatory for OSHA compliance. Always prioritize wet-cutting to keep dust levels at a minimum. If dry grinding is necessary, use a vacuum shroud system with a HEPA filter. Before every shift, inspect your mounting flanges and the blade's arbor hole. A poorly seated blade creates vibration, which ruins the cut and puts unnecessary stress on the saw's motor. Essential PPE for any abrasive work includes high-impact eye protection, hearing protection, and respirators rated for crystalline silica. Never skip these protocols, even for a single "quick cut."
The Final Polish: Integrating Abrasives into the Shower System
While the waterproofing layer is the most critical technical component of a bathroom renovation, the aesthetic finish determines the client's ultimate satisfaction. A perfectly installed PSC Waterproofing Shower Kit can look amateur if the miter joints are gapped or the drain cuts are jagged. Professional grade abrasives for tile allow you to bridge the gap between a watertight enclosure and a high-end architectural feature. It's about ensuring that every penetration and transition is as durable and visually precise as the system beneath it. When you prioritize the finish, you're not just selling a shower; you're selling craftsmanship that stands up to close inspection.
Mitered edges in shower niches are high-visibility areas where standard factory edges won't suffice. You should use a systematic polishing approach to ensure these joints meet with zero-clearance precision. This prevents the grout from becoming the primary structural filler, which often leads to cracking in high-moisture environments. A final inspection should involve more than just a visual check. Run your hand along every exposed edge and corner. If you feel any sharpness or burrs, use a fine-grit abrasive stone to ease the profile. This ensures a safe, comfortable experience for the end-user while providing a factory-level look.
Abrasives and Shower Hardware Integration
Customizing tile for linear shower drains requires a steady hand and a high-diamond concentration blade. These drains often require long, thin strips of tile that are prone to snapping if the abrasive creates too much heat or vibration. Similarly, when you're transitioning from wall tile to cove base molding, a smooth, clean bottom edge ensures the trim sits flush without unsightly gaps. Precise abrasive work ensures that hardware like soap dishes and niches integrate seamlessly into the layout, maintaining the clean lines expected in modern 2026 designs. Don't let a dull blade ruin a custom-cut drain cover that took an hour to measure.
The Pro Supply Center Advantage
Sourcing your professional grade abrasives for tile from the same supplier as your waterproofing system ensures tool compatibility and consistency. Pro Supply Center curates a selection specifically for the professional trade, focusing on functional reliability rather than aesthetic trends. Whether you're installing a complex steam shower or a standard residential tub surround, having a one-stop source for everything from the pan liner to the final polishing pad simplifies your project logistics. This comprehensive approach ensures the integrity of the build from the subfloor to the final polished edge, giving you the confidence that your tools will perform under pressure on every job site.
Elevating Your Installation Standards
Achieving a professional-level tile installation requires more than just high-quality materials; it demands the right tools to finish the job correctly. We've explored how matching bond hardness to specific materials like high-density porcelain prevents glazing and material waste. You've also seen how precision abrasive work directly complements the integrity of waterproofing systems by ensuring perfect fits for drains and niches. These technical details separate a standard renovation from a high-performance, expert build that stands the test of time.
By investing in professional grade abrasives for tile, you ensure your equipment matches the durability of the PSC Pro Gen II systems you install. Our curated selection focuses on functional reliability and contractor-grade performance to help you maintain a low cost-per-cut on every project. With national shipping available for professional installers, getting the right tools to your job site is straightforward and efficient. Precision is the final step in any successful build.
Shop Professional Grade Abrasives at Pro Supply Center and take the final step toward zero-chip, expert-level finishes today. Your reputation for quality starts with the precision of your first cut.
Frequently Asked Questions
What is the difference between a wet and dry diamond blade for tile?
Wet blades require a constant stream of water to cool the metal core and flush away abrasive slurry. This results in the cleanest possible cuts and maximum tool life. Dry blades feature specialized bonds and cooling slots, such as J-slots, to manage heat without water. While dry blades offer convenience for quick on-site adjustments, wet blades remain the professional standard for high-volume porcelain work to prevent core warping.
How do I stop my porcelain tile from chipping when I cut it?
Chipping is usually the result of excessive vibration or a glazed diamond matrix. You should use a continuous rim blade and maintain a slow, steady feed rate rather than forcing the tile through the saw. If the edge quality drops, dressing the blade with a silicon carbide stone will expose fresh diamonds. This reduces cutting resistance and ensures the professional grade abrasives for tile can grind the material cleanly.
What grit polishing pad should I use for a matte finish on stone?
To achieve a consistent matte or honed finish on natural stone, you should stop your grit progression at 400 or 600 grit. Moving to higher levels like 1500 or 3000 grit will begin to create a reflective, high-gloss surface. Always follow the full sequence from 50 grit upward to ensure you remove all scratches from the previous stage. Skipping steps often results in visible swirl marks that ruin the matte aesthetic.
Can I use a wood-cutting saw with a diamond blade for tile?
You shouldn't use a wood saw for tile because the RPM and motor design aren't compatible with abrasive masonry dust. Wood saws typically run at higher speeds that can cause a diamond blade to overheat or fail. Furthermore, wood saws lack the specialized water management systems required for wet cutting. Attempting this creates a significant silica dust hazard and risks permanent damage to the saw's motor and bearings.
How long should a professional-grade diamond blade last?
A high-quality blade typically provides 100 to 300 linear feet of cutting, though this varies based on material density and cooling efficiency. Dense porcelain wears segments much faster than soft ceramic. To extend the life of your professional grade abrasives for tile, always match the blade's bond to the material hardness. Proper RPM management and consistent water flow are the most effective ways to prevent premature segment loss and core fatigue.
Why does my diamond blade seem to stop cutting after a few uses?
Your blade has likely "glazed," a condition where the metal bond melts over the diamonds and prevents them from hitting the material. This occurs when cutting very hard porcelain without enough friction to wear the bond away naturally. You can revive the tool by making several passes through a dressing stone or a soft abrasive brick. This process strips the glazed metal and exposes a fresh layer of sharp diamond edges.
Do I need different abrasives for glass tile vs. ceramic tile?
Yes, glass tile requires specialized ultra-fine grit blades to prevent shattering and micro-cracking along the cut line. While ceramic blades are designed for aggressive stock removal, glass blades use a much higher diamond concentration with a finer grit, often 200 to 300 grit. Using a standard ceramic blade on glass will almost certainly result in splintered edges and ruined sheets. Proper glass abrasives ensure the cut is a controlled grind.
What is the best way to drill a hole in a porcelain shower wall?
The most reliable method is using a vacuum-brazed diamond core bit started at a 45-degree angle. Once the bit creates a small notch in the glaze, slowly rotate the drill to a 90-degree position while maintaining a steady, oscillating motion. This technique prevents the bit from walking across the polished surface. It ensures a clean, precise opening for shower valves and drains without risking a structural crack in the tile slab.


