

Most commercial flooring failures don't happen in the middle of the room; they start at the wall where the adhesive simply gives up. It's a common site issue that turns a profitable project into a series of costly callbacks. When you're working with vinyl cove base trim rolls, the difference between a seamless finish and a peeling disaster often comes down to the science of substrate preparation rather than just the volume of glue applied. You've likely dealt with the frustration of adhesive ridges telegraphing through thin vinyl or gaps appearing at the top of the base just weeks after installation.
We understand that a contractor's reputation relies on the long-term durability of their work. This guide promises to help you master the technical requirements for a permanent, gap-free bond that survives high-traffic commercial environments. You'll learn how to eliminate telegraphing and optimize your installation workflow for maximum efficiency. We'll provide a methodical breakdown of proper cornering techniques and the latest 2026 industry standards for adhesive application to ensure your finishes remain secure for years to come.
Key Takeaways
- Master the 70°F rule for climate control to ensure the substrate and adhesive reach thermal equilibrium 24 hours before installation begins.
- Identify the performance differences between solvent-free acrylic and pressure-sensitive adhesives to select the best bond for high-traffic commercial environments.
- Learn the professional back-gouge technique for outside corners to prevent white-stress marks and peeling when working with vinyl cove base trim rolls.
- Eliminate the risk of adhesive telegraphing by matching trowel notch sizes to the specific thickness of your cove base material.
- Implement a dry-fit installation workflow to minimize material waste and achieve seamless miter cuts on complex inside corners.
Essential Wall Preparation for Cove Base Adhesion
Successful installation starts with a substrate that is clean, dry, and structurally sound. Any residue from previous flooring projects, such as old mastic or carpet adhesive, must be mechanically removed. Chemical strippers should be used with caution; they can leave a film that prevents the new bond from anchoring. Dust is the most common enemy of a permanent finish. Always wipe the installation area with a damp cloth or use a vacuum with a HEPA filter to ensure the surface is pristine.
Perform a water droplet test to check for porosity. Place a few drops of water on the wall and observe the reaction. If they bead up, the surface is non-porous. High-gloss paints or epoxy coatings require scuffing with 80-grit sandpaper to create a mechanical key. Without this step, the adhesive will sit on the surface rather than penetrating it. This is especially critical in commercial kitchens or medical facilities where walls are often coated with specialized, non-absorbent finishes.
Substrate-Specific Requirements
Drywall and plaster must be smooth and free of major gouges. Patch any holes with a high-quality compound and allow it to dry completely before applying adhesive. For concrete or masonry, you must verify that the surface is fully cured. High alkaline pH levels or moisture vapor emission can cause the adhesive to re-emulsify. Metal or plastic surfaces are less common but require specialized primers to ensure the acrylic bond holds against these non-absorbent materials.
Acclimatization Protocols
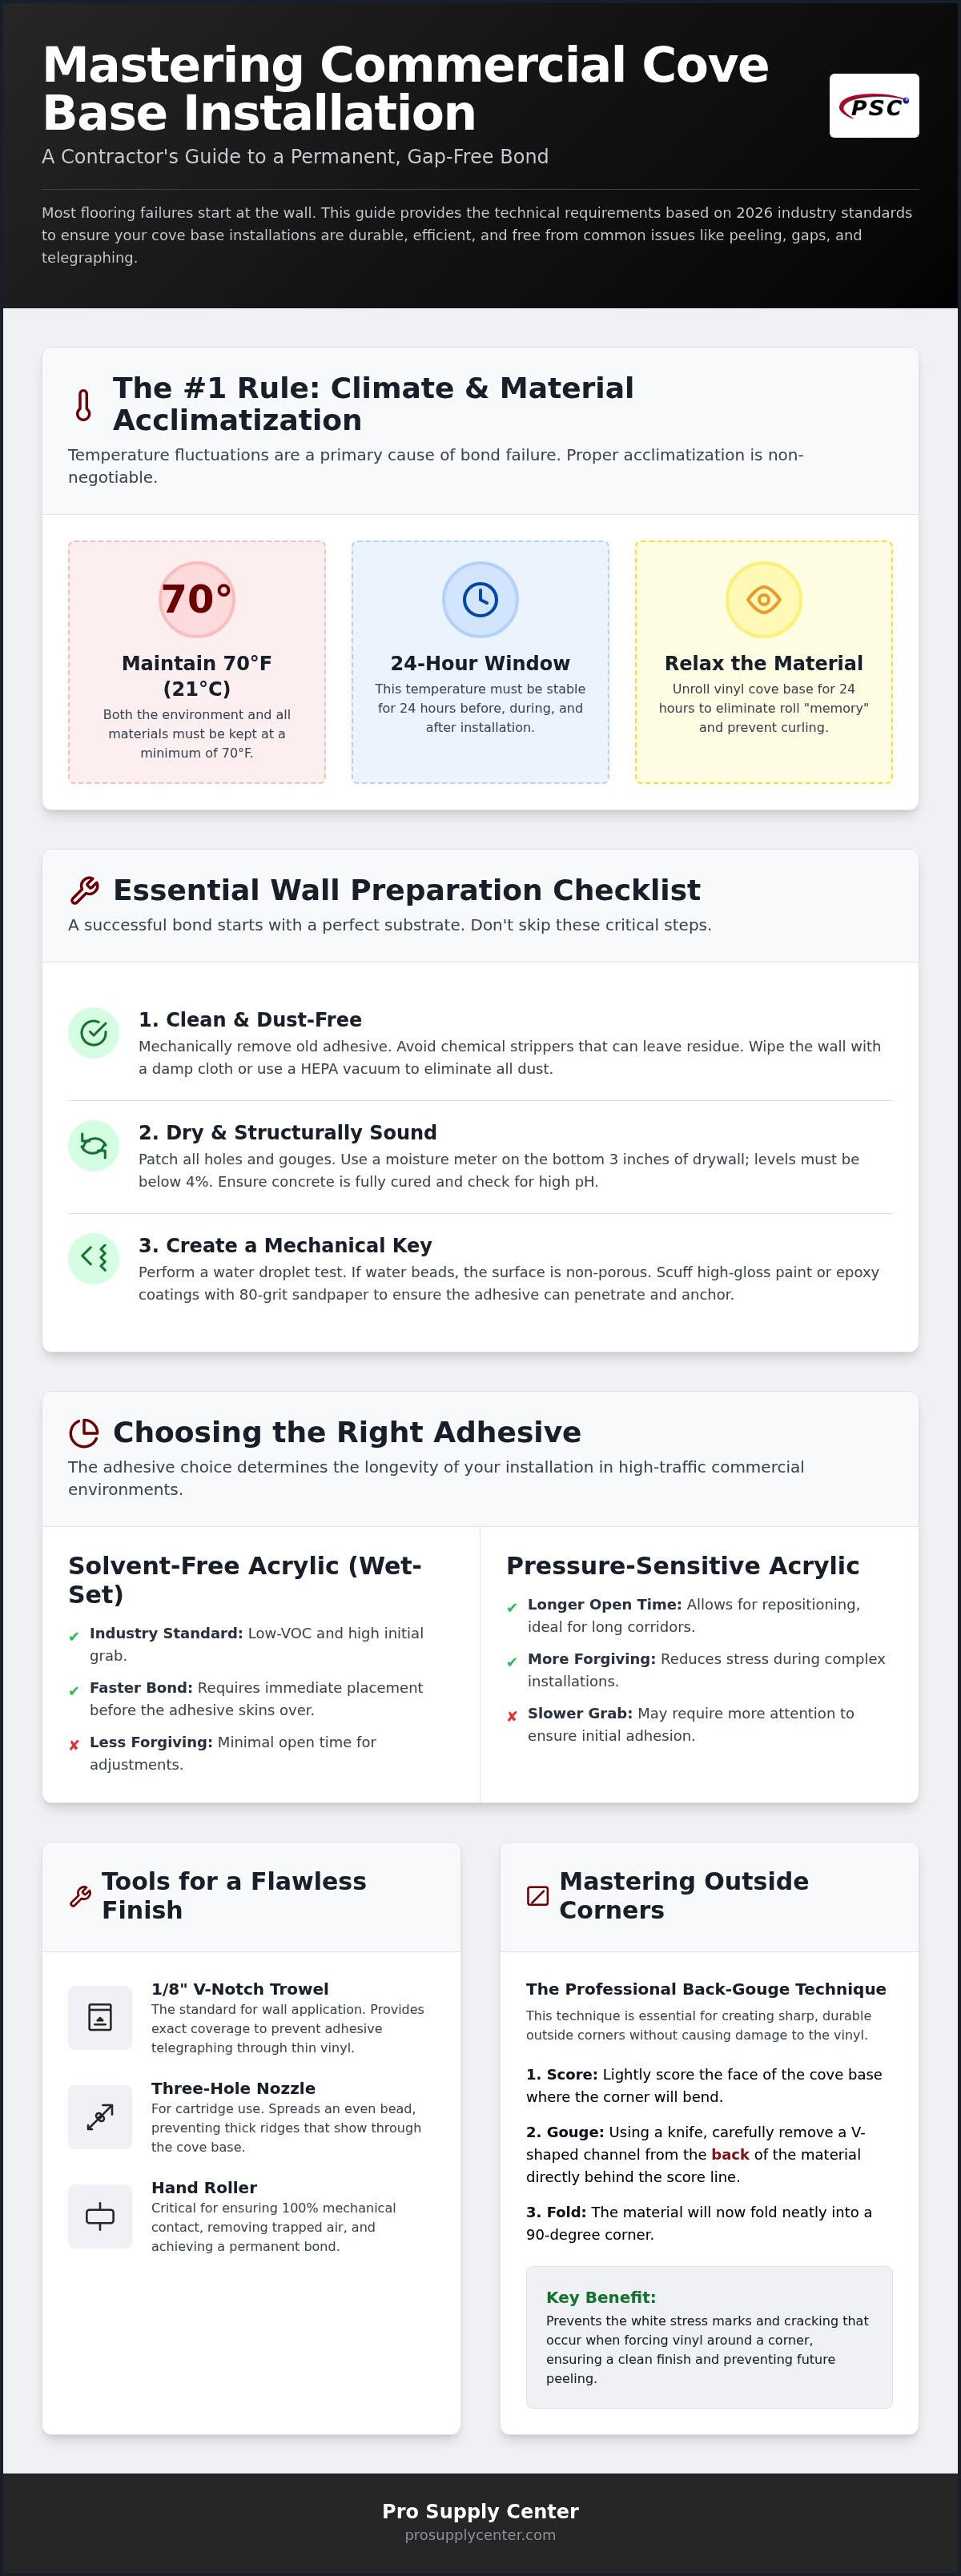
The 70°F Rule is a non-negotiable requirement for professional results under 2026 industry standards. Both the environment and the materials must be maintained at a minimum of 70°F (21°C) for at least 24 hours before, during, and after the installation. Temperature fluctuations cause materials to expand and contract at different rates, leading to bond failure.
Unroll vinyl cove base trim rolls and allow the material to relax for at least 24 hours. This eliminates the "memory" of the roll, which causes the ends to curl away from the wall. Use a moisture meter to check the bottom three inches of drywall. If moisture levels exceed 4%, address the source before proceeding. Ensure your adhesive is stored in the same room as the vinyl cove base trim rolls to guarantee the bond agent matches the material temperature.
Choosing the Right Cove Base Adhesive for Your Project
Selecting the correct adhesive is a technical decision that determines the longevity of your installation. Solvent-free acrylic adhesives have become the industry standard for 2026 commercial builds due to their low-VOC profiles and aggressive initial grab. When working with vinyl cove base trim rolls, you must choose between pressure-sensitive and wet-set formulas. Pressure-sensitive adhesives offer a longer open time, allowing for adjustments on long corridors. Wet-set adhesives provide a faster bond but require immediate placement before the glue skins over. You must also verify chemistry compatibility; while many modern acrylics are universal, some rubber-based trims require specific high-performance binders to prevent delamination over time.
Adhesive Delivery Systems
The scale of your project dictates the most efficient delivery method. For small repairs or residential top-set jobs, the 30oz cartridge is the most practical choice. It fits standard large-frame caulking guns and minimizes cleanup time. For large-scale commercial projects, purchasing adhesive in four-gallon pails is the only cost-effective strategy. This method allows for high-volume application on the wall using a notched trowel. If you're dealing with quick-fix vertical applications or non-porous surfaces where traditional wet glues might slip, aerosol spray adhesives provide a high-tack alternative that sets almost instantly. Professional contractors often source high-performance cove base and specialized adhesives to ensure their work meets high-traffic durability standards.
Essential Installation Tools
Achieving a professional finish requires more than just the right glue; it requires the right application tools. A 1/8 x 1/8 x 1/8 V-notch trowel is the standard for most wall applications. This specific notch size provides the exact coverage needed to prevent telegraphing while ensuring enough adhesive remains to bridge minor substrate irregularities. If your workflow relies on cartridges, a three-hole nozzle is indispensable. It spreads the bead evenly across the back of the vinyl cove base trim rolls, preventing the thick ridges that often show through thinner vinyl materials. Finally, never skip the hand roller. It's the only way to remove trapped air and ensure 100% mechanical contact between the wall and the trim material. Without consistent rolling, even the best adhesive will eventually develop hollow spots and localized bond failure.
Step-by-Step Guide to Applying Cove Base Adhesive
Precision in the initial layout prevents material waste and ensures a professional appearance. Before applying any bond agent, you must dry-fit your vinyl cove base trim rolls along the entire length of the wall. This allows you to plan your cuts and ensure that butt joints don't fall near high-visibility areas or corners. Mark the top edge of the base on the wall lightly with a pencil to serve as a guide for your adhesive spread. This simple step prevents you from applying glue too high, which leads to messy squeeze-out during the pressing phase.
When applying the adhesive, you have two primary methods: wall-spreading or back-buttering. For large commercial projects using 4-inch cove base rolls, wall-spreading with a notched trowel is significantly faster. However, back-buttering is often preferred for shorter runs or specialized repairs to maintain a cleaner workspace. Whichever method you choose, ensure the adhesive is applied in a uniform layer. Use the "drop and press" method to set the base. Start by positioning the toe of the base firmly against the floor, then pivot the top into place. This motion helps air escape and prevents the adhesive from being pushed upward toward the top edge.
The Application Process
Maintain a 1/4 inch gap from the top pencil line when spreading your adhesive. This buffer zone is essential; as you press the base into the wall, the adhesive will naturally spread upward. If you apply glue all the way to the top, it will ooze out and create a difficult cleanup task. Manage your open time carefully by only spreading enough adhesive for 10 to 15 linear feet at a time. This prevents the bond agent from skinning over, which would compromise the mechanical anchor. Ensure the toe sits flush against the floor without being under constant tension, as this tension will eventually cause the base to pull away from the wall.
Clean-up and Detailing
Address any adhesive squeeze-out immediately while it's still wet. A damp cloth is usually sufficient for solvent-free acrylics, but wait too long and you'll risk damaging the finish of the vinyl cove base trim rolls during mechanical scraping. For butt joints, use a sharp utility knife to create a slight undercut. This allows the top edges to meet tightly for a nearly invisible transition. Perform a final inspection by looking across the surface of the base at an angle. This helps you identify any telegraphing ridges or air pockets. Use a 3-section hand roller to apply firm, even pressure across the entire surface to eliminate these defects before the bond becomes permanent.
Mastering Corners: Gouging and Pre-molded Options
Corners represent the highest stress point for any installation. If you don't relieve the tension, the material will eventually pull away from the wall. When using vinyl cove base trim rolls, you have two paths: manual fabrication or pre-molded units. Pre-molded corners offer unmatched job-site efficiency and a uniform look, making them ideal for high-volume commercial projects. However, a skilled contractor should still master the back-gouge for custom requirements where pre-molded options aren't available. High-tension corner wraps require extra adhesive grab; apply a slightly heavier bead in these zones to counteract the material's natural tendency to straighten.
Outside Corner Techniques
The secret to a professional outside corner is the back-gouge. Use a top-set gouge to remove approximately 20% of the material's thickness from the backside where it meets the wall's edge. This removal prevents the white-stress marks that appear when vinyl is stretched too thin. If the material is stiff, a quick pass with a heat gun softens the polymer, allowing it to conform to sharp 90-degree angles without cracking. To ensure the toe sits perfectly against the floor, make a small V-shaped relief cut in the toe's bottom edge. This allows the base to wrap around the corner without buckling.
Inside Corner Scribing
Inside corners are generally handled through scribing or the wrap-around method. The wrap-around method involves forcing the base into the corner, but this often leads to bridging where the base fails to touch the wall in the deepest part of the corner. The more professional approach is the butt-and-scribe. You install one piece flush into the corner, then cut the second piece to match the profile of the first. This creates a tight, gap-free joint that handles thermal expansion better than a simple miter. When you're working with 4 inch cove base rolls, planning your runs so that seams don't land directly in the corner is essential for long-term durability.
For the highest quality results, always match your technique to the specific material grade. You can find a complete selection of contractor-grade cove base and installation tools to ensure your next project stays gap-free and survives high-traffic scrutiny.
Ensuring Long-Term Performance: Troubleshooting Failures
Even a technically sound installation can face challenges if site conditions shift or minor details are overlooked. Peeling and gapping are the most frequent issues, typically appearing at outside corners where the material's internal tension is highest. If the bond isn't absolute, the base will eventually pull away, creating an unsightly gap that collects debris. Telegraphing is another common failure; this happens when the ridges from an improper trowel notch size show through the face of the vinyl cove base trim rolls. Under the harsh, angled lighting of commercial corridors, these ridges become highly visible and signal a lack of professional craft. Adhesive ooze is a different problem altogether, usually resulting from applying the bond agent too close to the top edge. This excess material attracts dust and can be difficult to remove once it fully cures.
Common Failure Root Causes
Improper acclimatization remains the leading cause of post-installation shrinkage. If the vinyl cove base trim rolls aren't allowed to reach thermal equilibrium in the installation environment, they'll naturally contract as they settle, leading to gaps at every butt joint. Chemical compatibility is another factor that contractors often miss. Certain modern latex paints, particularly those with high silicone or "scuff-resistant" additives, can repel acrylic adhesives. This results in a bond that feels secure initially but fails within weeks. Dust contamination is the third major culprit. Even a wall that appears clean can have a fine layer of drywall dust that prevents the adhesive from anchoring into the substrate, leading to a localized mechanical failure that eventually spreads along the entire run.
Maintenance and Repairs
Addressing failures early can prevent a full-scale replacement. For small sections that have started to peel, you can use a syringe for precision adhesive injection. This allows you to deliver fresh bond agent directly behind the loose material without the mess of prying the base further away from the wall. Once the adhesive is injected, use a hand roller to reset the bond. Regular maintenance should involve cleaning with pH-neutral detergents. Harsh solvents or high-alkaline cleaners can seep behind the top edge and slowly degrade the adhesive bond over time. For long-term facility management, it's a best practice to keep a remnant from a 4 inch cove base roll in the building's maintenance storage. Having a matching batch and color on hand ensures that any future patch repairs are seamless and maintain the integrity of the original design.
Executing a Permanent Finish
Mastering the installation of vinyl cove base trim rolls requires a disciplined approach to site conditions and material science. You now have a framework for managing the 70°F rule to ensure thermal equilibrium and the technical knowledge to execute back-gouged outside corners that resist peeling. These steps don't just improve aesthetics; they prevent the mechanical bond failures that lead to expensive callbacks. By prioritizing substrate porosity testing and precise adhesive open times, you ensure your work survives the high-traffic demands of modern commercial environments.
Your reputation as a contractor depends on the stability of the materials you select. You can find contractor-grade vinyl and rubber trim, high-performance adhesive solutions, and expert-vetted installation supplies to support your next project. Shop Professional Cove Base and Adhesives at Pro Supply Center to secure the high-quality components required for a gap-free finish. With the right preparation and professional-grade supplies, you can deliver results that stay secure for years to come.
Frequently Asked Questions
How long does cove base adhesive take to dry before I can clean the floors?
You should wait at least 24 to 48 hours before performing any wet cleaning or maintenance on the floors. While the adhesive may feel set within a few hours, the chemical bond requires a full cure cycle to resist moisture penetration. If you introduce water or cleaning detergents too early, they can seep behind the toe of the base and re-emulsify the bond agent, leading to localized peeling.
Can I use liquid nails or construction adhesive for cove base?
Avoid using general-purpose construction adhesives or liquid nails for this application. These products are often too thick and rigid, which prevents the base from sitting flush against the wall. They also lack the grab needed to hold the material in place during the curing process. Specialized cove base adhesives are formulated to provide the necessary flexibility and thin profile required to prevent telegraphing through your vinyl cove base trim rolls.
Why is my cove base pulling away from the outside corners?
Pulling at outside corners is almost always caused by excessive material tension. If you don't back-gouge the trim to remove approximately 20% of its thickness at the bend, the material's natural memory will force it to straighten out. This physical force eventually overcomes the adhesive bond. To fix this, ensure you are relieving tension through gouging and applying a slightly heavier bead of high-performance adhesive in high-stress corner zones.
Do I need to prime the wall before applying cove base adhesive?
Priming is generally only required for specific substrate conditions like high-gloss epoxy paint or extremely porous masonry. For standard drywall, ensuring the surface is free of dust and old mastic is usually sufficient. If you are dealing with non-porous surfaces, scuffing the wall with 80-grit abrasives is often more effective than a primer alone. Always perform a water droplet test to determine if the wall requires a specialized bonding agent.
What size notched trowel is best for 4-inch rubber cove base?
A 1/8 x 1/8 x 1/8 V-notched trowel is the industry standard for 4-inch rubber and vinyl installations. This specific notch size ensures that you apply enough adhesive to bridge minor wall irregularities without creating thick ridges. Using a larger notch often leads to adhesive telegraphing, where the pattern of the glue becomes visible through the face of the trim. Maintaining a consistent angle while spreading is key to achieving a uniform bond.
How do I remove old cove base adhesive from a wall without damaging the drywall?
Mechanical removal using a flat-blade scraper is the safest method for protecting the drywall's paper facing. For stubborn acrylic residues, a heat gun can soften the bond, making it easier to peel away without gouging the substrate. Avoid using heavy chemical strippers that can soak into the gypsum core and affect the bond of your new vinyl cove base trim rolls. Finish the preparation with light sanding to ensure a smooth surface.
Can cove base be installed over existing vinyl or wallpaper?
Installing over wallpaper or existing vinyl is a common cause of failure because the adhesive is only as strong as the material beneath it. If the wallpaper peels, the cove base will fall off with it. You must remove these wall coverings and scrape away any underlying paste to expose the base substrate. This ensures the adhesive can form a direct, permanent mechanical anchor with the wall rather than a temporary surface bond.
What happens if the room temperature is below 70 degrees during installation?
Temperatures below 70°F (21°C) significantly slow the adhesive's cure time and increase the stiffness of the trim material. Cold vinyl is harder to wrap around corners and is more prone to memory curling. Additionally, the adhesive may fail to develop its full grab strength, leading to immediate or delayed gapping at the seams. Maintaining climate control for 24 hours before and after installation is a non-negotiable requirement for professional results in 2026.


