

What if a shower looks finished and sealed but water is still reaching the framing? Grout and tile are the visible surface, not the shower’s waterproofing layer. Preventing shower pan leaks depends on a continuous, compatible assembly beneath the finish, with careful attention to the drain, corners, and transitions.
Choosing suitable materials matters, but even an appropriate membrane can fail if it’s installed incorrectly or connected poorly to the drain. The resulting moisture damage may stay hidden until it reaches nearby walls or floors. Understanding how water is managed helps you check critical details before tile conceals them.
This guide explains where leaks commonly begin and compares traditional liner-and-mortar-bed pans with bonded waterproofing systems that use sheet or liquid-applied membranes. You’ll learn what to check in the slope, membrane coverage, seams, and drain connection, why testing before tiling matters, and how to assess whether system components are compatible. If the assembly or installation requirements aren’t clear, consult a qualified professional familiar with the selected system.
Key Takeaways
- Preventing shower pan leaks starts with checking every connection in the water-management assembly, not choosing a membrane by label alone.
- Compare waterproofing systems by drain compatibility, included components, and clear installation instructions.
- Use a pre-cover checklist to review the substrate, pan assembly, transitions, and drain before tile conceals them.
- Follow the selected manufacturer’s instructions for testing and acceptance, and resolve unclear details before moving to the next stage.
- Evaluate the PSC Pro Gen II Waterproofing System as one option, and verify current components and compatibility for your planned assembly.
Preventing shower pan leaks starts with understanding where water travels
A shower pan is the sloped, waterproofed assembly that collects water and directs it toward the drain. Its waterproofing path must connect the shower floor to the drain and continue across the areas where the floor meets walls, curbs, and other surfaces. Tile is the finish above this water-management assembly; it doesn’t replace it.
Quotable definition: A shower’s tile and grout are the finish; the shower pan’s continuous waterproofing layer directs water to the drain and protects the building beneath.
Water can move through grout joints and reach layers below the tile. The assembly must manage that moisture rather than rely on the finished surface to stop every drop. In some systems, waterproofing sits below a mortar bed; in bonded systems, a membrane is installed close beneath the tile. The layout varies, but the path to the drain must remain continuous. This principle also matters in a wet room, where waterproofing extends across a larger bathroom area.
What makes a shower pan watertight?
A watertight pan combines a prepared base, a slope that guides water toward the drain, and waterproofing connected to a compatible drain assembly. Slope helps prevent water from pooling, but the method and requirements depend on the selected system and project. The membrane’s location may vary, but its function does not: it must direct water toward the drain without gaps along the way.
Don’t judge the assembly by the tile’s appearance. Neat grout lines and clean corners can conceal a break in the waterproofing beneath. Before covering the work, confirm that the pan, drain connection, and adjoining surfaces follow the selected system’s installation instructions.
Where can shower pan leaks begin?
Leaks can start wherever the waterproofing path is interrupted or poorly connected. Check these areas closely:
- Drain connections: The drain must be designed to connect with the chosen waterproofing method. A mismatch or incomplete connection can leave a path for water to escape.
- Seams and corners: Overlaps, changes in plane, and inside corners need the treatment specified for the system.
- Curb transitions: The junction between the pan and curb is a change in surface that requires continuous waterproofing.
- Penetrations: Openings for fixtures or other components can compromise the barrier if they aren’t detailed correctly.
If water gets past the waterproofing, it may reach the subfloor, wall framing, or nearby finishes. That describes a possible failure path, not a diagnosis of a particular shower. Visible damage or signs of moisture call for inspection. Preventing shower pan leaks starts earlier, by checking concealed connections before they’re covered.
How shower pan leaks develop at drains, seams, and transitions
A leak often starts at a connection rather than in the open area of the shower floor. The waterproofing layer must meet the drain and continue through seams, corners, and penetrations without leaving a route for water to escape. A component may be suitable on its own but still fail as part of an assembly if its connection method doesn’t match the surrounding system.
Quotable takeaway: A shower stays protected when its waterproofing remains continuous at every connection, not simply when the tile surface looks intact.
Why the drain connection deserves careful attention
The drain is where the pan’s water-management layer connects to a fitting designed to work with it. That interface varies by system. Don’t assume a drain intended for one waterproofing method works with another without confirmation in the relevant manufacturer instructions.
Before installation, check the current documentation for both the drain and membrane. Confirm that the connection method, required components, and installation steps are compatible as a complete assembly. If the interface is incomplete, damaged, or assembled in a way the system doesn’t specify, water may pass below the pan and remain hidden beneath the finished floor.
How seams, corners, and penetrations become weak points
Waterproofing details need particular attention where the surface changes direction or something passes through it. A floor-to-wall corner, curb junction, membrane seam, or fixture opening needs the treatment prescribed for the selected system. Don’t assume generic sealant or extra material can substitute for that detail. Materials and layer sequences differ.
- Seams: Check that adjoining sections are joined using the system’s specified method.
- Changes of plane: Review corners and curb transitions for continuous coverage and the specified treatment.
- Penetrations: Confirm that openings and surrounding details are addressed in the product instructions.
- Damaged areas: Resolve cuts, gaps, or disturbed material before the assembly is concealed.
These checks matter in any renovation, and older buildings may bring additional considerations when altering existing interiors. For relevant projects, review the National Park Service’s historic preservation standards alongside the waterproofing system’s instructions.
For preventing shower pan leaks, treat every joint as part of one water-control assembly. Pro Supply Center carries shower drains and waterproofing supplies. Verify current compatibility and installation requirements before selecting or combining products.
Choosing a shower pan system: compare compatibility, not labels alone
A product name alone doesn’t tell you whether a waterproofing system fits your shower assembly. Compare how it handles the pan, drain connection, seams, corners, and transitions, then confirm that the parts and instructions work together. Sheet and liquid-applied membranes use different materials and application methods, so preparation, detailing, and connection requirements can differ. Neither method is a universal answer for every project.
Use these criteria to compare options without treating one label as a performance ranking:
| Selection criterion | What to verify |
|---|---|
| System approach | Understand where the waterproofing layer sits and how it directs water toward the drain. |
| Drain compatibility | Confirm the drain is intended to connect to the selected membrane and assembly. |
| Included components | Identify what the system supplies and what must be selected separately. |
| Installation documentation | Check instructions for substrate preparation, seams, transitions, and connections. |
| Project requirements | Verify applicable local code and product requirements before work begins. |
For an overview of the PSC Pro Gen II approach, review the shower waterproofing system reference guide. Use it as a starting point, then check current components and compatibility against the system’s documentation for your project.
What to verify before selecting waterproofing materials
Check that the membrane, drain, accessories, and substrate are suitable for the same assembly. Read current manufacturer instructions before choosing materials, since they specify preparation and connection details. Code requirements can also vary by jurisdiction. For example, many municipal authorities publish specific shower pan construction guidelines. Don’t assume a document from one area applies everywhere; confirm requirements with the relevant local authority for your project.
When a complete shower kit may simplify component selection
A shower kit can narrow component choices by grouping items intended for a system, reducing the guesswork of sourcing each part separately. Check what the kit includes and whether additional components are needed. A kit doesn’t replace careful preparation or correct installation. The waterproofing shower kit guide explains what to review before selecting one.
When preventing shower pan leaks, select the assembly first, confirm every connection, and follow the applicable instructions from preparation through testing. Compatibility is a practical selection check, not a substitute for workmanship or project-specific requirements.
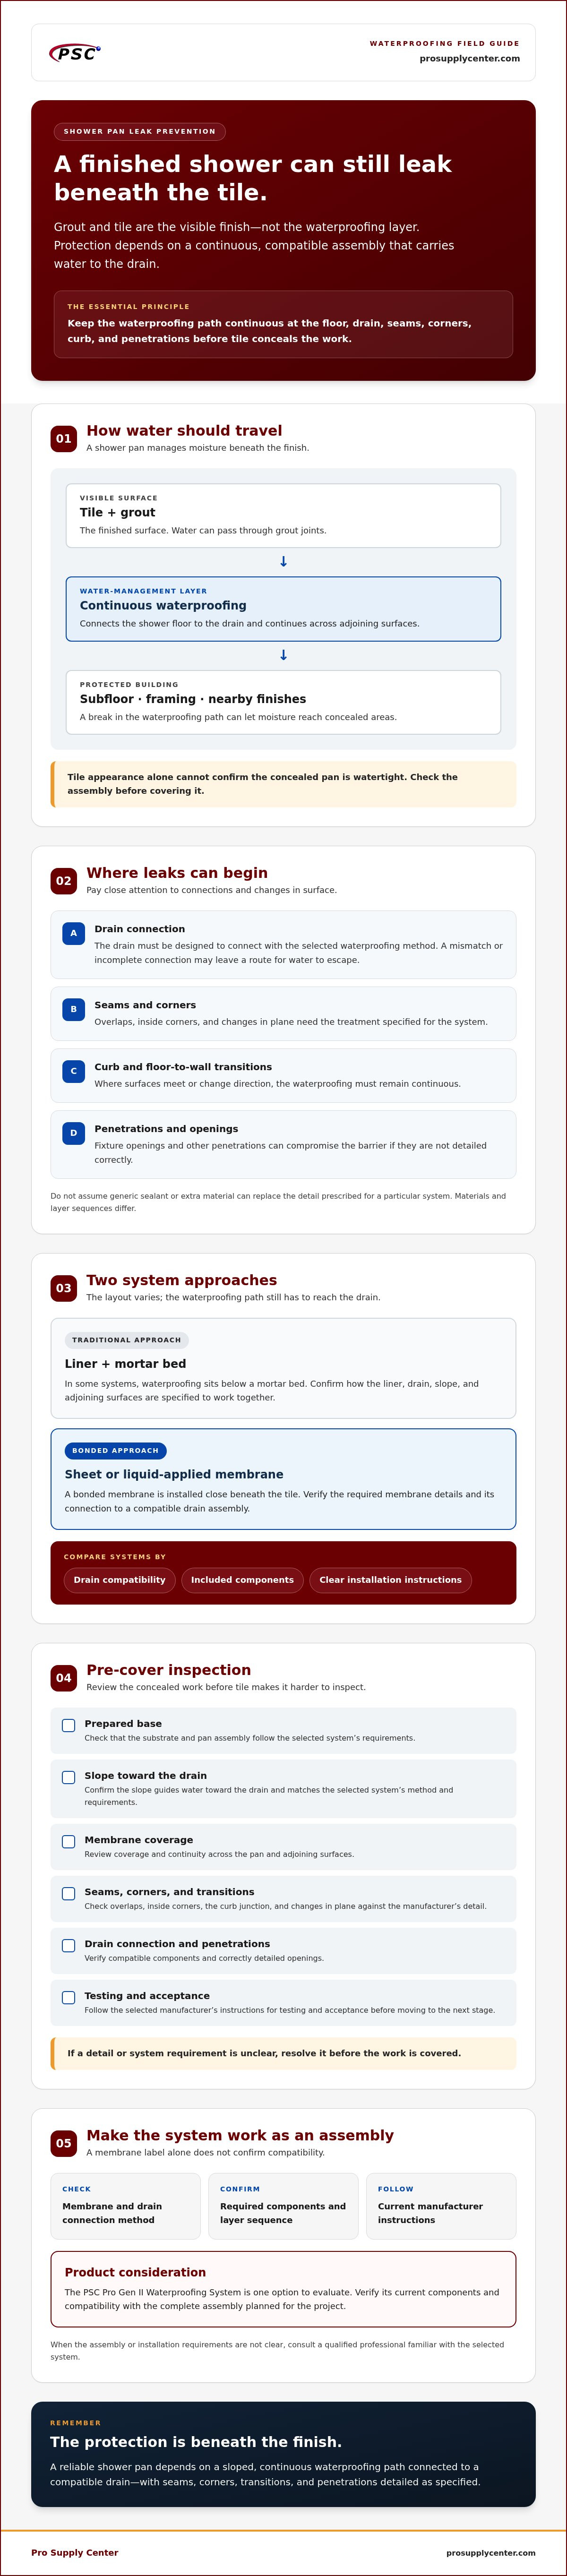
Prevent shower pan leaks with a pre-cover inspection checklist
Once tile is installed, the waterproofing details that matter most are difficult to inspect. Before covering the assembly, review the work against the instructions for the selected system. A checklist can help catch incomplete details while they’re still visible, but it doesn’t replace manufacturer requirements or a qualified inspection where one is needed.
What to check before the waterproofing is concealed
Review each stage in sequence. If the substrate or assembly doesn’t match the system instructions, stop and resolve the issue before proceeding.
- Substrate preparation: Confirm the base and adjoining surfaces are prepared as required for the selected waterproofing method. Look for visible damage or conditions that conflict with the instructions.
- Pan assembly: Check that the waterproofing is installed in the intended areas and that the floor directs water toward the drain. Don’t assume the finish will correct an issue beneath it.
- Transitions and penetrations: Inspect seams, corners, changes of plane, curb junctions, and openings for continuous coverage and the specified treatment.
- Drain connection: Verify that the drain is compatible with the system and connected using the documented method. Look for gaps, damage, or details that differ from the instructions.
- Final review: Check the whole assembly for punctures, loose or incomplete sections, and unresolved questions. Photograph concealed details before installing tile or other finishes.
Documenting the work creates a useful record of what was installed and where. Take clear photos of the drain, seams, corners, and transitions, and keep the product instructions with your project notes. If a detail is unclear or appears damaged, don’t cover it and hope for the best. Get clarification first.
How to approach shower pan testing responsibly
Testing and acceptance procedures depend on the selected system and applicable project requirements. Follow the current manufacturer instructions for testing the assembly and determining whether it’s ready for finish materials. Don’t rely on a generic test duration or water level from an unrelated system.
If requirements are uncertain, ask a qualified local professional or the relevant building authority to clarify what applies. Record the test method, date, observations, and results before the waterproofing is concealed. If the assembly doesn’t meet the stated acceptance criteria, address the issue and follow the instructions for retesting before moving forward.
Careful review before concealment is a practical step in preventing shower pan leaks. For project materials, review shower waterproofing supplies and confirm that selected components are appropriate for your assembly.
Choose a compatible waterproofing system and plan the next steps
A sound selection process starts with the full shower assembly. Confirm that the membrane, drain, and accessories are compatible, then follow the chosen system’s current instructions from substrate preparation through testing. This keeps the focus on how the parts work together rather than on product labels alone, and gives you a clear basis for comparing options before installation.
For another perspective on coordinating drains, niches, and waterproofing, read this professional shower hardware guidance. As you review any system, verify current components and instructions rather than assuming details from a previous project apply.
When to pause and get project-specific help
Pause before covering the assembly if the drain connection is unclear, waterproofing appears damaged, or a detail doesn’t match the product instructions. Suspected concealed leaks also call for assessment by a qualified professional; product selection guidance isn’t a substitute for inspection or repair. Gather the system instructions, product names, installation photos, and a brief project description so the right questions can be addressed.
How to evaluate PSC Pro Gen II for a shower project
The PSC Pro Gen II Waterproofing System is one option to evaluate when comparing assemblies. Start by identifying how your planned shower is constructed, then check current system documentation for included components, drain compatibility, preparation steps, and installation requirements. Don’t assume a component is suitable simply because it’s used elsewhere in a shower or looks similar to one specified in the instructions.
For preventing shower pan leaks, compatibility and correct installation go together. Confirm how every component connects, use the manufacturer’s current instructions, and resolve uncertainties before the assembly is concealed. If you’re comparing materials for an upcoming project, include Pro Supply Center’s waterproofing supplies in your selection process.
Build confidence into your next shower project
A watertight shower depends on more than a finished tile surface. The waterproofing assembly needs a continuous path to a compatible drain, with seams, corners, and transitions treated according to the selected system’s instructions. Checking those concealed details before covering them is a practical step toward preventing shower pan leaks.
Choose materials by how they work together, not by labels alone. Confirm that the membrane, drain, and accessories suit the planned assembly, and follow the manufacturer’s current instructions for preparation and testing. If a connection is unclear, damage is visible, or a leak is suspected, pause and seek qualified project-specific help.
Pro Supply Center specializes in the PSC Pro Gen II Waterproofing System and offers waterproofing shower kits and shower drains. Review the available options and verify current components and compatibility for your project. Explore Pro Supply Center’s waterproofing systems and shower kits to plan your shower assembly.
Frequently Asked Questions
Can tile and grout alone prevent a shower pan leak?
No. Tile and grout are finish materials, not a replacement for a continuous waterproofing assembly beneath them. Water can pass through grout joints, so protection depends on the layers below the finish directing moisture toward the drain. Those layers must also connect correctly at seams, corners, transitions, and the drain interface. A tidy tile surface can’t confirm that the concealed waterproofing path is complete or properly installed.
What is the most common cause of a leaking shower pan?
There isn’t one defect that explains every leaking shower pan. Installation errors are a common cause, but a leak may involve an interrupted waterproofing path at the drain, seams, corners, or penetrations. Damage or an incompatible connection can also create a concealed route for water. Symptoms alone don’t establish the cause, so have the assembly assessed before deciding which component needs correction or replacement.
How can I tell if my shower pan is leaking?
Possible clues include moisture outside the shower, damaged or discolored nearby finishes, or dampness that persists after ordinary use. These signs can have other causes, so they don’t prove that the pan is leaking. A concealed leak may also go unnoticed until nearby materials show damage. If you suspect a problem, don’t rely on appearance alone; arrange a qualified assessment to identify the source.
Does a shower pan need to be tested before tile is installed?
Testing may be required, but the correct procedure and acceptance criteria depend on the selected waterproofing system and applicable local requirements. Follow the current manufacturer instructions rather than borrowing a test method, duration, or water level from another assembly. If the requirements aren’t clear, check with a qualified local professional or the relevant building authority. Resolve any failed or uncertain result before installing tile.
Can I waterproof a shower pan without replacing the drain?
It depends on the existing drain’s type and condition, and whether it’s compatible with the waterproofing system you plan to use. Don’t assume a new membrane can connect correctly to an existing drain just because the parts appear to fit. Review the current system instructions for the specified drain interface, then seek a project-specific assessment if compatibility or condition is uncertain before proceeding.
How do I choose a waterproofing system to prevent shower pan leaks?
Compare how each system connects its membrane to the drain, what components it includes, and what substrate preparation it requires. Read the current manufacturer instructions for seams, transitions, and testing, then confirm any applicable local requirements. Sheet and liquid-applied methods have different installation details, so neither is automatically best for every project. Preventing shower pan leaks depends on compatibility and correct installation across the complete assembly.


