

More leveling force isn’t always better for natural stone. A tile leveling system for natural stone must suit the material and installation. Clips or wedges can help control lippage, but if they’re used incorrectly, they may mark a delicate finish or apply unwanted pressure.
It’s reasonable to ask whether a system designed for ceramic tile is suitable for marble or other stone, especially when thicknesses and finishes vary. A leveling aid can help align neighboring tiles, but it can’t correct an uneven substrate, replace careful setting technique, or create grout joints by itself.
This guide compares common leveling-system designs and explains what to check before choosing one, including stone thickness, contact points, finish protection, and manufacturer instructions. It also covers how substrate preparation, suitable setting materials, and traditional spacers work alongside a leveling system, and where the system’s limits matter. Pro Supply Center offers a ceramic tile leveling system. Check its specifications before considering it for natural stone.
Key Takeaways
- Use a leveling aid to align neighboring tiles, not to correct an uneven floor or replace proper mortar coverage.
- Compare systems by their tile contact points and removal method, then check stone compatibility and dimensions with the manufacturer.
- Choose a tile leveling system for natural stone based on the specific stone, thickness, finish, and joint requirements, not maximum leveling force.
- Inspect and prepare the substrate, dry-fit the layout, and follow the system’s instructions before setting stone.
- Pro Supply Center offers a ceramic tile leveling system. Check its specifications before considering it for a stone installation.
What a Tile Leveling System for Natural Stone Can and Cannot Do
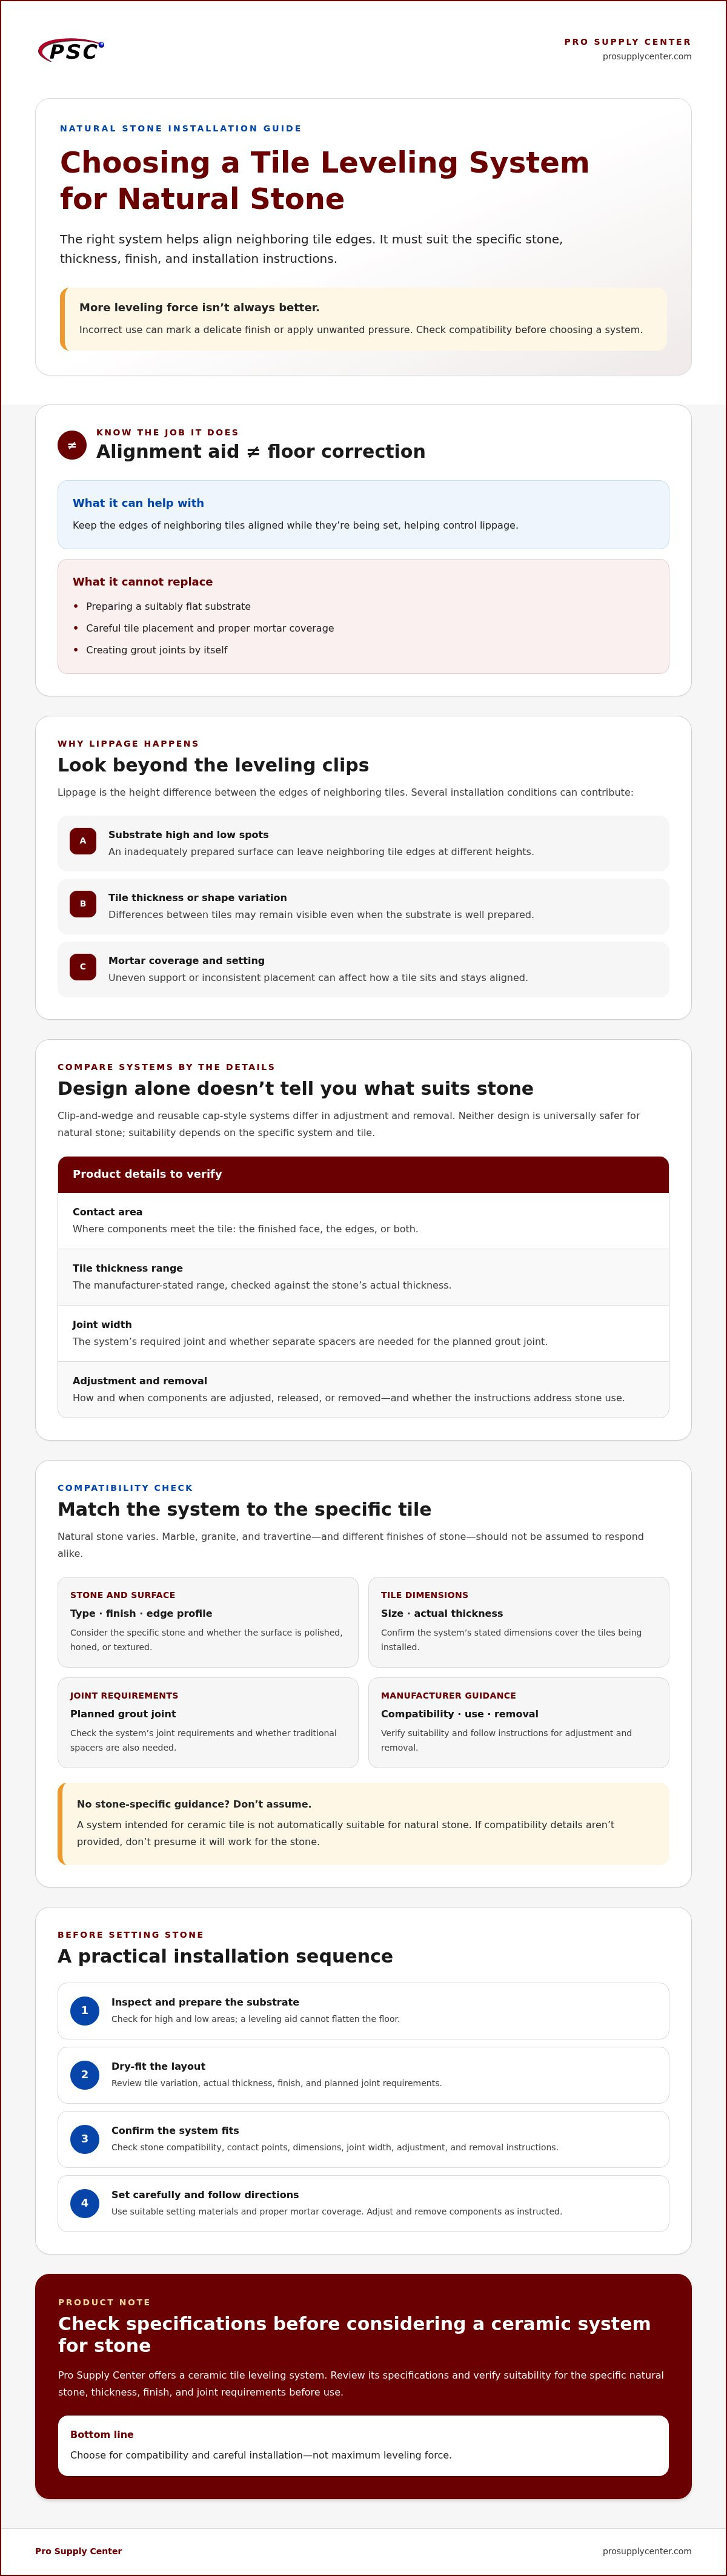
A tile leveling system helps align the edges of adjacent tiles while they’re being set. It doesn’t flatten the floor, correct tile variation, or replace proper mortar coverage. That distinction matters with natural stone, where material characteristics and installation conditions affect the finished surface. Consider a tile leveling system for natural stone only after checking that it suits the stone, finish, tile dimensions, and manufacturer instructions.
Lippage is the height difference between the edges of neighboring tiles. It may result from an uneven substrate, variations in tile thickness or shape, or how tiles are positioned in the mortar. A leveling aid can help keep adjacent edges aligned during setting, but it can’t make an inadequately prepared surface flat or compensate for poor mortar coverage.
Natural stone is a broad category with varied materials and characteristics. Dimension stone includes materials such as marble, granite, and travertine, but the name alone doesn’t indicate how a particular tile will respond to a leveling system.
What causes lippage in natural-stone tile installations?
Start with the surface beneath the tile. High and low areas can leave neighboring edges at different heights, while differences in tile thickness may remain visible even on a well-prepared substrate. Mortar coverage and placement matter too. Uneven support or inconsistent setting can affect how a tile sits and whether it stays aligned as work continues.
Check substrate flatness and tile variation before setting. Clips and other leveling components can assist with alignment, but they aren’t a remedy for an unsuitable substrate or inconsistent setting technique.
Why natural stone needs a compatibility check
Stone finishes vary. Polished stone looks different from honed or textured stone, and some surfaces may be more susceptible to visible marks. Don’t assume one finish or stone type will respond like another. A component’s contact area and the pressure used during adjustment can affect the tile face or edges, particularly if the system isn’t suitable or is tightened improperly.
Before use, check the leveling-system and stone manufacturers’ instructions. Verify that the system is approved or recommended for the specific stone, tile thickness, joint width, and finish. Follow the instructions for adjustment and removal. If those details aren’t provided, don’t assume a system intended for ceramic tile is suitable for natural stone.
How to Compare Leveling Systems for Marble, Travertine, and Other Stone
Check compatibility first, then compare handling and convenience. Verify stone compatibility and tile dimensions before comparing convenience. This keeps a familiar installation workflow from taking priority over whether the system’s contact points, thickness range, and removal method suit the stone.
Clip-and-wedge and reusable cap-style systems can both hold neighboring tile edges in position during setting, but their adjustment and removal steps differ. Check how each component engages the tiles, whether it touches the finished face or only the edges, and what the manufacturer says about tightening and removal. Neither design is universally safer for natural stone. The right fit depends on the specific system and tile.
Compare the system details, not just the style
Use product documentation to compare the details below. Verify each dimension and compatibility statement with the system manufacturer before purchase.
| Comparison point | What to check |
|---|---|
| System style | Clip-and-wedge or reusable cap-style. Confirm the adjustment and removal sequence. |
| Contact area | Where components meet the tile, including whether they touch the finished surface or edges. |
| Tile thickness range | The manufacturer-stated minimum and maximum, and whether the range covers the stone’s actual thickness. |
| Joint width | The system’s required joint and whether separate spacers are needed to achieve the planned grout joint. |
| Removal method | How and when to release or remove components, and whether the instructions address stone use. |
Which stone and tile details should you verify?
Identify the stone type, finish, edge profile, tile size, and actual thickness range. A polished marble face, honed limestone, and textured travertine may have different surface sensitivities. Don’t assume that a system suitable for one finish works for another. Compare the system’s stated thickness range, joint-width requirements, contact surfaces, and installation directions with the tile and layout.
The Dimension Stone Design Manual is a reference for natural-stone design and construction. For a specific installation, follow the stone and leveling-system manufacturers’ instructions. If surface sensitivity is uncertain, test a small area only when manufacturer guidance allows it.
Pro Supply Center offers a ceramic tile leveling system. Review the ceramic tile leveling system and compare its product specifications with your stone before choosing it.
Will a Tile Leveling System Damage Natural Stone? Risks and Safeguards
It can, but damage isn’t inevitable. Risk depends on whether the system is approved for the stone, where its components make contact, how much pressure is applied, and how it’s installed and removed. For a tile leveling system for natural stone, compatibility and controlled use matter more than tightening force.
Distinguish potential risks from product-specific warnings. Contact or pressure could mark a visible face or stress an edge, depending on the stone and component design. Those are factors to assess, not proof that a particular system will cause damage. Treat a manufacturer warning as specific guidance for that product. If the instructions don’t address natural stone or its finish, don’t infer approval from a general claim that the system works with tile.
How surface finish and contact points change the risk
Polished surfaces can make a mark easier to notice, while honed and textured finishes have different surface characteristics. Don’t assume any finish is immune to damage. Inspect where clips, wedges, or caps bear against the tile, and check whether the manufacturer identifies those contact points as suitable for the stone and finish. Don’t assume a component is non-marking based on its appearance or material alone. Follow the specified adjustment and removal method. Forceful tightening can add pressure without improving a poor fit.
What a leveling system cannot fix
A leveling aid doesn’t prepare the substrate, make it flat, or ensure that suitable setting materials are used. It also can’t compensate for insufficient or uneven mortar coverage. Trying to pull tiles into alignment with excessive force may temporarily conceal a placement problem while leaving the underlying issue unresolved.
Check project requirements against the stone, mortar, and leveling-system manufacturers’ instructions. For broader installation guidance, consult the TCNA Handbook for Ceramic, Glass, and Stone Tile Installation, including the applicable method and substrate requirements. Follow the directions for the materials in your installation rather than treating a leveling system as a substitute for them.
Before setting, check the system’s stone compatibility and understand its prescribed pressure and removal steps. If guidance is missing or unclear, pause and ask the manufacturer rather than tightening further. Controlled use starts with a suitable system and sound setting work, not extra force.
How to Use a Leveling System with Natural Stone: Checks Before Setting
For a natural-stone installation, treat the leveling system as one part of a controlled setting process, not a shortcut around preparation. Work through these checks before setting the first tile:
- Inspect the substrate. Check its condition and flatness against the requirements for the tile, setting material, and installation method. Address unsuitable areas before laying stone.
- Dry-fit representative tiles. Compare actual thicknesses, layout, and neighboring edge alignment. This can reveal fit issues before mortar and leveling components are in use.
- Verify system compatibility. Check that the manufacturer approves the system for the stone type, finish, tile dimensions, and joint requirements.
- Set the stone as directed. Use a mortar suitable for the specific stone and follow its instructions for placement and coverage.
- Adjust gently and remove as directed. Follow the leveling-system instructions for placement, adjustment, timing, and removal. Observe the setting material’s instructions before removing components or grouting.
A representative test area can help show whether components fit the tile and whether contact or adjustment raises a surface concern. Test only if the system manufacturer’s guidance allows it, and follow the specified procedure. A successful test doesn’t replace checking the substrate or verifying written compatibility for the full installation.
Prepare the substrate and dry-fit the stone
Don’t rely on clips to pull tiles across high and low spots. Determine substrate flatness requirements from the applicable installation method and product guidance. Check the specific requirements for your project rather than assuming one tolerance suits every stone and format. During the dry fit, note thickness differences and edge profiles, then check that the selected mortar is suitable for the stone and follow its coverage instructions.
Place, adjust, and remove components carefully
Position and adjust components only as the leveling-system manufacturer directs. Use controlled pressure, and stop if a component visibly stresses, marks, or shifts a tile. Don’t force alignment to compensate for a fit or substrate problem. Follow the system’s removal instructions and the mortar’s setting or curing guidance before grouting.
For a ceramic-focused overview of leveling and lippage, see “Eliminating Lippage with Ceramic Tile Leveling Systems.” Its guidance concerns ceramic tile, so check natural-stone compatibility separately before using a system on stone. Review the ceramic tile leveling system and compare its product specifications with your stone before considering it for your installation.
Choosing a Natural Stone Compatible System and Verifying Your Purchase
Choose a system only when its manufacturer’s instructions match your stone and tile dimensions. A clear product description or general claim about tile use isn’t enough to establish compatibility with natural stone. Use this checklist before buying:
- Stone approval: Does the manufacturer explicitly support your stone type and finish?
- Tile thickness: Does the stated thickness range cover the actual tiles, including variation between pieces?
- Joint width: Do the system’s joint requirements suit the planned layout and grout joint?
- Component contact: Where do clips, wedges, or caps touch the tile, and does the guidance address the finished surface and edges?
- Use and removal: Are the placement, pressure, and component-removal instructions clear for this stone?
A suitable tile leveling system for natural stone has specifications that fit the material, finish, tile size, and installation plan. If any detail is unclear, ask the system manufacturer before purchase instead of relying on assumptions or a general product label.
Questions to ask before selecting a system
Ask whether the system is approved for the specific natural stone and finish, whether its thickness and joint-width ranges match the actual tile and layout, and what pressure and removal directions apply. Keep the answers with the product instructions so the installer can refer to them during setting. If the manufacturer excludes the stone or can’t confirm compatibility, choose another approach.
When to choose another approach
A leveling system isn’t mandatory for every stone installation. Installers may select a different method based on the stone, finish, tile dimensions, and project conditions. Don’t force a system that lacks clear compatibility guidance. A leveling aid shouldn’t take precedence over the stone manufacturer’s requirements or sound setting practice.
Pro Supply Center offers a ceramic tile leveling system and professional tiling accessories. Check the system’s documentation before considering it for a stone project. Once you’ve reviewed the specifications, review Pro Supply Center tiling supplies or contact the retailer with product questions.
Make Your Final System Choice with Confidence
The right tile leveling system for natural stone isn’t simply the one that applies the most force. Choose based on compatibility with the stone and finish, the tile’s actual dimensions, and clear instructions for use and removal. A leveling aid can help manage adjacent tile edges, but it works best alongside sound preparation and setting practice, not as a fix for underlying installation issues.
Before you buy, check the manufacturer’s guidance for your specific stone, including contact points and joint requirements. If compatibility is unclear, pause and choose a method supported for the material rather than guessing.
Pro Supply Center offers a ceramic tile leveling system and professional tiling accessories. Review the system specifications before considering it for natural stone. Explore Pro Supply Center tiling supplies as you plan your installation.
Frequently Asked Questions
Can you use a tile leveling system on natural stone?
Sometimes, but only if the system manufacturer confirms it’s suitable for the specific stone and finish. Check the stated tile-thickness range, joint-width requirements, contact points, and installation instructions before use. Don’t assume a system marketed for ceramic tile also suits marble, travertine, or another natural stone. If the instructions allow it, test a representative piece to check fit and surface contact before starting the full installation.
Will tile leveling clips scratch or damage marble?
Damage isn’t inevitable, but risk depends on where components contact the tile, how much pressure is applied, the marble finish, and how the system is installed and removed. Check the manufacturer’s guidance for the system and stone. Avoid forceful tightening, and inspect a test area if instructions permit. Stop if a component visibly marks or stresses the tile. A general claim that clips work with tile doesn’t confirm they suit every marble surface.
Do tile leveling systems prevent lippage in natural stone?
No system can guarantee a lippage-free result. A leveling aid can help align adjacent tile edges while the setting material is workable, but substrate flatness, tile thickness variation, mortar coverage, placement, and installation technique still affect the result. Prepare the substrate before setting, follow the system instructions, and use the components only for alignment. If the base or tile pieces vary, clips won’t remove the underlying cause of uneven edges.
What leveling system is best for natural stone tile?
There’s no single best system for every stone installation. For a tile leveling system for natural stone, compare manufacturer-confirmed compatibility with the specific stone and finish, thickness range, joint-width requirements, component contact points, adjustment method, and removal instructions. Consider tile size and edge profile too. If product documentation doesn’t clearly cover the material, ask the manufacturer or choose a method recommended for that stone.
Can a tile leveling system correct an uneven floor?
No. A leveling system helps hold adjacent tile edges in alignment. It doesn’t flatten an uneven floor or replace substrate preparation. An irregular base can still cause problems even when clips or wedges are in place. Check the applicable substrate requirements for the tile and setting materials, then correct unsuitable conditions before installation. Follow project-specific guidance rather than increasing pressure on the leveling components to compensate for an uneven surface.
Should you test a tile leveling system before installing natural stone?
A representative test can help reveal fit, contact, or surface concerns before the full installation, provided the system and stone instructions allow it. Use a spare or inconspicuous sample when possible, follow the manufacturer’s procedure, and inspect both the finish and edges. A test is a practical check, not proof of overall compatibility. Confirm that the manufacturer supports the specific stone and tile dimensions before relying on the system.
Do natural stone tiles need special mortar when using a leveling system?
Mortar selection depends on the stone, tile format, substrate, and installation conditions, not simply on whether a leveling system is used. Check the stone and mortar manufacturers’ instructions for material compatibility, application, and coverage. A leveling aid can’t correct an unsuitable mortar choice or inadequate coverage. Confirm the setting-material requirements before beginning, and follow the directions for both the stone and mortar throughout installation.


