

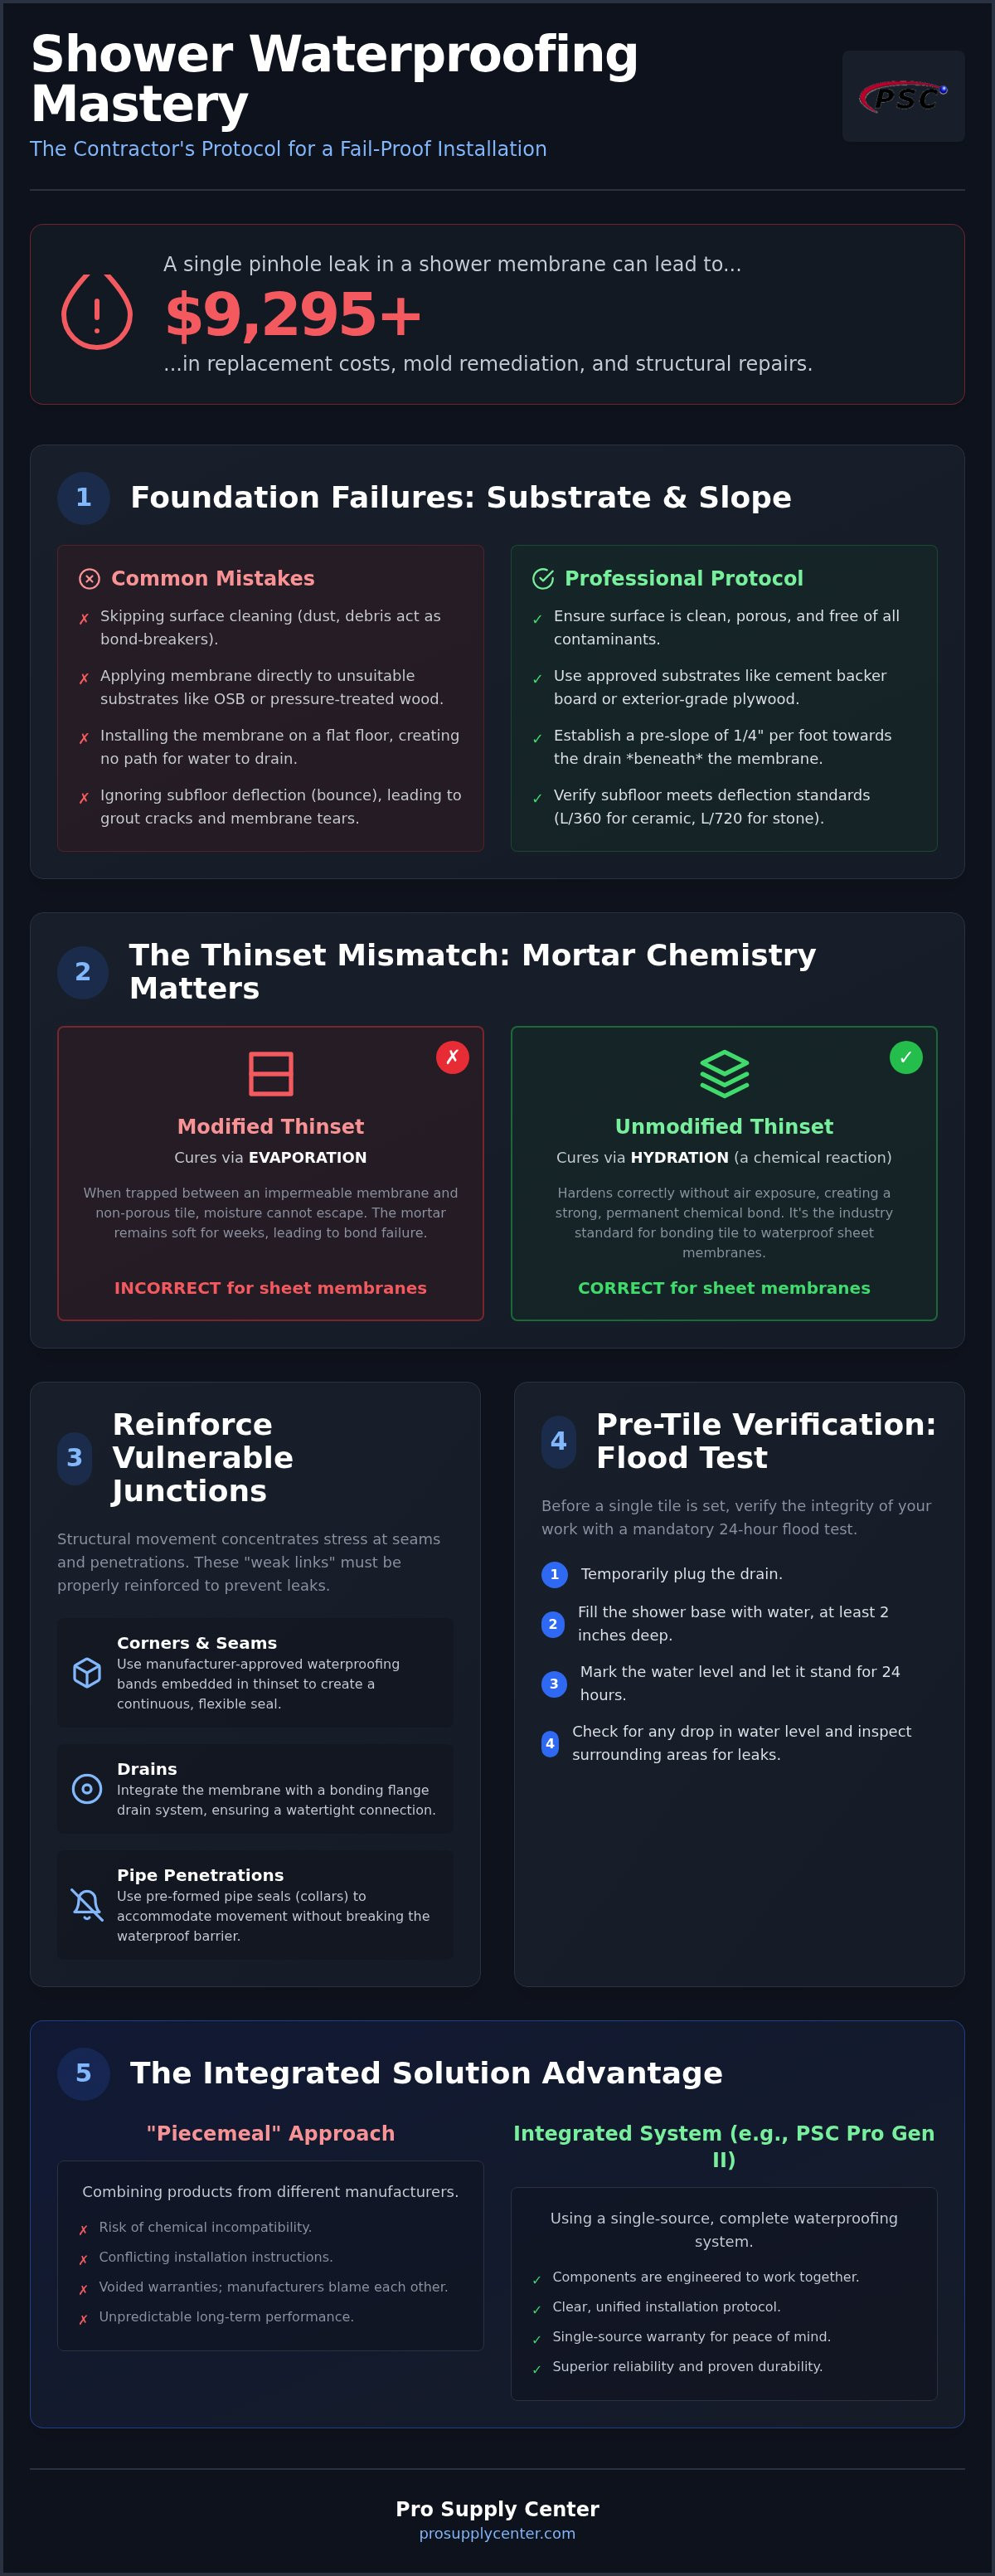
A single pinhole in a shower membrane can lead to over $9,295 in replacement costs before a homeowner even notices a damp spot on the ceiling. While the tile gets the visual credit, the invisible waterproofing layer determines whether a project is a professional success or a catastrophic liability. You likely take pride in your craftsmanship, yet the fear of expensive callbacks and invisible mold growth behind the walls is a constant reality for many in the trade. Identifying the specific shower waterproofing mistakes to avoid is the only way to protect your reputation and your bottom line.
It's easy to get confused by conflicting manufacturer specs or the nuances of mortar compatibility. This checklist provides a professional contractor's protocol for a fail-proof installation. We'll examine why "piecemeal" systems often fail, how to handle critical structural transitions, and the technical advantages of using integrated solutions like the PSC Pro Gen II Waterproofing System. From meeting 2026 building codes to mastering material chemistry, this guide ensures your next build is optimized for long-term durability and performance.
Key Takeaways
- Understand why surface preparation and subfloor deflection are the critical first steps to preventing membrane delamination and structural failure.
- Identify the specific shower waterproofing mistakes to avoid regarding thinset chemistry, particularly the risks of using modified mortars with impermeable membranes.
- Learn how to reinforce vulnerable junctions and pipe penetrations to ensure the "weak links" in your installation can withstand natural structural movement.
- Discover the professional protocol for a 24-hour flood test to verify the integrity of your waterproofing work before beginning the tiling process.
- Gain insight into why integrated solutions like the PSC Pro Gen II Waterproofing System provide superior reliability and single-source warranty protection over piecemeal installations.
Foundation Failures: Skipping Surface Preparation and Slope
Waterproofing starts long before the membrane is unrolled. If the substrate is compromised, even the highest-grade HDPE membrane will fail. One of the most common shower waterproofing mistakes to avoid is treating the surface as a secondary concern. Bonding requires a clean, porous surface. Dust, drywall compound, and old adhesive residues act as bond-breakers. If you can wipe your hand across the floor and see white powder, the thinset won't grab. This leads to delamination, which eventually causes the tile to lift and the waterproof seal to break.
Substrate compatibility is equally vital. Pressure-treated lumber and OSB (Oriented Strand Board) are unsuitable for direct membrane application. OSB is prone to swelling when exposed to even minor humidity, and pressure-treated wood contains oils and chemicals that prevent a primary mechanical bond. You must ensure the foundation consists of approved materials like cement backer board or exterior-grade plywood that is properly supported. Skipping this verification is a leading cause of catastrophic shower failure.
While localized substrate preparation is key, larger structural issues can also impact bathroom integrity. For those in Texas managing more extensive subfloor or foundation concerns, Crown Leveling Inc. provides expert insights into identifying and repairing slab leaks that could otherwise jeopardize your new installation.
The Pre-Slope Requirement
Water management happens on two levels: the tile surface and the waterproofing layer. Many contractors mistakenly install the membrane on a flat floor, assuming the tile mortar will create the pitch. This is a recipe for standing water and "sour" smells. Industry standards, and the 2026 building codes, require a minimum slope of 1/4 inch per foot toward the drain. This slope must exist beneath the membrane so that any moisture that migrates through the grout can move toward the weep holes. Whether you use a traditional mud bed or modern pre-sloped pans from comprehensive waterproofing systems, that pitch must be established before the waterproofing is finalized.
Substrate Integrity and Deflection
Tile is rigid, but wood is flexible. If your subfloor has too much "bounce," the grout will crack and the membrane will eventually tear or delaminate. This is known as the "Deflection Factor." You must ensure the joist spacing and subfloor thickness meet TCNA standards, typically L/360 for ceramic and L/720 for natural stone. Before installation, test the floor for movement. If there is visible flex, you may need to add a second layer of plywood or sister the joists. Removing old contaminants like wax, oil, or paint is also non-negotiable. A clean, stable foundation is the only way to ensure the shower waterproofing mistakes to avoid don't become a reality during the life of the installation.
The Thinset Mismatch: Why Mortar Choice Leads to Failure
Selecting the wrong mortar is one of the most common shower waterproofing mistakes to avoid, often because the chemistry of curing is misunderstood. Many installers assume that "modified" means "better" because of the added polymers. However, when you're working with an impermeable sheet membrane, these polymers can become a liability. Modified thinsets generally cure through evaporation. When you sandwich this mortar between a waterproof membrane and a large-format porcelain tile, there's no airflow. The moisture has nowhere to go, meaning the mortar can remain soft for weeks, compromising the structural integrity of the entire shower.
Following manufacturer specifications is the only way to ensure a valid warranty and a long-lasting bond. If you're comparing systems, understanding these technical nuances is essential; always consult each manufacturer's specific guidelines to ensure compatibility and optimal performance.
Understanding Hydration vs. Evaporation
Unmodified thinset cures through a chemical reaction called hydration, which allows it to harden even in the absence of air. This makes it the industry standard for bonding tile to sheet membranes. In contrast, modified mortars rely on the evaporation of water to allow the polymers to form a film and bond. If that water is trapped, the bond never reaches its full strength. Hydration-based curing is a chemical process that transforms the mortar into a solid structure without requiring exposure to the atmosphere. Adhering to the International Plumbing Code guidelines for material compatibility ensures that these chemical bonds remain permanent and moisture-resistant.
Avoiding the 'Loose Membrane' Syndrome
If you notice a "squishy" feeling under the membrane or a hollow sound after the tile is set, you likely have a bonding failure. This often stems from using the wrong notch trowel. Using a trowel with notches that are too deep can create air pockets or excessive mortar height that won't collapse properly. Conversely, a trowel that is too small won't provide enough coverage to saturate the membrane's fleece backing. You need 100% coverage to ensure the system performs under pressure.
To prevent these issues, always use the specific trowel size recommended by the system manufacturer. For a reliable, professional-grade result, consider using a PSC Waterproofing Shower Kit, which is designed to work seamlessly with specific mortar types to eliminate guesswork on the job site.
Vulnerable Junctions: Corners, Drains, and Pipe Penetrations
Transitions are the primary failure points in any wet room. While a flat wall is relatively easy to seal, 90% of water intrusion occurs at the junctions where planes meet. One of the critical shower waterproofing mistakes to avoid is the belief that overlapping flat membrane at a corner provides a sufficient seal. In reality, structural settling and seasonal expansion put immense stress on these 90-degree angles. If the membrane isn't flexible enough to accommodate this movement, it will eventually tear, creating an invisible pathway for water to reach the framing.
Adhering to TCNA installation standards requires that all transitions remain watertight under pressure. This includes the "forgotten" areas like pipe penetrations and mixing valves. Without specialized mixing valve seals or pipe collars, water can track back along the shower arm or behind the escutcheon plate. This moisture rots the wall cavity from the inside out, often going undetected until the subfloor is compromised.
The Necessity of Pre-Formed Corners
Using pre-formed inside and outside corners is the professional solution to corner bulk and failure. These components are factory-molded to fit perfectly into transitions without the bunching or "tenting" associated with folding flat sheets. The PSC Pro Gen II Waterproofing System includes these pre-formed corners to ensure a uniform thickness that doesn't interfere with your tile layout. When installing these, ensure a minimum 2-inch overlap with the wall membrane using appropriate seam tape or bands to maintain a continuous, impermeable barrier.
Integrating Shower Niches and Drains
Recessed niches are notorious for "window-sill" leaks. Water often pools on the bottom ledge of the niche, eventually finding its way through grout cracks at the corners. Every niche must be fully wrapped and integrated into the wall membrane, with the bottom shelf sloped slightly toward the shower floor. Similarly, the connection to shower drains must be seamless. Whether you are using a standard square drain or a modern linear system, the membrane must be mechanically or chemically bonded to the drain flange to prevent sub-floor saturation. Finally, always ensure the top of the curb is sloped 1/4 inch per foot toward the drain and fully encased in the waterproofing system.
The Pre-Tile Verification Checklist: 24-Hour Flood Testing
The most expensive shower waterproofing mistakes to avoid are the ones you don't catch until the project is finished. You can follow every manufacturer's instruction to the letter, but without a flood test, you're simply guessing. A flood test is the industry-standard method for verifying the integrity of the shower pan before a single tile is set. It acts as a final insurance policy, protecting you from liability and the homeowner from catastrophic water damage. If a leak exists, it's far better to find it while the membrane is exposed than after you've installed thousands of dollars in premium tile.
During the test, it's common to see "wicking," where moisture climbs slightly up the fleece backing of the membrane. This is normal capillary action and doesn't indicate a failure. A true structural leak is identified by a measurable drop in the static water level that cannot be attributed to evaporation. Documenting the start and end of this test with photos of the water line is a professional best practice that provides proof of a successful installation for your warranty records. To ensure you have all the components needed for a successful test, consider using a PSC Waterproofing Shower Kit, which includes integrated drains designed for easy testing.
How to Perform a Proper Flood Test
Performing a flood test requires a methodical approach to ensure accuracy. Follow these steps to verify your work:
- Plug the drain: Use a pneumatic test plug or a mechanical expansion plug. Ensure it's seated below the level of the waterproofing membrane to test the drain-to-pan connection.
- Fill the pan: Carefully fill the shower floor with water until it reaches at least 1 inch above the highest point of the floor, typically the curb or the transition to the walls.
- Mark the waterline: Use a grease pencil or a piece of tape to clearly mark the water level on the wall membrane.
- Wait 24 hours: Leave the water standing for a full day. Check the level again after 24 hours. If the level hasn't moved, the pan is watertight.
Verifying Slope and Drainage
A leak-proof pan is only half the battle; the shower must also drain efficiently. Once the flood test is complete and you pull the plug, observe the drainage. You're looking for "bird baths," which are small pockets of standing water that fail to move toward the drain. Standing water leads to mold growth and grout discoloration over time; for detailed insights on the environmental risks of trapped moisture, Mold Pros Phoenix serves as a comprehensive resource for professionals and homeowners alike. A simple "ping pong ball" test can verify unimpeded flow. Drop a ball at various points around the perimeter; it should roll directly to the drain without hesitation. Finally, ensure the drain flange is perfectly flush with the waterproofing layer. If the flange is too high, it creates a dam that prevents the sub-tile area from ever fully drying out.
The Integrated Solution: Why Systems Outperform Piecemeal Prep
Mixing and matching components from different manufacturers is one of the most persistent shower waterproofing mistakes to avoid. While it might seem cost-effective to use one brand's membrane with another's sealant or drain, this piecemeal approach often leads to chemical incompatibility. If the sealant doesn't bond permanently to the membrane, the entire system's integrity is compromised. Most manufacturers won't honor a warranty if you've substituted critical components, leaving you fully liable for any future failures.
Transitioning to an integrated system like the PSC Pro Gen II Waterproofing System eliminates these variables. It provides a single-source warranty, ensuring that every layer is engineered to work together. This system doesn't just offer security; it increases job site efficiency. By using pre-sloped pans and integrated niches, you remove the margin for error inherent in traditional mud bed construction. You're not just buying materials; you're adopting a tested protocol that minimizes callbacks.
Benefits of PSC Waterproofing Shower Kits
PSC Waterproofing Shower Kits are designed to simplify the installation process while maintaining professional standards. When you open a kit, you have the assurance of guaranteed chemical compatibility between the membrane, seam tapes, and specialized sealants. This "everything in one box" approach prevents job site delays caused by missing parts or mid-project trips to the supplier for a specific corner piece. These components are professional-grade, built to withstand the rigors of heavy-duty use without the risk of degradation found in consumer-level alternatives.
Final Professional Touches
A leak-proof shower is the priority, but the aesthetic finish is what the client sees. To achieve a high-end look, it's essential to use a Ceramic Tiles Leveling System. These tools prevent "lippage"-the uneven edges between tiles-which is especially critical when working with trending large-format tiles. A perfectly flat surface doesn't just look better; it ensures water flows correctly toward the drain without being diverted by raised tile edges or "bird baths" mentioned in previous sections.
Finalizing the build also requires selecting the correct drain grate. Match the grate to both the room's aesthetic and the required flow rate of the shower head to prevent water from backing up. For long-term integrity, advise clients on proper maintenance. Avoid harsh acidic cleaners that could damage grout or specialized finishes. Periodically checking the perimeter sealant for signs of wear ensures the waterproofing remains uncompromised for the life of the home.
Secure Your Build with Professional-Grade Protocols
Shower failure isn't a matter of if, but when, if the underlying chemistry and structural transitions aren't respected. By prioritizing unmodified thinset for proper hydration and strictly adhering to a 24-hour flood test, you eliminate the guesswork that leads to costly callbacks. Understanding the critical shower waterproofing mistakes to avoid transforms a standard renovation into a durable, code-compliant installation that protects both your reputation and the property's structure.
Relying on an integrated system is the most effective way to ensure material compatibility across every layer of the build. Whether you're managing complex drain transitions or waterproofing recessed niches, a unified approach provides the single-source warranty and reliability that piecemeal installations lack. Professional results require professional tools.
Take the risk out of your next project by using high-performance components designed for the trade. You can build a leak-proof shower with the PSC Pro Gen II Waterproofing System. We offer contractor-grade PSC Pro Gen II membranes, complete all-in-one shower kits, and national shipping on professional tiling tools. Your commitment to these rigorous standards ensures a result that stands the test of time.
Frequently Asked Questions
Can I use modified thinset to bond my shower membrane?
No, you should generally use unmodified thinset when bonding tile to an impermeable sheet membrane. Modified thinsets require evaporation to cure, but since the membrane and tile are non-porous, moisture stays trapped. Unmodified thinset cures through hydration, which is a chemical reaction that doesn't need air. This ensures a rock-solid bond that won't remain soft or fail over time.
How long should I wait for the waterproofing to cure before tiling?
Sheet membranes like the PSC Pro Gen II allow for immediate tiling once the membrane is set in the thinset. If you're using a liquid-applied system, you typically need to wait 24 hours for it to change color and fully cure. Always verify the specific curing requirements for your system to prevent the tile from shifting or the membrane from peeling during the installation process.
What is the most common place for a shower to leak?
Transitions and junctions are the most frequent failure points, accounting for approximately 90% of all shower leaks. Specifically, the corners where the floor meets the wall and the area around the drain flange are highly vulnerable. Using pre-formed corners and integrated drain systems is a professional strategy to reinforce these weak links against structural movement and settling.
Is it necessary to waterproof the entire bathroom or just the shower?
While building codes only mandate waterproofing for the shower receptor and adjoining walls, many professionals recommend waterproofing the entire floor in luxury wet rooms. Standard installations only require protection in the immediate wet area. However, extending the membrane at least 12 inches outside the shower door can prevent floor damage from overspray and exit drips.
Can I install a new waterproofing system over old tile?
You should never install a new waterproofing system directly over old tile. This approach prevents you from inspecting the underlying substrate for rot or deflection issues. To avoid common shower waterproofing mistakes to avoid, you must strip the area to the studs or subfloor. This ensures the new membrane bonds to a stable, clean, and approved surface.
Why is my shower curb leaking even though I used a liner?
Curb leaks often occur because the installer drove fasteners through the top or inside face of the curb, puncturing the liner. Water eventually seeps through these holes and rots the wooden framing. A professional-grade installation uses a sheet membrane that is wrapped over the curb and bonded with thinset, eliminating the need for mechanical fasteners in the wet zone.
What is the difference between a liquid membrane and a sheet membrane?
Sheet membranes provide a factory-guaranteed uniform thickness, whereas liquid membranes rely on the installer's ability to apply the correct mil depth. While liquid membranes are often cheaper per square foot, they require longer cure times and multiple coats. Sheet systems like PSC Pro Gen II offer superior durability and allow you to move from waterproofing to tiling in a single day.
Do I need a flood test if I used a pre-sloped shower pan?
Yes, a flood test is mandatory even if you use a pre-sloped shower pan. A pre-sloped pan only guarantees that water moves toward the drain; it doesn't guarantee that the membrane-to-drain connection or the corner seams are watertight. The 2026 International Plumbing Code requires a 24-hour test to verify the integrity of the entire assembly before you cover it with tile.


