

The best Schluter shower kit alternative is not necessarily the one with parts that look most familiar. Focus on whether the waterproofing components work together and whether the installation sequence fits your shower design and experience. Switching systems can change which materials and details your project requires, so compare the complete assembly before choosing.
Start with the system type, not the brand name. Sheet membranes, liquid-applied membranes, and foam-board systems use different application methods and may require different components. Mixing products without documented compatibility can leave gaps in the waterproofing plan.
This guide explains what to compare in a Schluter shower kit alternative, including system format, drain connection, transitions, and installation requirements. You’ll learn how to match a system to your shower layout and assess whether its components belong together. We’ll also cover PSC Pro Gen II as an option to evaluate, along with practical ways to coordinate waterproofing materials, shower drains, and other components.
Key Takeaways
- Choose a system format that suits your shower layout and installation plan, not just one that feels familiar.
- Compare the system format, transitions, drain connection, and manufacturer documentation side by side.
- Use your shower dimensions, layout, substrate, drain, and project scope to narrow down a Schluter shower kit alternative.
- Review the installation sequence and required components before selecting a system to help avoid compatibility gaps.
- Consider PSC Pro Gen II alongside other systems as you compare waterproofing options and coordinate shower components.
Why look for a Schluter shower kit alternative? Start with the project requirements
Compare shower waterproofing systems by how they suit the project, not just by brand. You may be weighing sheet membranes against other formats, identifying which components are needed, or considering how an alternative changes the installation sequence. The right choice depends on the shower layout and which materials need to work together, not on whether the kit resembles one you have used before.
A coordinated waterproofing system is designed around compatible layers and transitions. When selecting products individually, take extra care to establish how the membrane connects to the drain and how seams, corners, and penetrations are treated. Compare the complete assembly and its instructions rather than judging one product in isolation. No single system is automatically the best fit for every layout or installer.
What does a shower waterproofing kit need to do?
The waterproofing layer manages water that passes through tile and grout, helping protect the shower assembly behind the finished surface. Tile and grout provide the visible finish, but they are not a substitute for a continuous waterproofing layer. A basic overview of shower construction also explains the role of a waterproofing material behind the finish.
Continuity is essential. Seams, inside corners, plumbing penetrations, and the drain connection each need a planned treatment that follows the selected system’s instructions. A gap or incompatible transition can interrupt the protective layer, even if the surrounding membrane is installed correctly. Before choosing a kit, list these details and identify how the system addresses each one.
Which projects prompt shoppers to consider an alternative?
Existing conditions often shape a remodel. The substrate, drain location, shower footprint, and any parts of the assembly being retained can affect which products fit and how the work proceeds. A system suited to a straightforward rebuild may require a different installation plan when the layout or existing drain presents constraints.
New construction and professional projects can bring different priorities. One plan may favor a familiar sequence, while another may be organized around a different membrane format or component set. Map the shower layout and drain position first, then compare each system’s required transitions and installation steps. This makes a Schluter shower kit alternative easier to assess on practical fit rather than brand familiarity alone.
Compare shower kit alternatives by system type and component compatibility
Compare the full waterproofing assembly, not just the membrane. Sheet-based systems use membrane sheets, while board-based approaches use panels as part of the assembly. The format affects measuring, cutting, fitting, seams, and transitions, though exact requirements vary by product. Use the manufacturer’s instructions to identify each system’s components and installation sequence.
Use this framework to compare options. The questions below help organize your review; they do not imply that every system uses the same parts or methods.
| Comparison point | What to review | Why it matters |
|---|---|---|
| System format | Is the assembly sheet-based, board-based, or another format? | The format affects how the waterproofing layer is measured, cut, fitted, and detailed. |
| Transitions | How does the system treat seams, corners, penetrations, and changes between surfaces? | These details need a continuous, system-compatible waterproofing treatment. |
| Drain coordination | How does the specified waterproofing assembly connect to the selected drain? | The drain connection is part of the waterproofing detail, not a separate finishing choice. |
| Documentation | Which current installation instructions and technical documents cover the products? | Documentation clarifies approved materials, preparation, and sequence for that system. |
Which components should you compare across systems?
Compare the waterproofing layer, seam treatment, corner details, penetration details, and drain connection as one assembly. For each component, look for manufacturer documentation specifying its use with the selected system. A product that appears suitable is not automatically documented for that application. For broader context on tile installation standards, consult the ANSI Tile Industry Specifications, then use product-specific instructions for the system requirements.
How do installation workflow and system format differ?
System format affects the work sequence. Sheet materials generally call for planning the layout, cuts, and joins. Board-based assemblies involve fitting panels and detailing their joints and transitions. These are broad comparison points, not substitutes for product instructions. Substrate condition, shower shape, niches, plumbing penetrations, and drain position can all affect the required steps and materials.
Separate documented requirements from general comparison questions. Manufacturer instructions define system-specific preparation, compatible components, and installation procedures. Asking which format suits a layout helps organize the decision, but does not establish compatibility. For a deeper system overview, see The Professional Guide to Waterproofing Shower Kits in 2026. Pro Supply Center’s waterproofing shower kits and shower drains can also be reviewed as part of a coordinated component plan at Pro Supply Center’s shower waterproofing supplies.
Will a Schluter shower kit alternative fit your shower design and installation plan?
It can, if the system’s components and installation sequence suit the planned shower assembly. A Schluter shower kit alternative is not a direct fit simply because it serves the same general purpose. Check how the waterproofing approach works with the layout, substrate, drain, and tile assembly. Then compare the steps needed to complete each detail.
How should you assess compatibility before selecting a system?
Map every point where the waterproofing layer changes direction or meets another component. Mark inside and outside corners, seams, plumbing penetrations, niches, and the drain connection. Use current manufacturer instructions to identify the specified treatment and components for each detail. Do not assume products from different systems are interchangeable because they look similar. Use a combination only when compatibility is documented.
This review can reveal workflow implications early. For example, a niche or offset drain may add transitions that need to be addressed in the assembly plan. Resolving those details before selecting materials helps prevent last-minute substitutions and gaps in the installation sequence.
What project conditions can change the comparison?
Start with the shower footprint and whether the design includes a curb or curbless entry. Note the drain location, substrate, planned waterproofing format, and tile assembly. These conditions affect the layout and work sequence, while the applicable product instructions determine specific preparation and detailing requirements. For code or assembly questions, verify the requirements that apply to the project rather than relying on a general comparison.
The table compares workflow considerations, not system performance. Actual steps depend on the selected products and project conditions.
| Workflow factor | Potential advantage | Tradeoff to consider |
|---|---|---|
| Sheet-based format | May provide a defined sheet layout for covering surfaces. | Measure and plan cuts, seams, corners, and penetrations according to system instructions. |
| Board-based format | Rigid panels can shape the work around the surfaces being covered. | Panel joints, corners, and transitions still need the specified waterproofing detail. |
| Drain placement | A planned location can help organize the shower assembly and work sequence. | Confirm the drain connection is documented for the chosen waterproofing system. |
| Shower design and substrate | Reviewing these early helps align preparation with the installation plan. | Changes to the layout or substrate may affect the required steps and materials. |
For product-specific context, consult PSC Pro Gen II Waterproofing System: The Professional Reference Guide alongside current system instructions. Apply the same fit check to every option: trace the assembly from substrate to drain, account for each transition, and confirm the planned sequence before choosing a system.
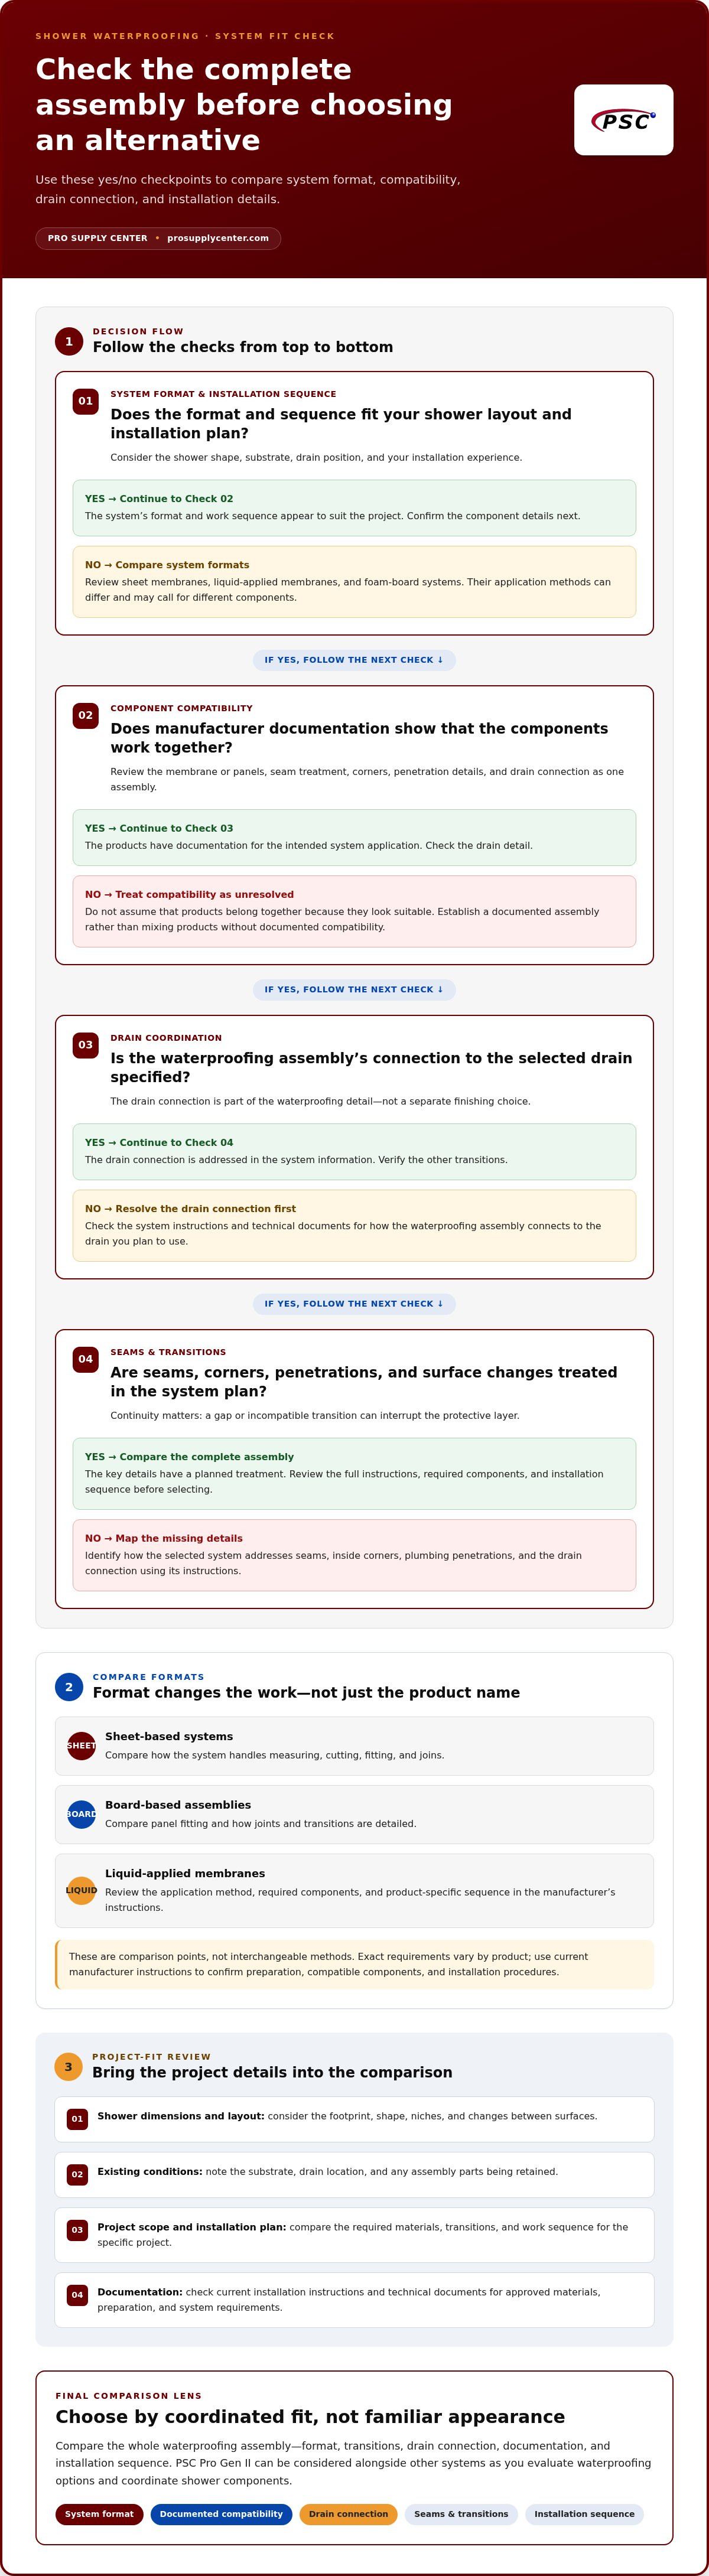
Use this checklist to evaluate a shower kit alternative before buying
A consistent checklist makes it easier to compare a Schluter shower kit alternative with other systems on practical fit. Gather the project details first, then apply the same questions to each option. This keeps the decision focused on the complete assembly rather than kit size, product count, or broad marketing claims.
- 1. Record shower dimensions and layout. Note floor and wall measurements, the entry design, corners, and changes in plane. Include the planned tile assembly and project scope.
- 2. Document the substrate. Identify the surface where the waterproofing system will be installed. Record existing conditions that may affect preparation or installation.
- 3. Locate and describe the drain. Record its type and position in the shower. Include the drain in the comparison because its connection to the waterproofing assembly matters.
- 4. Mark features and transitions. List planned niches, benches, curbs, plumbing penetrations, corners, and other details the waterproofing layer must address.
- 5. Identify the required components. Use current product documentation to determine the specified waterproofing layer and the treatments required at seams, corners, penetrations, and the drain.
- 6. Check component coordination. Confirm that each selected product is specified for use with the system. Do not treat similar-looking materials from different systems as interchangeable without documented compatibility.
- 7. Review the installation sequence. Compare preparation, measuring, cutting or fitting, detailing, and installation order. Consider how the sequence aligns with the substrate and shower design.
- 8. Separate facts from assumptions. Record product-specific requirements from manufacturer instructions separately from general impressions or marketing language. Flag unresolved assembly or code questions for verification before work begins.
Use the same criteria for every candidate. A kit with more components is not automatically a better fit. What matters is whether its documented parts and installation steps address the details in your project. This side-by-side method can also reveal a missing transition or a step that does not align with the planned workflow.
For additional context on coordinating drains, niches, and waterproofing, see Professional Shower Hardware: The Contractor’s Guide to Drains, Niches, and Waterproofing. To review materials for your project, explore Pro Supply Center’s shower waterproofing systems and components.
Consider PSC Pro Gen II as a professional shower waterproofing alternative
PSC Pro Gen II is Pro Supply Center’s primary waterproofing system offering and a professional option to include in your comparison. Evaluate it using the same project criteria as any other system: shower layout, substrate, drain, transitions, and planned installation sequence. This keeps the decision focused on project fit rather than assuming two systems are equivalent because they serve a similar purpose.
How does PSC Pro Gen II fit into an alternative search?
Start with product-specific information for the PSC Pro Gen II Waterproofing System. Review its current instructions and system overview to understand the required components and installation details. Then compare those requirements with your project notes. Pay particular attention to how the planned assembly addresses corners, penetrations, seams, and the drain connection.
Use like-for-like documentation before drawing conclusions about another brand. A fair comparison considers each system’s published requirements and workflow. Do not assume equal components, installation steps, or performance without supporting information. Pro Supply Center also offers waterproofing shower kits and shower drains, which can be considered as part of the component plan.
What is the next step for choosing a system?
Bring your project information together before selecting materials. Use this quick review to apply the earlier checklist to PSC Pro Gen II and any other candidate:
- Match the project. Compare your shower dimensions, layout, substrate, drain position, and features with the system’s documented requirements.
- Trace the waterproofing details. Identify how the specified components address each seam, corner, penetration, and transition in your design.
- Review the work sequence. Check preparation and installation steps against the planned tile assembly and project workflow.
- Resolve open questions. Use current product instructions for product-specific details, and verify applicable assembly or code requirements for the project.
A system is a practical candidate when its documented components and instructions align with the shower assembly you intend to build. If you’re considering a Schluter shower kit alternative, apply the same comparison method to every option, including PSC Pro Gen II. Explore the Pro Supply Center waterproofing systems to review the PSC Pro Gen II system and available waterproofing shower kits.
Choose a Waterproofing System That Fits Your Project
A useful comparison starts with your shower, not the brand name. Match the system format and documented components to the layout, substrate, drain, transitions, and installation sequence. Then review current manufacturer instructions to make sure the planned assembly works as a complete system.
This process gives you a practical way to assess a Schluter shower kit alternative without assuming every option is interchangeable or suited to every installation. PSC Pro Gen II Waterproofing System is Pro Supply Center’s primary waterproofing system offering. The company also offers waterproofing shower kits and shower drains to support coordinated project planning.
Ready to compare your project needs with available options? Explore Pro Supply Center waterproofing systems and review the system details as you plan your shower. Use the checklist and pay close attention to compatibility before choosing your system.
Frequently Asked Questions
What is a good alternative to a Schluter shower kit?
A good alternative is one whose documented components and installation requirements fit your shower assembly. PSC Pro Gen II Waterproofing System is Pro Supply Center’s primary waterproofing system offering and can be assessed alongside other options. Compare system format, substrate requirements, seams, corners, penetrations, drain connection, and installation sequence. Use current manufacturer documentation for product-specific details rather than assuming two systems are equivalent based on appearance or general purpose.
Are shower waterproofing systems interchangeable?
No. Do not assume shower waterproofing systems are interchangeable. Each system has its own product instructions and may specify particular materials and methods for seams, corners, penetrations, and drain transitions. A component that appears to fit may not be documented for use with another system. Compare the complete assembly and follow current manufacturer instructions. If you’re considering a combination of products, look for documentation that addresses compatibility for the intended application.
Can you mix components from different shower waterproofing brands?
You can mix components only when their compatibility for the intended assembly is documented. Otherwise, combining products from different brands may leave uncertainty about how transitions should be treated or which installation steps apply. Check current manufacturer instructions for the waterproofing layer, seam and corner treatments, penetrations, and drain connection. If documentation does not establish compatibility, keep the assembly within one system rather than relying on visual similarity or assumptions.
How do I compare a shower kit alternative with a Schluter system?
Compare both systems against the same project details: shower dimensions and layout, substrate, drain position, planned features, required transitions, and installation sequence. Review each manufacturer’s current instructions to identify specified components and preparation steps. Separate documented product requirements from marketing descriptions or assumptions. Judge a Schluter shower kit alternative by how completely its documented assembly suits your project, not by kit size or brand familiarity alone.
Do I need a complete shower waterproofing kit?
Not always, but you do need a complete, compatible waterproofing assembly for the planned shower. A kit may group system components, while a project assembled from individual products requires you to identify each necessary material and verify compatibility. Account for the waterproofing layer, seams, corners, penetrations, and drain transition. Use the manufacturer’s instructions to determine what the selected system requires for your layout and substrate.
What should a shower waterproofing kit include?
There is no universal contents list. A kit or system should provide, or clearly specify, the materials needed for its waterproofing approach and the relevant details in your shower, such as seams, corners, penetrations, and the drain connection. Requirements can vary with the system format and project design. Review product documentation and compare its specified components with your layout before selecting a kit. Do not assume every kit includes every project-specific item.
How much does a shower waterproofing kit cost?
Cost depends on the selected system, shower dimensions, project scope, and the components required for the assembly. Instead of comparing a single kit price, build a like-for-like materials list for each option. Account for the waterproofing method, transition details, drain coordination, and project-specific requirements. Check current product information for the exact items in each kit, since kit contents and project needs can differ.
Can a waterproofing system work with a curbless shower?
Yes, a waterproofing system can be used in a curbless design when its documented assembly suits the shower layout, substrate, and drain arrangement. Curbless designs require careful coordination of the floor, waterproofing transitions, and drainage. Review current system instructions and applicable project requirements before selecting materials. Confirm that the planned sequence addresses the full shower area and the connection between the waterproofing layer and drain.


