

Tile and grout aren’t the waterproofing layer. The best way to waterproof a shower is to build a continuous, compatible assembly behind or beneath the finish, with seams, corners, and the drain treated as parts of the same system. A gap at any of these transitions can undermine otherwise careful work.
Different waterproofing methods can work when installed according to their requirements, but mixing components or missing a transition can leave a path for moisture. To choose an approach, start with the shower design, base, substrate, and drain, then compare how each system connects these parts.
This guide compares common waterproofing methods, explains why drain connections and other details matter, and offers a sequence for checking the work before tile goes in. It also looks at how a coordinated system or shower kit, including the PSC Pro Gen II Waterproofing System, can help organize components. The goal is a clear plan you can review before the finish conceals the assembly.
Key Takeaways
- The best way to waterproof a shower is to plan the membrane, transitions, and drain as one compatible assembly.
- Compare sheet membranes, liquid-applied membranes, and traditional pan liners by how they fit your shower design and substrate.
- Use the shower type, base, substrate, and drain configuration to narrow your system choice before installation begins.
- Follow the selected product instructions for preparation, seams, application, curing, and testing before tile goes in.
- A coordinated waterproofing system or shower kit can help organize the components needed for your project.
Why the Best Way to Waterproof a Shower Starts Beneath the Tile
A shower’s finished surface takes daily water exposure, but it isn’t the layer that protects the framing and surrounding structure. The best way to waterproof a shower is to plan the barrier behind or beneath that finish, then connect it carefully at every change of direction and opening. The right assembly depends on the shower design, base, substrate, and selected waterproofing method.
Tile is the visible finish; the waterproofing layer is the barrier that protects the underlying assembly from water that passes through joints or around details. Grout and tile can resist water, but they don’t replace a dedicated waterproofing layer. General waterproofing principles apply: the barrier must suit its environment and remain continuous where surfaces meet.
Where shower water can travel behind a finished surface
Grout joints aren’t sealed barriers. Water can move through them and reach the substrate, while changes of plane, such as the wall-to-floor junction, create transitions that need careful detailing. Substrates and shower assemblies vary, so the chosen method must account for the materials and interfaces in the specific project.
Pay particular attention to places where a waterproofed surface is interrupted or changes direction:
- Corners and seams: Treat wall-to-wall and wall-to-base connections so adjoining areas remain joined.
- Fasteners and penetrations: Fixings, plumbing outlets, and other openings interrupt a surface and need appropriate detailing.
- Drain connection: The waterproofing layer must meet the drain in a way that fits the selected system and drain configuration.
A missed detail can create a path for water even when the larger wall or floor area is covered. A visually sound tile installation alone can’t show whether the waterproofing underneath is continuous.
What a complete shower waterproofing assembly must connect
Think of the shower as connected zones, not isolated surfaces: the base, walls, corners, openings, and drain all need to work together. Continuity means water moving behind one finished area encounters a connected waterproofed surface, rather than an unprotected break at a seam or transition. The way those zones connect depends on the selected system, so components and installation details must be compatible.
For example, waterproofing a wall without resolving its junction with the shower base leaves a potential weak point. The drain isn’t a separate afterthought either; its interface belongs in the overall plan. Related components such as drains and niches also affect how a shower assembly is laid out. The professional shower hardware guide explains how these elements relate to waterproofing decisions.
Before choosing materials, map every surface the assembly must protect and mark where it meets another surface, opening, or drain. This gives you a practical basis for comparing methods and checking the work before tile covers it.
How Shower Waterproofing Methods Differ at the Assembly Level
Waterproofing methods differ in how they cover surfaces and connect at seams, corners, penetrations, and the drain. Sheet membranes use joined sections, liquid-applied membranes form a coating when applied as directed, and traditional pan-liner approaches rely on a different base and wall-detail design. None is automatically right for every shower. The best way to waterproof a shower depends on whether the complete assembly suits the substrate, base, drain, and installation requirements.
Waterproofing performance depends on compatible, connected components, not on a membrane considered by itself. The table offers a high-level comparison. Exact requirements depend on the selected products and shower design.
| Assembly consideration | Sheet membrane | Liquid-applied membrane | Traditional pan liner |
|---|---|---|---|
| Substrate compatibility | Depends on the membrane and approved substrate. | Depends on the product and prepared surface. | Depends on the planned base and wall assembly. |
| Transitions | Seams, corners, and penetrations need system-specific detailing. | Coverage must remain continuous at edges and changes of plane. | Base-to-wall details follow the liner approach. |
| Drain connection | Must match the membrane and drain design. | Must follow the specified connection method. | Uses a drain and base detail suited to the liner system. |
| Application controls | Placement, seams, and overlaps follow product instructions. | Application and curing requirements vary by product. | Installation follows the liner system’s required sequence. |
| Instruction complexity | Requires careful attention to joints and accessories. | Requires attention to coverage and product-specific controls. | Requires coordination of base, walls, and drain details. |
What to evaluate in sheet and liquid-applied systems
For either method, check how the system treats every transition. Sheet membrane seams and corners need the designated connection details; liquid-applied membranes need consistent coverage at corners and around penetrations. Product instructions govern surface preparation, application, and curing, so don’t assume two products use identical steps. Compare the documented requirements for the specific assembly rather than relying on a general claim about one method being better.
When a traditional shower pan liner enters the decision
A pan-liner approach has its own base, drain, and wall-detail requirements. It isn’t interchangeable with a surface-applied membrane assembly: details designed for one approach may not suit another. Keep components and installation assumptions within the selected system, and use its instructions to define how the parts connect. For product context, see the PSC Pro Gen II system reference.
Project requirements also matter. The International Residential Code is one reference in the broader building-code framework; applicable requirements depend on the jurisdiction and project. Once you’ve identified the design and method, compare the required components and details as a complete set. Pro Supply Center offers the PSC Pro Gen II Waterproofing System as an option for planning a coordinated assembly.
How to Choose the Best Shower Waterproofing Method for Your Project
Choose a method by starting with the shower’s actual construction, not a product label or a general claim about which system is “best.” The best way to waterproof a shower is the method whose published requirements match the design from the base through the walls and connect properly to the drain. Record the key conditions before comparing systems.
- Shower type: Note whether the design is enclosed, curbless, or part of a larger wet area.
- Base design: Identify whether the shower uses a prefabricated base or a custom-built base.
- Substrate: Record the wall and floor materials, then check that the system instructions allow their use.
- Drain configuration: Confirm the drain style and how the selected waterproofing assembly connects to it.
- Project requirements: Account for planned details, applicable local requirements, and constraints specific to the build.
Match the waterproofing approach to the substrate and shower design
Each system is designed around particular surfaces and transitions. A substrate that works with one method may not be approved for another, so compare the proposed materials with the system’s compatibility guidance before building. Treat curbless showers, prefabricated-base installations, and custom-built bases as distinct planning cases because their floor, wall, and threshold connections may differ. Don’t choose a substrate or assembly by habit alone.
Read the installation instructions for the full scope: approved substrates, preparation, transition details, and required quality-control steps. These practical requirements are more useful for selection than broad marketing language. If the shower design or substrate falls outside the documented conditions, resolve the system choice before installation.
Check compatibility at the drain, corners, and penetrations
Review every interruption in the waterproofed surface, not just the large wall and floor areas. The drain connection must suit both the drain configuration and the waterproofing method. Include inside and outside corners, seams, niches, benches, valves, and pipe penetrations in the same review. A coordinated kit can help you consider related components together; the waterproofing shower kits guide covers kit considerations.
Use this compatibility check before settling on a system:
- Confirm the substrate and base are covered by the product instructions.
- Identify how seams, corners, and openings are detailed.
- Verify that the drain connection is designed for the selected assembly.
- List inspection and testing steps required by the product instructions and project.
Requirements can vary by jurisdiction and shower design, so don’t assume one code detail or test procedure applies everywhere. Verify applicable local requirements for the specific project. Pro Supply Center offers the PSC Pro Gen II Waterproofing System and waterproofing shower kits, which you can compare against these criteria as you plan a coordinated assembly.
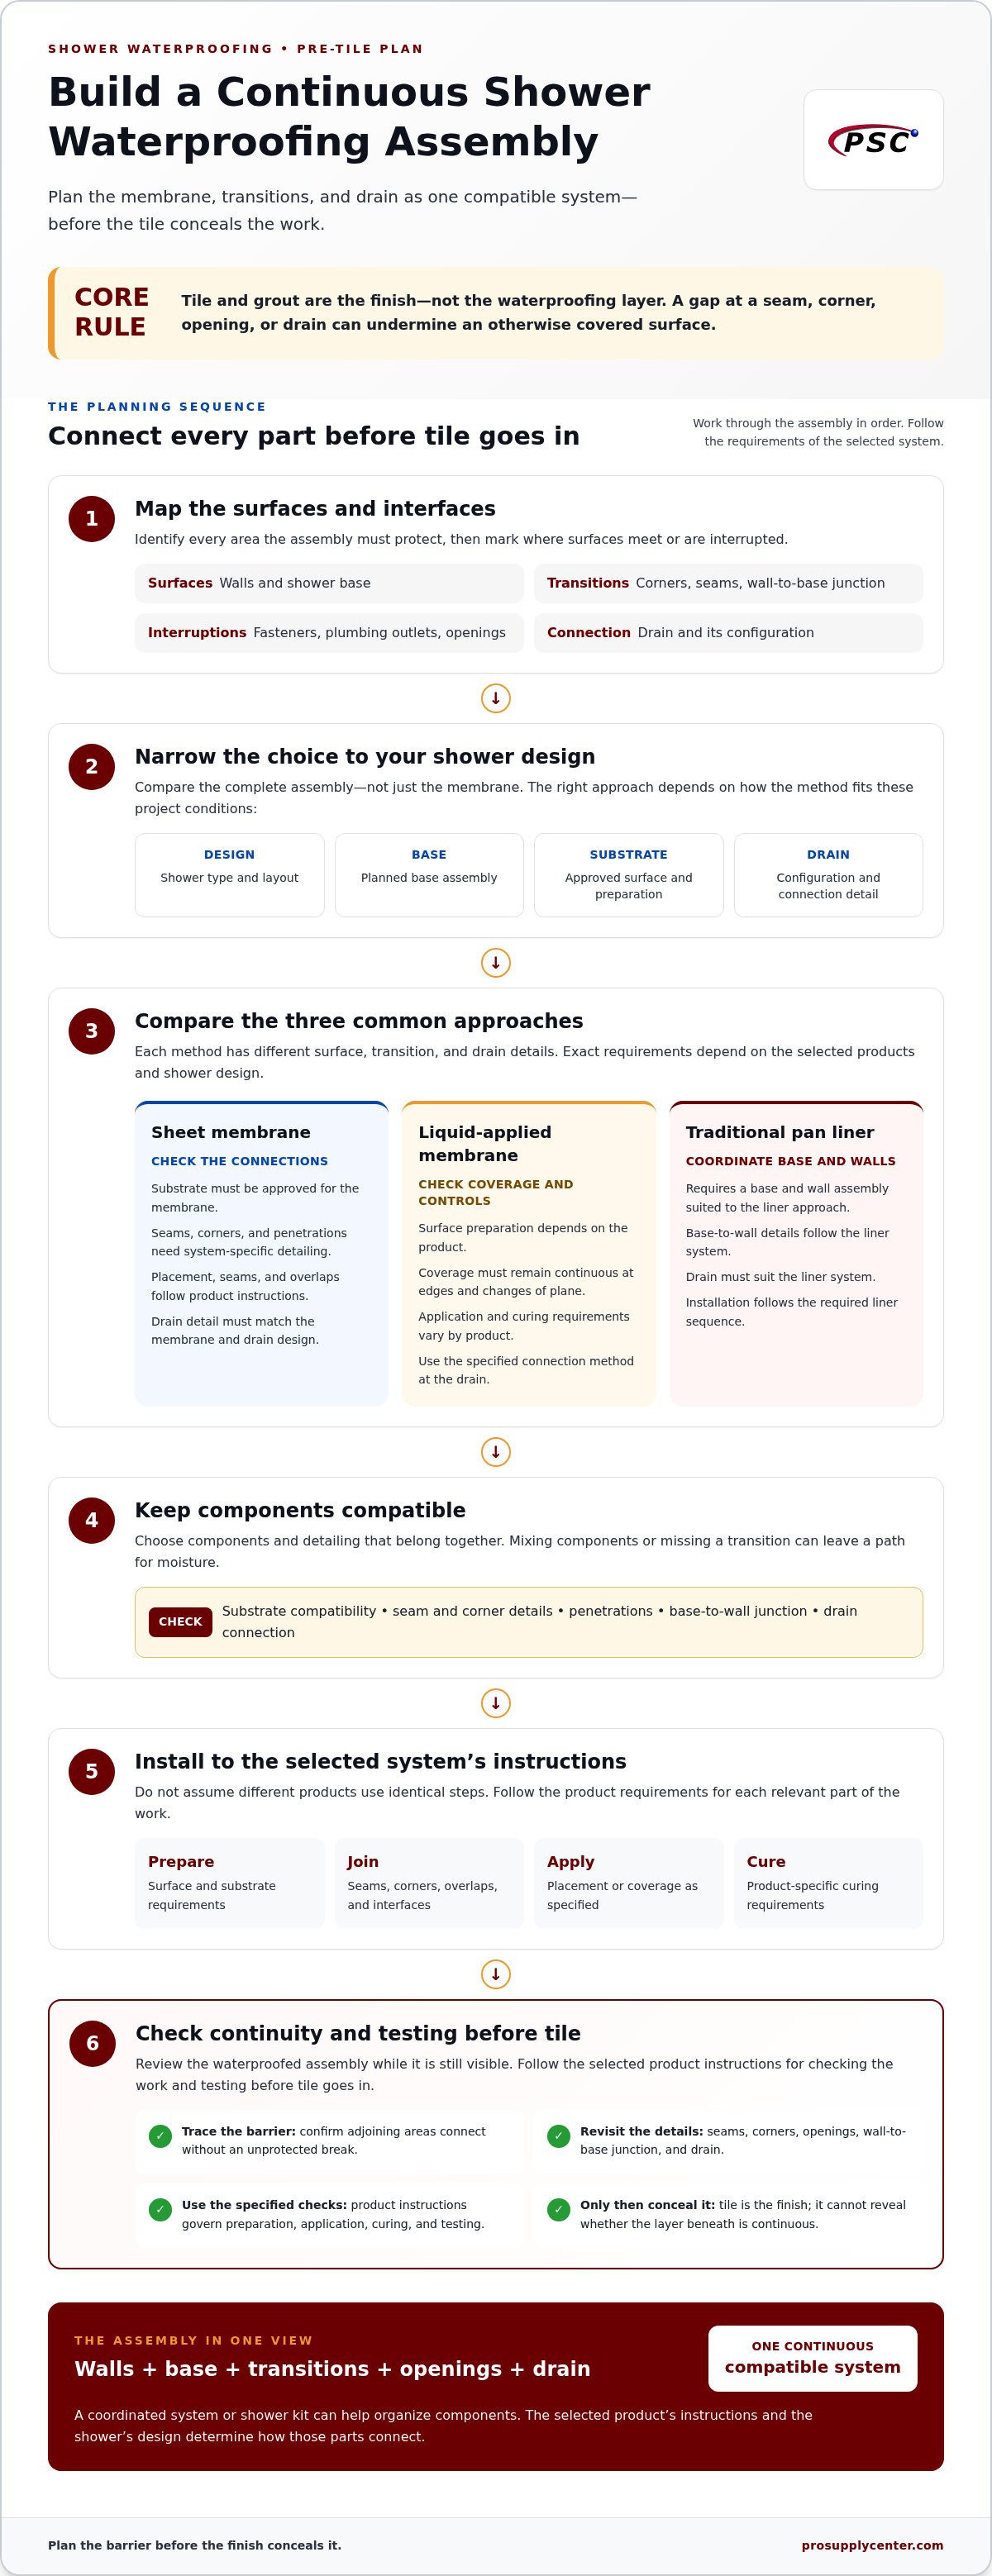
How to Waterproof a Shower: A Pre-Tile Installation Sequence
A reliable installation depends on doing the work in the right order and checking each stage before it’s hidden. The best way to waterproof a shower is to follow the selected system’s instructions from substrate preparation through inspection, rather than relying on a generic sequence for every product. Materials, coverage, overlaps, cure times, and test procedures vary, so use the requirements for your assembly and project.
- Confirm the assembly. Match the waterproofing method to the shower base, substrate, drain, and project requirements. Gather the system components and instructions before starting.
- Prepare the substrate. Check that surfaces are ready for the selected method and meet its stated conditions.
- Plan and detail transitions. Identify corners, seams, penetrations, and drain connections, then treat them as specified.
- Apply the system. Follow the product’s installation sequence and stated coverage requirements.
- Inspect and test. Examine the completed waterproofing and follow applicable product and project requirements for testing.
- Proceed to tile. Cover the assembly only after required inspection steps are complete and any defects have been resolved.
Prepare and detail the substrate before waterproofing
Before application, check that the substrate is clean and in the condition required by the selected system. Look for debris, damage, or other issues that could interfere with installation, and address them according to the relevant instructions. Preparation requirements aren’t necessarily the same across membrane types or substrates.
Plan the details before opening materials. Mark where the system must address corners, seams, plumbing penetrations, and the drain transition. This helps ensure details are handled in the correct order, with the specified materials, rather than improvised during installation.
Apply, inspect, and test according to the system instructions
Follow the manufacturer’s application sequence, including instructions for coverage, overlaps, and curing. These controls are product-specific. Resolve any unclear steps against the applicable instructions before proceeding; visual appearance alone may not establish that installation requirements have been met.
Pre-tile inspection is the last practical opportunity to examine hidden waterproofing details before the finish conceals them. Check the full assembly, especially transitions and penetrations, for gaps, incomplete coverage, or damage. A water test or other inspection procedure depends on the system, shower design, product instructions, and applicable local requirements. Don’t set tile over unresolved defects or skip required checks just to keep the project moving.
After inspection, document any required checks for the project and proceed with tile only as permitted by the system instructions. For coordinated components, explore shower waterproofing systems and kits from Pro Supply Center.
Choose a Coordinated Shower Waterproofing System and Plan the Next Step
The selection is complete when the waterproofing method, substrate, shower base, drain, and installation requirements all fit together. A product that suits one part of the shower doesn’t automatically resolve connections elsewhere. Before purchasing materials, make a project checklist and use it to compare the complete system, not just a membrane or coating in isolation. That’s the practical basis for choosing the best way to waterproof a shower for your design.
What to review before selecting a waterproofing system
Write down the conditions the assembly must address, then compare them with the relevant product instructions. This helps identify missing components or unresolved transitions while changes are still manageable. Keep the review specific to your project rather than assuming a familiar approach will suit every shower.
- Substrate: Confirm the system instructions address the surfaces in your shower.
- Shower base: Note whether the base is prefabricated or custom-built, and how it connects to the walls.
- Drain: Check how the selected assembly is intended to meet the drain configuration.
- Transitions: Account for seams, corners, niches, benches, valves, and pipe penetrations.
- Installation requirements: Review preparation, application, coverage, curing, inspection, and any stated testing steps.
Use the instructions as selection criteria, not broad promotional language. If a component or detail isn’t addressed in the system documentation, resolve that gap before committing to the assembly. Include applicable local requirements in your planning as well.
Where the PSC Pro Gen II system fits into the decision
The PSC Pro Gen II Waterproofing System is one option to consider when comparing shower waterproofing supplies. Evaluate it against the same project checklist as any system: consider the substrate, base configuration, drain connection, required transitions, and instructions for the planned installation. The goal is a compatible assembly for the specific shower, not a claim that one system is universally superior.
Related product categories can support the planning process. Pro Supply Center offers waterproofing shower kits and shower drains, which you can consider alongside the system as you identify the components your design calls for. Keep the chosen components aligned with the relevant instructions, and don’t assume that parts from different approaches connect in the same way.
With your project criteria in hand, review the PSC Pro Gen II Waterproofing System and related shower-kit options as a next step in comparing coordinated supplies for your shower design.
Move Your Shower Plan Toward the Right System
Before materials go on site, turn your design decisions into a clear component plan. Match the system to your shower configuration, then use its product instructions to guide preparation, installation, and inspection. This keeps the focus on details that matter instead of searching for one product that can solve every challenge. The best way to waterproof a shower is the approach that fits the project and is installed as a connected assembly.
Pro Supply Center offers the PSC Pro Gen II Waterproofing System, along with waterproofing shower kits and shower drains to consider as you plan. Review the product details against your project requirements and identify the components your assembly needs.
Explore the PSC Pro Gen II Waterproofing System and take the next step toward a well-planned shower build. A compatible system and careful pre-tile review can help you move forward with greater clarity.
Frequently Asked Questions
Is tile or grout enough to waterproof a shower?
No. Tile and grout form the finished surface, but they aren’t a substitute for a dedicated waterproofing layer. Grout sealer can help reduce staining or moisture absorption at the surface, but it doesn’t turn the tile assembly into a waterproof barrier. For the best way to waterproof a shower, plan for the layer beneath the finish to protect the structure, and detail joints and penetrations as the selected system requires.
Can a shower be waterproofed with a liquid-applied membrane?
Yes, a liquid-applied membrane can be used when it’s intended for the shower assembly and installed according to its product instructions. Confirm that the substrate is approved and follow the stated application and curing requirements. Corners, valves, pipe openings, and the drain connection need compatible details too. Coating the broad wall surfaces alone doesn’t establish that the whole shower has been waterproofed as a connected assembly.
What is the difference between a shower pan liner and a waterproofing membrane?
A traditional shower pan liner is part of a specific base construction, commonly placed beneath a mortar bed, with its own drain and wall-detail requirements. A bonded waterproofing membrane is typically applied or installed closer to the tile assembly, on the surface specified for that system. These approaches aren’t interchangeable. Their base construction, drain connection, and wall transitions differ, so follow the complete instructions for the selected design rather than combining details.
How long should shower waterproofing cure before tile is installed?
There isn’t one cure time that applies to every shower waterproofing product. Check the selected manufacturer’s instructions for the required cure conditions and when tile installation may begin. Liquid-applied products can have specific drying or curing requirements, while sheet systems may have different installation steps. Temperature, humidity, substrate condition, and application details can affect whether stated requirements are met, so don’t rely on touch or appearance alone.
Do shower walls need to be waterproofed all the way to the ceiling?
Not necessarily. Required coverage depends on the shower design, product instructions, and locally adopted code requirements. Model plumbing and residential codes may specify minimum waterproofing heights, but the locally adopted version and project conditions matter. A shower with spray directed toward a larger wall area may call for different planning than a compact enclosure. Confirm the required coverage for the specific design before installation.
Does shower waterproofing need to be tested before tiling?
Testing or inspection may be required by the applicable code, product instructions, or project requirements, so determine the procedure before covering the assembly. Model codes include flood-testing provisions, but the procedure that applies depends on your jurisdiction and shower assembly. Follow the requirements for the specific project, and complete any required checks before tiling.
Can I install a shower waterproofing system over any substrate?
No. Waterproofing products are designed for specified substrates and preparation conditions, and compatibility varies by system. A product approved for one backer material may not be suitable for another or for a surface that hasn’t been prepared as directed. Check the manufacturer’s approved-substrate list and installation instructions before buying or applying materials. Also confirm how the selected system handles joints, penetrations, and the drain over that substrate.


