

The easiest cove base to install can still be the wrong choice for the wall behind it. Self-adhesive cove base trim relies on a clean, dry, smooth surface for its backing to bond properly, so a peel-and-stick approach isn’t right for every room or substrate. Before choosing it over separately applied adhesive, assess the wall condition, moisture exposure, and details at corners and seams.
This guide compares self-adhesive vinyl and rubber options with glue-applied alternatives, explains how to assess project conditions, and outlines what to review before ordering. You’ll also find a practical checklist for choosing a finish and planning a consistent wall-to-floor transition. Pro Supply Center supplies vinyl and rubber cove base trim, so understanding how material and installation conditions affect fit can help you make an informed selection.
Key Takeaways
- Match Self-adhesive cove base trim to the wall surface and room conditions before choosing a backing method.
- Compare peel-and-stick and separately applied adhesive by preparation needs and application control.
- Measure wall runs and plan for corners, doorways, and joints to estimate the trim your project requires.
- Use the buying checklist to compare material, profile, and product directions before selecting a finish.
- Choose the attachment method that suits the project. Convenience alone doesn’t make one option right for every job.
Is Self-Adhesive Cove Base Trim Right for Your Project?
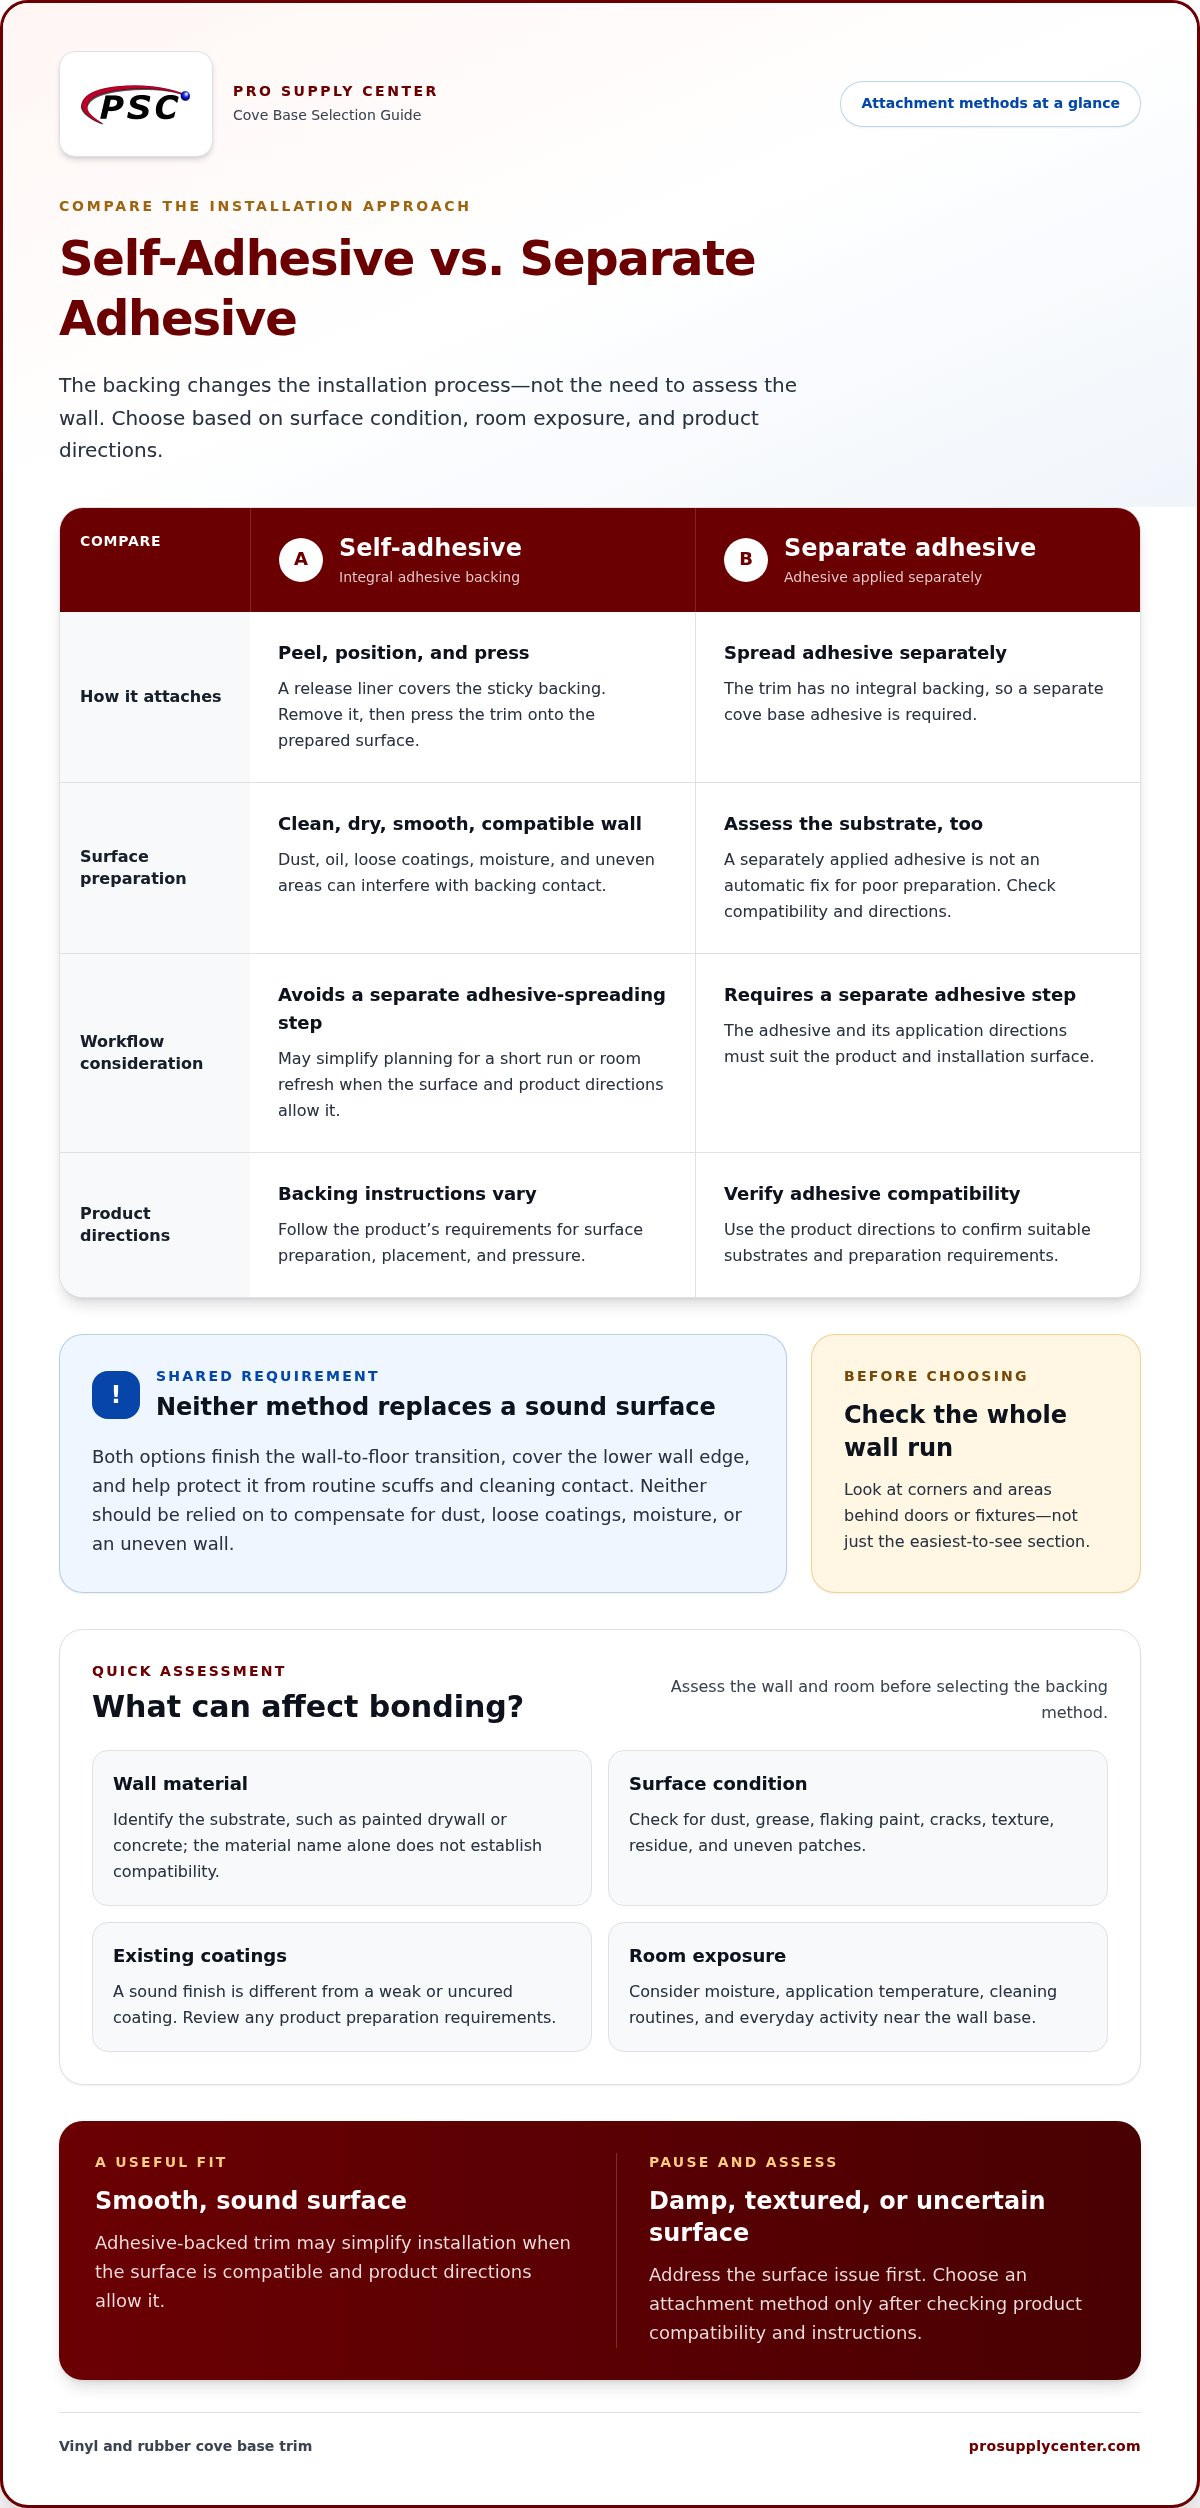
Self-adhesive cove base trim is resilient wall base with an adhesive backing that bonds directly to a prepared wall surface. Glue-applied cove base has no integral backing and requires a separate adhesive. Both finish the wall-to-floor transition, cover the lower edge of the wall, and help protect it from routine scuffs and cleaning contact. The attachment method changes the installation process, but neither eliminates the need to assess the substrate.
The practical question isn’t simply whether peel-and-stick trim is faster. Consider whether its backing is compatible with the wall and room conditions, and whether you can prepare the surface as the product requires. The trim should create a neat transition without relying on adhesive to compensate for dust, loose coatings, moisture, or an uneven wall.
What does self-adhesive mean for cove base trim?
Adhesive-backed trim typically has a release liner covering the sticky backing. During installation, you peel away the liner and press the trim onto the prepared surface. This avoids separately spreading cove base adhesive, but backing and application directions vary by product. Follow the specific instructions for surface preparation, placement, and pressure rather than assuming every self-adhesive trim installs the same way.
Where can adhesive-backed cove base make sense?
This method may suit a project where a straightforward application is useful and the wall provides a compatible, smooth bonding surface. It can be convenient for short runs or a room refresh where avoiding a separate adhesive step simplifies planning. Those are potential workflow advantages, not proof that the trim suits a particular job. Product directions and the actual surface condition determine whether the backing is appropriate.
Inspect the full wall run before selecting a product. Painted surfaces may have peeling or chalking areas; walls near sinks or entries may be exposed to moisture; older surfaces may have residue from previous finishes. Any of these conditions can interfere with contact between the backing and wall. Self-adhesive cove base trim won’t repair a weak coating or flatten an uneven substrate.
- Cleanliness: Remove dust, oil, and other residue using a preparation method suitable for the surface.
- Bonding surface: Check for loose paint, flaking material, rough patches, or gaps that could prevent even contact.
- Room conditions: Consider moisture and routine cleaning, then follow the product’s suitability guidance.
For example, if a wall has a smooth, sound finish and the product instructions allow that surface, adhesive-backed trim may simplify installation. If the wall is damp, textured, contaminated, or has an uncertain coating, address the surface issue before installing. Separately applied adhesive is another attachment method, not an automatic fix for poor preparation. Its compatibility and directions matter too.
Pro Supply Center supplies vinyl and rubber cove base trim. Start by assessing the substrate and room, then compare product backing and installation requirements. That sequence helps you determine whether adhesive-backed trim fits the project or whether another attachment approach better suits the conditions.
How Substrate, Surface Condition, and Room Use Affect Trim Choice
The backing can bond only as well as the surface beneath it allows. Before choosing trim, assess the wall material, its condition, any existing coating, and the room’s typical conditions. A wall that looks clean from across the room may still have dust, oil, loose paint, or uneven areas that interrupt contact. Substrate condition is a core factor in adhesive bond reliability.
Use this checklist to evaluate the installation surface:
- Wall material: Identify whether the run is painted drywall, concrete, or another substrate. These are examples to assess, not a guarantee that every product will adhere to each one.
- Surface condition: Look for dust, grease, flaking or loose paint, cracks, texture, and uneven patches. These can prevent the backing from making consistent contact.
- Existing coatings: Note whether the wall is painted, sealed, or recently coated. A sound finish and a weak or uncured coating are not equivalent bonding surfaces.
- Room exposure: Consider moisture, application temperature, cleaning routines, and the amount of everyday activity around the wall base.
Which wall surfaces need extra attention?
Painted drywall and concrete are common examples, but the material name alone doesn’t establish compatibility. Glossy paint needs careful assessment, while dusty concrete can leave particles between the backing and wall. Textured or damaged areas may reduce contact, and recently coated walls may need additional time or preparation. Check the product instructions for approved substrates and preparation requirements.
Inspect the full length of the wall, including corners and areas behind doors or fixtures. One section may be smooth and sound while another has peeling paint or old adhesive residue. Don’t rely on the backing to bridge gaps or hold onto a weak surface. Prepare the substrate only by a method appropriate for the wall and specified in the product directions.
How do room conditions influence the decision?
A dry interior with stable conditions may present fewer challenges than a room where the wall base is regularly exposed to splashes, damp cleaning, or temperature swings. Application temperature can also matter because product instructions may specify conditions for installing the trim. Review those directions alongside the room’s normal use, rather than judging suitability by how the room looks on installation day.
For example, a hallway and a room near a frequently used sink have different exposure patterns. That difference doesn’t determine the outcome by itself, but it helps identify what to check in the product guidance. If moisture is persistent or the substrate stays damp, address the underlying condition and assess whether the specified attachment system suits the environment. Cove base trim is a finish material, not a substitute for waterproofing or a required wall or floor assembly.
Select self-adhesive cove base trim only after checking the surface and room conditions. Pro Supply Center supplies vinyl and rubber cove base trim, giving you material options to compare as you match the trim category to the project.
Self-Adhesive vs. Separate Adhesive: Compare the Trade-Offs
Self-adhesive cove base trim has adhesive attached to its backing. Separately applied systems use cove base trim and a distinct adhesive selected for the installation. Neither approach is automatically better. The right fit depends on the substrate, product directions, site conditions, and installation requirements. Compare the work involved and the control each method offers instead of judging by attachment method alone.
| Factor | Self-adhesive backing | Separate adhesive |
|---|---|---|
| Backing approach | Adhesive is attached to the trim and covered by a release liner. | Adhesive is applied separately to the trim, wall, or as directed by the product. |
| Preparation | Requires a surface prepared to the trim manufacturer’s instructions. | Also requires suitable surface preparation, plus following the adhesive directions. |
| Application control | Placement and alignment matter because the backing is exposed as the liner is removed. | Can offer flexibility in adhesive selection and application, subject to product compatibility. |
| Project considerations | Review substrate approval, room conditions, and application requirements for the trim. | Review compatibility among the trim, adhesive, substrate, and room conditions. |
Think about the full installation, not just how the adhesive reaches the wall. A long, uninterrupted run has different positioning demands from a wall with frequent corners, doorways, or joints. Choose a method that suits the work sequence and site conditions, while ensuring the specified products are compatible with the substrate.
When can self-adhesive backing simplify the work?
Because the adhesive is already on the trim, this method can reduce the need to handle and apply a separate adhesive. That may simplify staging when the approved surface and installation conditions are straightforward. It doesn’t remove the need to align each run carefully or prepare the wall. Follow the trim manufacturer’s application requirements, including any directions for positioning and pressing the backing into place.
Plan the sequence before exposing the adhesive. Dry-fitting a piece can help you assess its position and how it meets adjacent runs, but follow the product’s instructions for any recommended handling or placement process. Once application begins, the specific backing and directions may limit corrections.
When might separately applied adhesive offer more control?
A separate adhesive approach lets you select adhesive as part of the project specification, which may be useful when the substrate or room conditions require closer evaluation. Irregular surfaces and demanding environments deserve particular attention. This isn’t a blanket recommendation: confirm compatibility among the trim, adhesive, and substrate, and follow each product’s instructions. An adhesive should not be assumed to compensate for a surface problem.
Use the manufacturer’s guidance to identify approved applications and preparation. Pro Supply Center supplies vinyl and rubber cove base trim for project selection. Compare the attachment approach with the material and site conditions, then choose the system that matches the installation requirements.
Use This Buying Checklist Before Ordering Self-Adhesive Cove Base
A reliable order starts with a clear takeoff and a product match, not a guess based on room size. Use this checklist to connect wall runs, substrate, material, profile, and application directions before selecting self-adhesive cove base trim. Mapping the job first can help prevent a quantity shortfall or a mismatch between the backing and the project.
Measure the project and map the trim runs
Measure each wall run separately and note openings, inside corners, and outside corners as distinct details. Mark expected joints and whether offcuts can be reused on shorter sections. Once the layout is set, compare the required footage with the product’s confirmed length and packaging coverage. Don’t assume every roll or package contains the same amount.
- Define the project area. List every wall section receiving base, including alcoves and short returns. Note doorways or other openings where trim won’t run.
- Identify and assess the substrate. Record the wall material, coating, and surface condition along each run. Flag areas that may need preparation or closer review against product directions.
- Choose the material. Compare the project’s use and room conditions with the available material options. Pro Supply Center supplies vinyl and rubber cove base trim, and the right material depends on the application.
- Confirm the profile and dimensions. Review the product’s stated height, shape, and other dimensions where provided. Consider how the profile will meet the flooring and finish adjacent walls.
- Review backing and application directions. Check the specified substrate, preparation, room conditions, and installation requirements. Don’t infer backing details or suitability from a product photo or category name.
- Calculate the order. Use measured runs, planned joints, and corner details alongside confirmed product length and package coverage. Allow for cuts and layout decisions based on the actual product and project plan.
Check the product details that affect fit
Compare material, profile, dimensions, color, backing, and application instructions where product information provides them. Keep confirmed details separate from assumptions: a familiar material or similar-looking trim doesn’t establish identical dimensions or installation requirements. A commercial grade cove base selection guide can help frame the comparison, while product directions remain the reference for application.
Before finalizing quantities, sketch the wall runs and label each measurement. For example, show a doorway interruption separately from the adjoining wall lengths so you don’t count trim across an opening. Record inside and outside corners individually, then decide where joints will land and whether offcuts suit the remaining sections. This makes it easier to review the takeoff against actual package coverage.
Ready to compare trim materials for your project? Browse vinyl and rubber cove base trim as you work through the checklist.
Select Cove Base Trim and Plan the Next Project Step
Make the decision in order: assess the substrate, consider room conditions, choose a suitable material and profile, then compare backing methods. This keeps appearance from driving a choice that may not fit the wall or the way the room is used. Use product information to confirm dimensions, backing, and application requirements instead of relying on assumptions about a general trim category.
Match your project requirements to the trim category
Start with the wall and its condition. Then account for moisture exposure, expected room use, and the finish you want at the floor edge. Compare vinyl and rubber trim as material categories, and review each product’s profile and directions for the specific job. General guidance can narrow your options, but product specifications determine substrate approval and application conditions.
Each attachment method has practical trade-offs:
- Self-adhesive backing: May simplify application by reducing the need to handle a separate adhesive. Placement, surface preparation, and the manufacturer’s directions still matter.
- Separate adhesive: May allow project-specific adhesive selection, but requires compatibility checks for the trim, substrate, and site conditions.
Neither method suits every job. A simple application process doesn’t guarantee a suitable bond, and a separately selected adhesive doesn’t resolve a weak or unsuitable surface. If the room or substrate presents unusual demands, let product instructions guide the decision rather than relying on a general performance claim.
Pro Supply Center supplies vinyl and rubber cove base trim alongside flooring and construction materials. Use the category as a starting point, then compare the product details that correspond to your measurements and installation conditions.
Prepare for a clean, consistent finish
Before moving to the next project step, gather wall-run measurements, corner and doorway notes, substrate observations, and room-condition details. Keep these with the product’s confirmed profile, dimensions, backing information, and application directions. Together, they make it easier to check that your trim choice and planned quantity align with the layout.
For installation details, follow the instructions supplied with the selected trim and any compatible adhesive. Don’t treat cove base as a replacement for moisture protection or another required assembly. Careful planning clarifies what the product is intended to do and what preparation the wall needs.
Once you’ve compared the substrate, room use, material, profile, and backing, browse vinyl and rubber cove base trim to find a category for your project.
Turn Your Trim Choice Into a Clear Project Plan
Before ordering, create a short project record with the wall runs, surface conditions, room use, preferred profile, and applicable product directions. This gives you a practical reference when comparing options and helps align the trim, quantity, and planned finish. Self-adhesive cove base trim can suit a project when the product and prepared substrate match the job, but choose based on actual conditions rather than convenience alone.
A clean, consistent wall-to-floor transition starts with a product that fits the project and a plan that accounts for its requirements. Pro Supply Center supplies construction and flooring materials, including vinyl and rubber cove base trim, to customers nationwide.
Browse Pro Supply Center cove base trim to explore options for your project. With the key details in hand, you can make a considered selection and plan a finished edge that fits the space.
Frequently Asked Questions
Does self-adhesive cove base trim need additional adhesive?
Usually, no: the backing is intended to attach the trim without a separate adhesive. Don’t add glue automatically or assume every product has identical requirements. Extra adhesive could conflict with the trim’s instructions or affect placement. If an edge lifts during a test fit, check the specified surface preparation and application directions instead of covering the issue with another adhesive. Use an additional product only if the manufacturer directs it.
Can self-adhesive cove base stick to painted drywall?
It may adhere to painted drywall if the product allows that substrate and the paint is sound. A smooth, firmly bonded coating differs from paint that is peeling, chalky, or freshly applied. Check for loose finish and review product guidance about coatings or preparation. If paint comes away from the wall easily, the trim may bond to the paint without securing the weak layer underneath.
Can self-adhesive cove base trim be installed in a bathroom?
It depends on the bathroom’s moisture exposure and the trim’s stated application conditions. A dry powder room differs from a wall beside a tub or shower that gets frequent splashes. Check whether the product is suitable for the specific location, and keep the wall dry as directed during application. Cove base is a finishing trim, not waterproofing; it can’t replace a waterproofing system where one is needed.
How do you measure for cove base trim?
Measure each section of wall where trim will run, then add the lengths for a total. Leave out openings such as doorways, and record short returns, inside corners, and outside corners separately so the layout is clear. Compare the total with the product’s stated length or package coverage. Account for cuts and planned joints using the actual product dimensions, rather than estimating from the room’s floor area.
Is self-adhesive cove base better than glue-applied trim?
Neither method is best for every project. Self-adhesive trim can avoid handling a separate adhesive, while glue-applied trim lets the adhesive be selected separately for the job. For a short, straightforward wall run, the simpler workflow may appeal; a project with unusual surfaces calls for closer compatibility review. Compare substrate approval, preparation, room conditions, and product directions before choosing, rather than treating convenience as proof of better performance.
Can you install self-adhesive cove base over existing trim?
Don’t assume it can be installed over existing base. The old trim may be uneven, loose, dirty, or shaped in a way that prevents the new backing from making consistent contact. Adding another layer can also leave a bulky edge or create an awkward meeting point at door casings. Check the new trim’s substrate requirements. If they don’t allow installation over existing trim, remove it and prepare the wall as directed.
How long does self-adhesive cove base take to bond?
There isn’t one reliable bonding time for every trim and backing. The product instructions should specify application conditions and any guidance about when the bond is ready for normal room use or cleaning. Don’t judge readiness only by whether the trim feels attached immediately after pressing it into place. For example, wait until the manufacturer’s stated guidance permits wet cleaning against the new base.


