

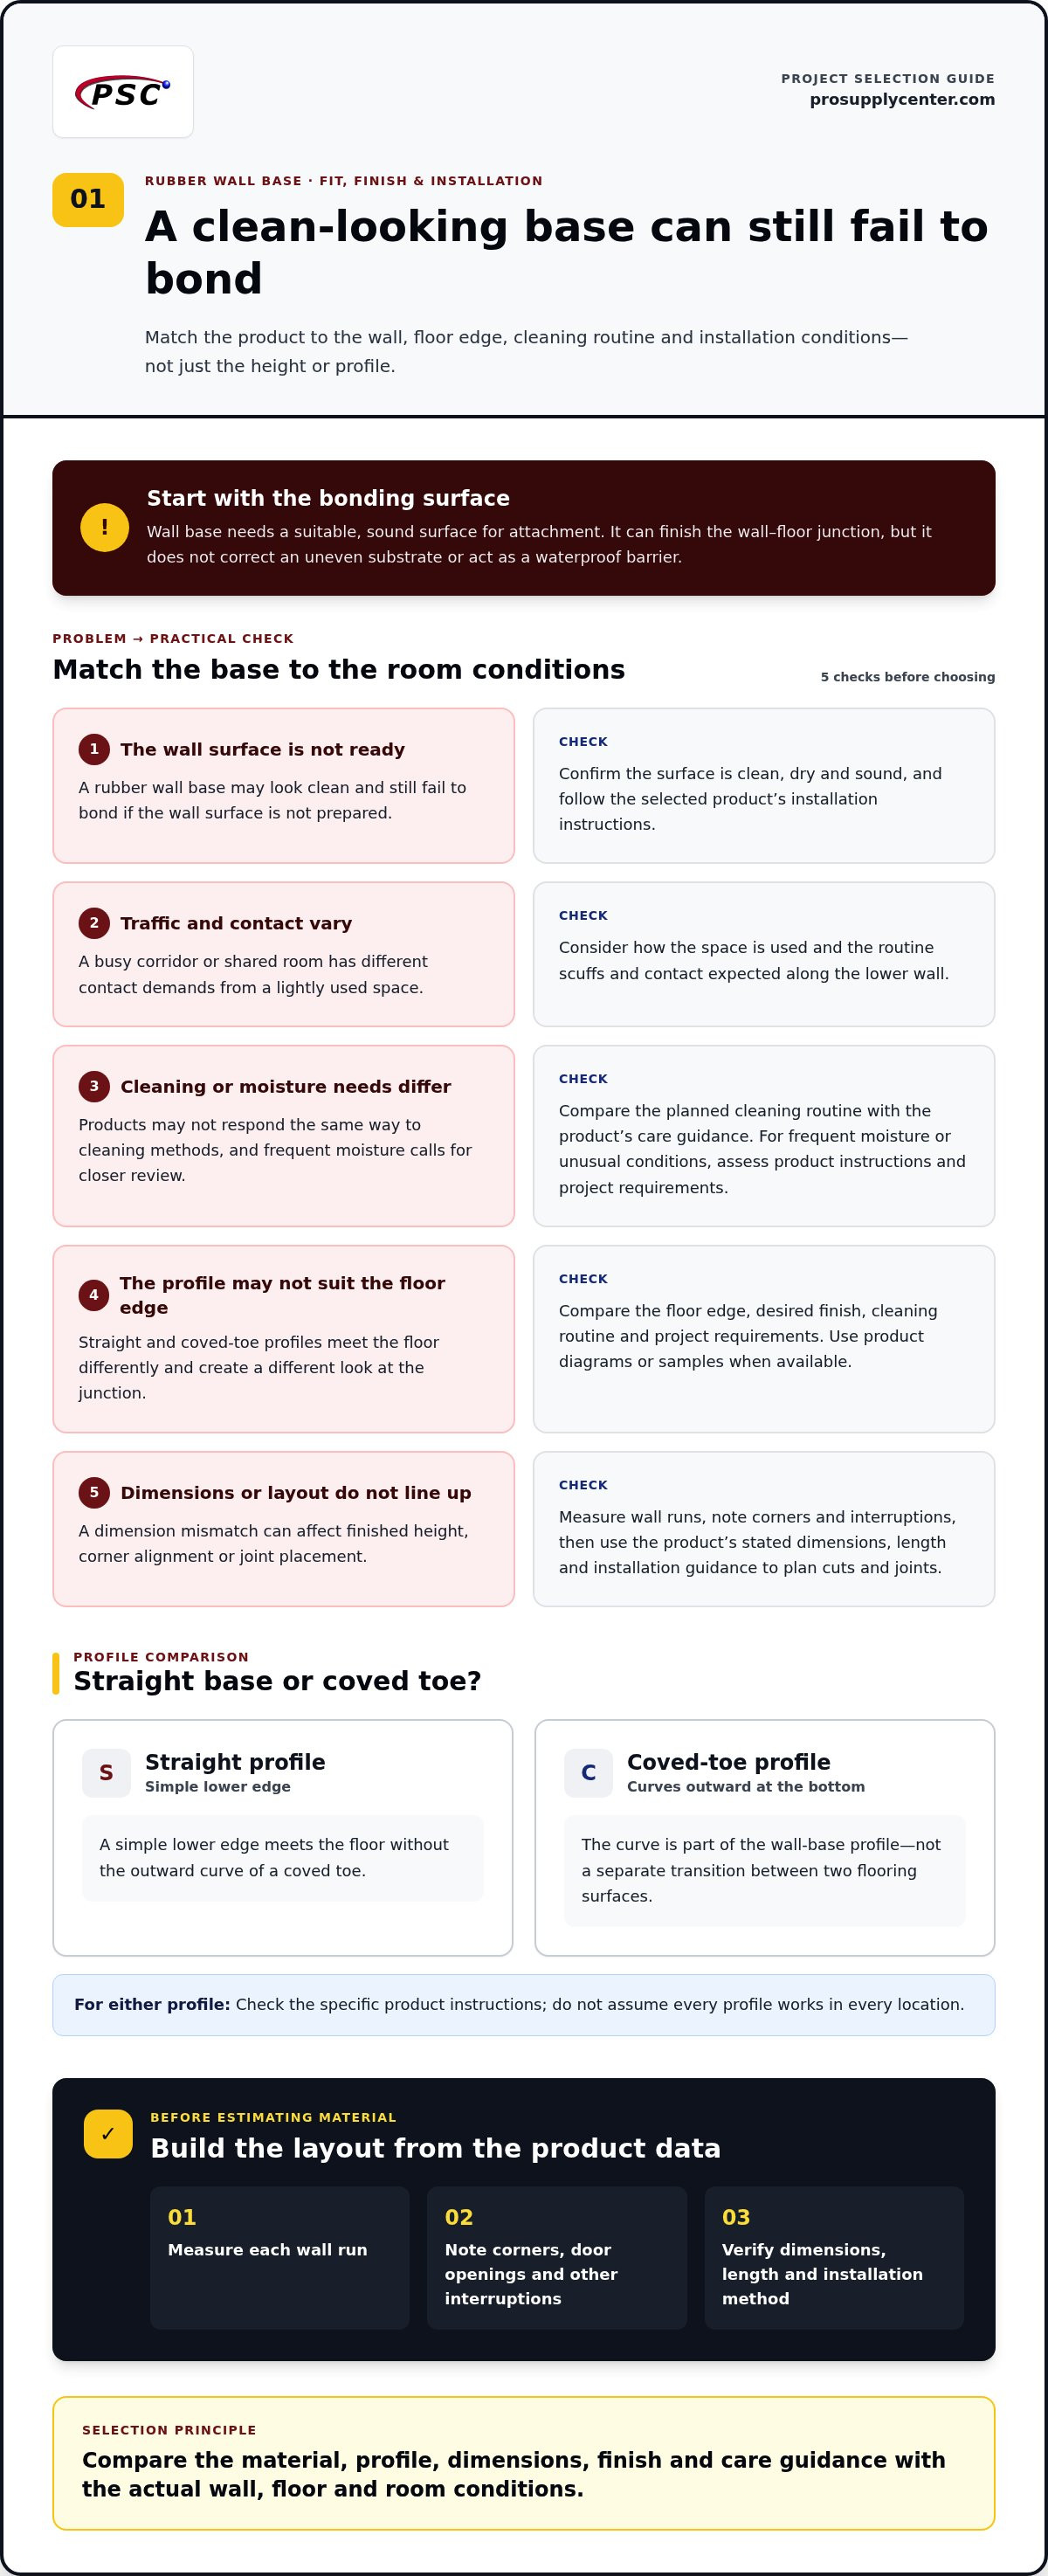
A rubber wall base can look clean and still fail to bond if the wall surface isn’t ready. Choosing rubber wall base involves more than selecting a height or profile. The flooring edge, wall condition, cleaning routine, and installation method all affect how well the finished perimeter fits and holds. To make a sound choice, compare the product requirements with the actual conditions where it will be installed.
This guide explains how wall base finishes the wall-floor junction, how straight and coved profiles differ, and what to consider when comparing materials and dimensions. It also covers preparation and installation planning based on the selected product’s instructions. Pro Supply Center carries cove base in rubber and vinyl trim categories, giving you a practical starting point for comparing options. Use the project checklist to reduce avoidable fit and bonding problems.
Key Takeaways
- Understand how wall base finishes the wall-floor junction and helps shield the lower wall from routine scuffs.
- Compare straight and coved profiles based on the floor edge and the finish you want.
- Evaluate traffic, cleaning routines, substrate, design needs, and installation constraints before selecting rubber wall base.
- Plan installation around the manufacturer’s instructions, accurate measurements, and a clean, dry, sound surface.
- Use a project checklist to compare cove base options, including the vinyl and rubber trim carried by Pro Supply Center.
What Rubber Wall Base Does at the Wall-Floor Junction
At the end of a flooring project, the narrow joint where the finished floor meets the wall still needs a considered finish. Rubber wall base is trim installed along that junction to create a finished edge and help shield the lower wall from everyday scuffs and contact. It’s a finishing component, not flooring underlayment. Underlayment sits beneath a floor covering, while wall base remains visible around the perimeter.
The base’s role depends on its profile and installation. It can cover the edge where wall and floor meet, but it isn’t a substitute for correcting an uneven substrate or a waterproof barrier. Review the selected product’s instructions and the project conditions before making a choice. For a broader overview of the trim category, Baseboard, also known as skirting board or cove base, is a trim piece that covers the joint between the wall and the floor.
How Rubber Wall Base Finishes a Room
Wall base visually frames a room and gives the floor perimeter a consistent line. Depending on the product and floor edge, it may cover a small gap or minor irregularity at the junction. This creates a more finished edge and can make routine sweeping and wiping more straightforward by reducing an exposed corner where dust can collect. It doesn’t prevent cleaning or moisture from affecting the wall or floor.
Wall base is different from nearby trim and flooring parts. Shoe molding and quarter-round are narrow pieces often used at the foot of baseboards to cover a gap. Wall base is installed directly at the wall-floor junction. A floor transition, by contrast, bridges the meeting edges of two flooring surfaces, such as where flooring types change. Each product has a different position and purpose.
Where Rubber Wall Base May Be Considered
Rubber wall base may suit commercial or residential interiors where a defined perimeter finish is needed. The right option depends on how the space is used. A busy corridor or shared room has different contact and cleaning demands from a lightly used space, so consider expected traffic and the regular cleaning routine when comparing materials and profiles. Don’t assume one base will suit every room, floor, or exposure.
Check how the wall surface, finished floor, and base will work together. A suitable, sound bonding surface matters because the trim must attach as directed by its manufacturer. Cleaning products and methods matter too: compare the planned routine with the product’s care guidance instead of assuming all rubber formulations respond the same way. For areas with frequent moisture or other unusual conditions, assess the product instructions and project requirements before selecting a base.
Considering these conditions first helps clarify both the trim’s purpose and its limits. Next, compare product materials, profile details, and finish requirements with the demands of the site.
Rubber Wall Base Materials, Profiles, and Finish Details
Product labels may use terms such as “rubber,” “resilient,” “straight,” and “cove,” but a label alone may not provide enough information to plan a good fit. Check the manufacturer’s specifications for the stated material, profile, dimensions, installation method, and care guidance. Rubber wall base is trim, not rubber flooring: it finishes the perimeter at the wall and floor, while the floor covering is a separate surface with its own requirements.
Don’t assume that products with similar descriptions have identical construction or installation needs. Use product data as the basis for comparison, especially when the finish must align with adjoining trim or meet project-specific requirements. The U.S. Access Board’s guidelines for floor and ground surfaces address accessibility and safety; wall-base selection doesn’t replace evaluating the floor surface itself.
Straight Base and Coved-Toe Profiles
A straight profile has a simple lower edge, while a coved-toe profile curves outward at the bottom. This difference affects how the trim meets the floor and the appearance of the junction. Consider the floor edge, desired finish, cleaning routine, and project requirements when choosing between them. Check the specific product instructions rather than assuming every profile works in every location.
Profile terminology can vary, so compare product diagrams or samples when available. A sketch or photo can help show whether the lower edge sits flush against the flooring, overlaps its edge, or creates a curved transition. A coved toe is part of the wall-base profile, not a separate floor transition between two floor coverings.
Dimensions, Color, and Finish Coordination
Measure each wall run and note inside and outside corners before estimating material needs. Account for door openings and other interruptions, then use the product’s stated length and installation guidance to plan cuts and joints. Check product dimensions before laying out the installation, because a mismatch can affect the finished height, corner alignment, or joint placement.
Height affects how prominent the base looks against the wall, while thickness can influence how it meets adjacent surfaces. Length affects where seams fall and how much cutting the layout requires. Check the specification sheet for each measurement. Don’t rely on assumed standard sizes or use dimensions from another product simply because it has a similar material label.
Color and surface finish also shape the result. If possible, compare the base with the installed flooring, wall color, and nearby trim under the room’s actual lighting. A close match can make the perimeter less conspicuous, while a contrasting finish can create a deliberate border. Use product information to confirm the chosen color and finish.
Before deciding, organize the key details: profile, measured wall runs, dimensions, finish, and installation instructions. Pro Supply Center carries vinyl and rubber cove base trim as part of its flooring-material selection, giving you a starting point for comparing project needs with product details.
How to Choose Rubber Wall Base for Project Conditions
Start with the conditions at the wall-floor junction, not the product label alone. A useful comparison considers expected traffic, cleaning routine, wall surface, floor edge, appearance, and installation constraints together. These factors help define what to look for. Confirm the exact material properties and installation requirements in the selected product’s specifications.
The Resilient Floor Covering Institute (RFCI) is a leading trade association for the resilient flooring industry in North America. Its industry resources can provide broader context, but they don’t replace manufacturer instructions for a specific base. Use the questions below to define project requirements before comparing products, including commercial grade cove base options.
| Project condition | Questions to resolve |
|---|---|
| Traffic and impact | Will the area see frequent foot traffic, carts, equipment, or repeated contact near the wall? |
| Cleaning routine | How often is the area cleaned, and do the product’s care instructions align with the planned methods? |
| Wall substrate | What is the wall surface, and is it suitable for the product’s specified adhesive and installation method? |
| Floor and design | How does the base need to meet the floor edge, and should its appearance blend with or contrast against adjacent finishes? |
| Installation constraints | Are there corners, doorways, irregular surfaces, or tight work areas that affect layout and fitting? |
Match the Base to Traffic and Maintenance
Consider how the room is used. A corridor exposed to carts and steady foot traffic presents different selection priorities from a quiet room with little contact at the walls. Note where impacts are likely, how often cleaning occurs, and which methods are planned. Then compare the product specifications and care instructions with those demands. Don’t infer chemical resistance, service life, or impact performance from the word “rubber” alone.
Check Substrate and Finish Compatibility
Identify both the wall surface and floor edge before settling on an installation approach. Adhesive choice and substrate compatibility depend on the specific base and its manufacturer’s instructions. Even a suitable product needs the prescribed surface conditions and installation method. Plan how the finish will continue through corners, doorways, and adjoining wall runs. Accurate measurements and a clear layout help avoid awkward changes in height or visible misalignment.
Separate general material considerations from verifiable product details. A material category can help organize comparisons, but it doesn’t establish the exact composition, performance, or installation requirements of an individual product. Confirm those details in its technical information. Keep a short project checklist with the traffic pattern, cleaning routine, substrate, floor edge, finish goals, and installation limitations. This makes product comparisons more direct and keeps a feature that sounds useful from distracting from an actual site requirement.
How to Plan Rubber Wall Base Installation in High-Traffic Areas
In a busy interior, reliable installation starts with preparation, not adhesive. Plan the work around the selected product’s manufacturer instructions, since bonding methods, cutting guidance, and environmental requirements can vary. Before installation, confirm the wall is suitable, map the full run, and address surface problems. A careful sequence helps limit avoidable fit and adhesion issues.
Prepare and Lay Out the Wall
Inspect the substrate along the entire installation area. Dust, moisture, loose material, and uneven sections can interfere with a clean bond or consistent fit. Correct surface problems before proceeding, and follow the product instructions for required wall conditions. If the manufacturer specifies acclimation or environmental limits, include them in the work plan rather than assuming every base is handled the same way.
Measure the full wall run and record corners, doorways, interruptions, and termination points. Make a dry layout before applying adhesive. Position the material without bonding it to see where corners and joints will land, which cuts are needed, and whether the planned sequence creates a consistent line. Adjust piece lengths and account for transitions between adjoining runs before installation.
Bond, Fit, and Inspect the Base
Once the layout is settled, follow the selected product’s instructions for adhesive and application. Use an adhesive approved for that product and the stated substrate. Don’t substitute a familiar method or assume an adhesive intended for another trim or floor material is compatible. Follow the manufacturer’s guidance for application details, including how to place the adhesive and position the base.
Fit corners, joints, and endpoints using the product’s cutting recommendations. Work methodically along the planned run, keeping the top edge aligned and joints positioned as laid out. Avoid forcing a piece to follow an uneven wall. Address the surface issue or follow the product-specific guidance for handling it. In high-traffic spaces, clean edges and consistent alignment support a finished appearance and routine upkeep.
Before returning the area to use, inspect the full installation. Look for lifted edges, gaps at joints, uneven alignment, adhesive residue, and incomplete contact with the wall. Follow the manufacturer’s directions for any required setting time or restrictions before the area is used or cleaned. Keep the product and installation guidance with project notes so future maintenance follows the same requirements.
Compare vinyl and rubber cove base trim at Pro Supply Center to find a trim category that fits your project requirements.
Choose Rubber Wall Base from Pro Supply Center
A good selection starts with the conditions on site, then checks whether the product’s profile, dimensions, and installation requirements fit the plan. Before choosing rubber wall base, bring together the practical details: how the room is used, the condition of the wall and floor edges, the maintenance routine, and the finish you want. This keeps the decision tied to the project rather than assumptions based on a product label.
Use a Final Rubber Wall Base Checklist
Review these points before settling on a product:
- Site conditions: Note expected foot traffic, possible contact from carts or equipment, and the regular cleaning routine.
- Profile: Decide whether the project calls for a straight edge or a coved toe, then compare the selected profile with the floor junction and finish requirements.
- Measurements: Record wall runs, corners, doorways, transitions, and termination points so the layout and material estimate reflect the actual space.
- Substrate: Identify the wall surface and resolve dust, moisture, loose material, or uneven areas before bonding.
- Product instructions: Use the manufacturer’s specifications for adhesive, application, cutting, environmental conditions, and any required setting time.
Keep the notes with the product information. This makes it easier to compare options consistently and gives anyone working on the project a clear reference for the selected material and installation approach. For commercial areas, evaluate the specific site demands rather than relying on “commercial grade” as a guarantee of fit or performance. Terms such as commercial grade cove base still need to be considered alongside the product’s stated specifications and project requirements.
Find Cove Base Trim for the Project
Pro Supply Center carries vinyl and rubber cove base trim. Use the checklist to narrow your selection by site conditions, profile, measurements, substrate, and manufacturer instructions, then compare the relevant product details. The category is a starting point; product information helps determine whether a specific option aligns with the planned installation.
Before finalizing your choice, check that the intended finish works across corners, doorways, and adjoining wall runs, and that the layout accounts for joints and cuts. Tie installation decisions to the selected product’s instructions instead of applying a method from a different material or profile. This planning helps avoid preventable mismatches between the trim, wall surface, and floor edge.
Browse Pro Supply Center’s vinyl and rubber cove base trim selection to compare options for your project.
Set the Perimeter Finish Before the Next Project Step
Make the wall-base decision part of the flooring plan, not a last-minute add-on. Settling the intended finish before work begins gives the project team a clear reference for coordinating the room’s perimeter with the broader finish schedule. Keep the selected product information with the project records so decisions about the base remain easy to trace as work progresses.
A clear specification also helps prevent substitutions under time pressure. Pro Supply Center carries cove base trim in vinyl and rubber categories, so you can compare options as part of your project planning.
Browse vinyl and rubber cove base trim at Pro Supply Center to compare the product details with your project requirements.
Frequently Asked Questions
What is rubber wall base used for?
Rubber wall base trims the perimeter where a finished floor meets the wall, creating a deliberate edge and helping protect the lower wall from routine scuffs. For example, it can finish the wall along a hallway or shared room. Its profile and material should suit the space. It isn’t a substitute for a floor transition or a moisture barrier.
Is rubber wall base the same as rubber flooring?
No. Rubber flooring covers the walking surface, while rubber wall base is a separate trim installed along the wall-floor junction. The two products have different positions and functions, so one shouldn’t be selected as a substitute for the other. Installing rubber flooring doesn’t automatically finish the exposed floor perimeter; the edge treatment still needs to suit the wall and floor materials.
Can rubber wall base be installed over painted drywall?
It may be possible if the painted drywall is clean, dry, sound, and compatible with the selected product’s adhesive instructions. Peeling paint, chalky residue, moisture, or damaged drywall can compromise the bond, so correct those conditions before installation. Check the manufacturer’s guidance for painted surfaces and adhesive compatibility. If the paint’s bond to the drywall is questionable, attaching trim over it won’t solve the underlying problem.
How do you cut rubber wall base around inside and outside corners?
Use the cutting method specified for the chosen base and make a test cut on a spare piece when possible. Measure each corner carefully, mark the cut, and check the fit before bonding the material. Inside and outside corners may require different cuts depending on the profile and product. Don’t assume one technique works for every base; manufacturer guidance helps avoid gaps, poor alignment, or visible damage to the trim.
What adhesive should be used for rubber wall base?
Use an adhesive approved by the manufacturer for the specific wall base and substrate. Don’t assume one adhesive is compatible with every rubber formulation, wall surface, or installation condition. Check the product instructions for application details, surface requirements, and environmental limits. Avoid substituting an adhesive intended for another trim or flooring product unless the manufacturer identifies it as suitable for the selected base.
Can rubber wall base be installed over existing wall base?
Removing the existing base first usually provides a more predictable surface for fitting and bonding. Installing new trim over old material can create unevenness, weak attachment, or a bulky edge, especially if the existing base is loose or damaged. Whether overlaying is acceptable depends on the new product’s instructions and the condition of the existing surface. Check the fit at corners and doorways before deciding how to proceed.
How do you remove rubber wall base without damaging the wall?
Remove it slowly and work close to the wall. Start at an accessible edge, gently loosen the trim with a plastic putty knife, then peel it back gradually rather than pulling sharply outward. Stop if the drywall paper or paint begins lifting. Adhesive residue may need a removal method compatible with the wall finish; test it in a discreet spot and follow the product directions.


