

The most aggressive abrasive tool isn’t always the right choice. The wrong setup can leave scratches, uneven areas, or extra work before the next step. Choosing abrasive tools for surface preparation starts with the material and the required finish, not just the tool category.
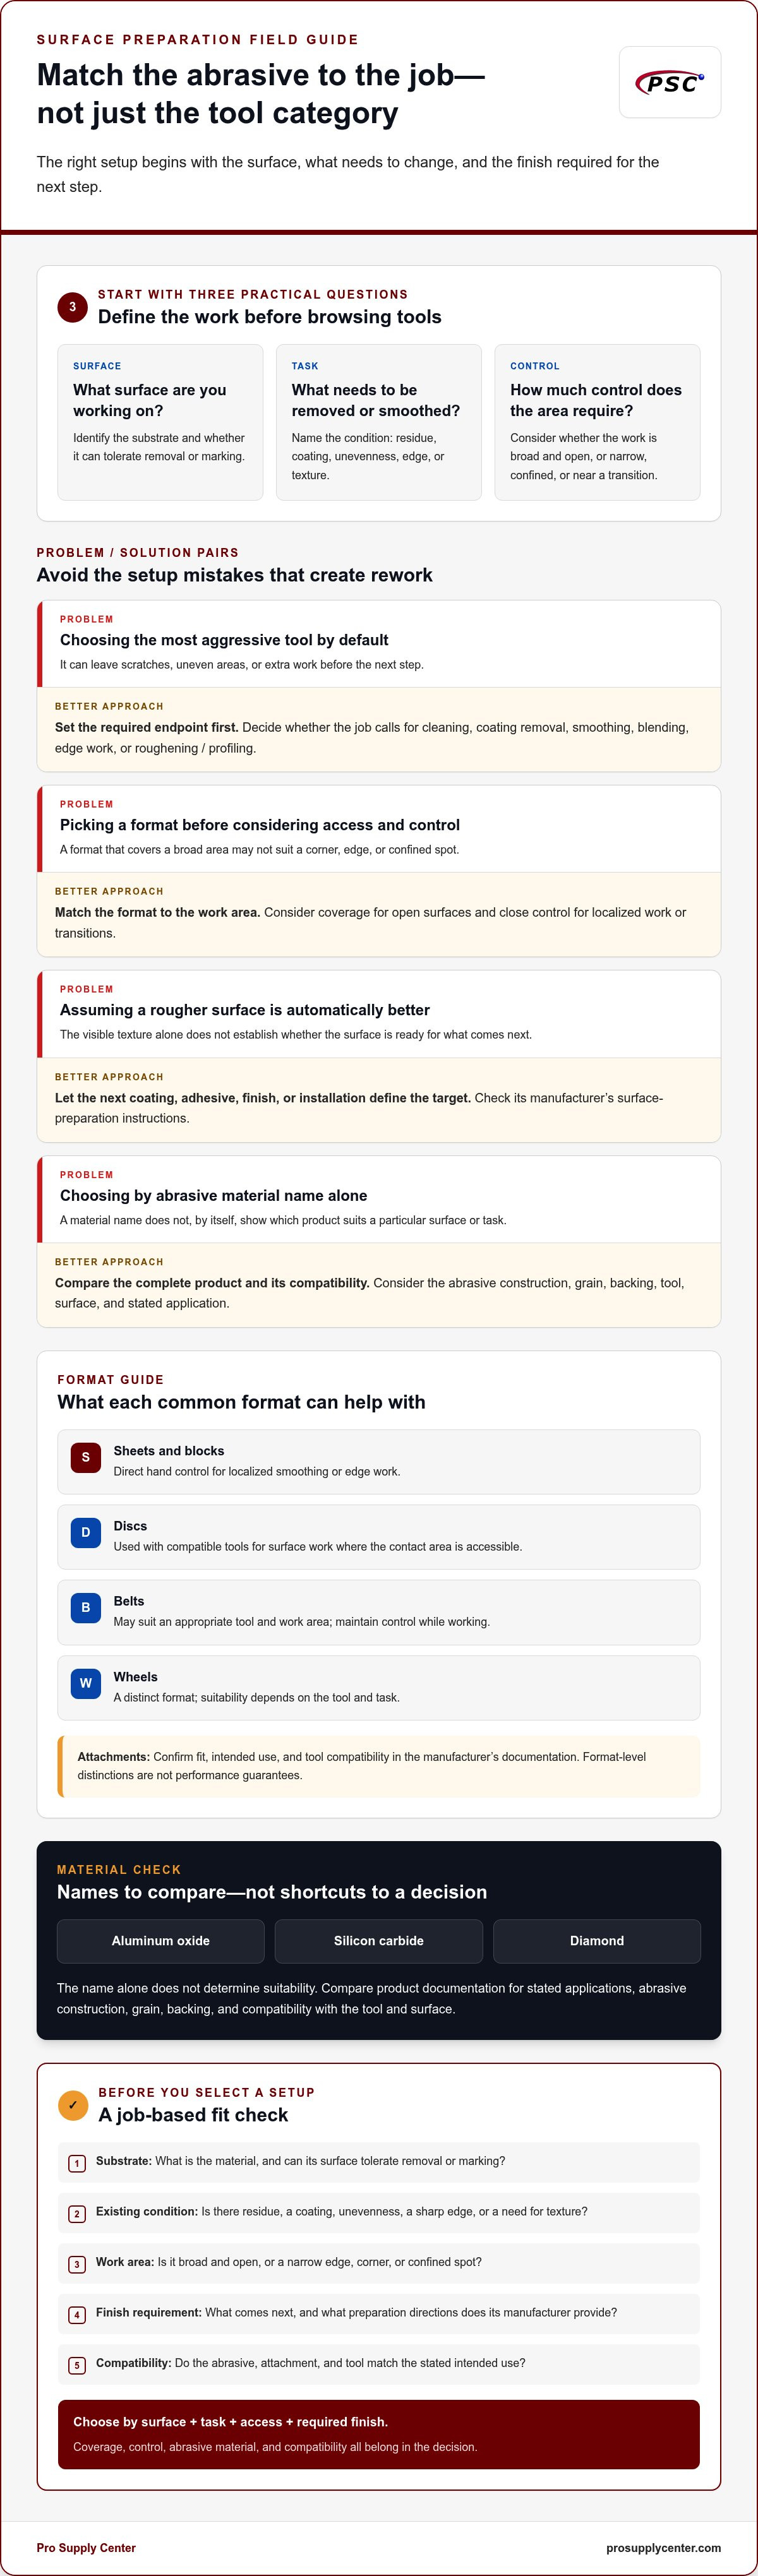
Product descriptions can make abrasive materials and formats difficult to compare if they don’t explain how they relate to the task. Start with three practical questions: What surface are you working on? What needs to be removed or smoothed? How much control does the area require?
This guide compares common abrasive tool types, explains the factors that shape selection, and helps you build a setup around the surface, task, and intended finish. You’ll also find practical ways to reduce unwanted marks and rework. Pro Supply Center offers professional-grade abrasives for construction and flooring projects, and the guidance here can help you decide what the job calls for.
Key Takeaways
- Start with the preparation task and desired finish to narrow down suitable abrasive tools for surface preparation.
- Compare handheld, powered, and attachment-based formats based on the area, access, and level of control needed.
- Consider abrasive grain and backing, then check compatibility in manufacturer documentation.
- Use a job-based checklist to assess tool fit, plan safe preparation, and decide when to replace consumables.
- Explore Pro Supply Center’s professional-grade abrasives for construction and flooring preparation needs.
Abrasive Tools for Surface Preparation: Start with the Job
Surface preparation readies a substrate for its next coating, adhesive, finish, or installation step. Depending on the job, that can mean removing residue or an old coating, smoothing an uneven area, blending a transition, preparing an edge, or creating a surface profile suited to what comes next. These objectives can overlap, but they aren’t interchangeable. A tool that removes material quickly may be too aggressive for a finish-sensitive surface.
“Abrasive tools are the implements and abrasive materials used to alter a surface; cleaning, removal, smoothing, and profiling are the preparation outcomes they help achieve.” Keep the decision focused: define the surface condition the job needs, then compare tools that can produce it. For background on how abrasive action removes or changes material, see Abrasive Machining Processes.
What does surface preparation need to accomplish?
Start by naming the objective. Cleaning targets unwanted surface matter. Coating removal takes off some or all of an existing layer. Smoothing reduces irregularities, while blending makes the transition between worked and unworked areas less abrupt. Edge work focuses on a boundary or corner. Roughening or profiling changes the surface texture when the next application requires it.
The next material helps define the target. A coating, adhesive, or finish may have its own surface-preparation requirements, so use its manufacturer’s documentation to guide the work. Don’t assume a visibly rougher surface is automatically more suitable, or that a smoother one is always preferable. The right endpoint depends on the substrate and application instructions, not a tool label or an unverified performance claim.
Which details should you identify before comparing tools?
Write down the job conditions before browsing abrasive options. This separates the work objective from a preferred tool and makes comparisons more useful.
- Substrate: Identify the material and consider whether its surface can tolerate material removal or marking.
- Existing condition: Note whether you’re dealing with residue, a coating, unevenness, a sharp edge, or a surface that needs texture.
- Work area: Distinguish a broad, open plane from a narrow edge, corner, or confined spot. Access affects both control and the tool format that can reach the area.
- Finish requirement: Record what comes next and any surface-preparation directions from its manufacturer.
Preparing a broad area for a new finish and blending a small repaired patch are different jobs, even if both involve abrasion. The first may call for coverage and consistency; the second may require careful control around the transition. In either case, let the substrate, existing surface, access, and required finish guide the choice. Once those are clear, you can compare abrasive tools for surface preparation by the work they need to do, rather than choosing a format first and trying to make it fit.
Abrasive Tool Types and Materials: Understand the Main Options
Once the job is defined, compare both the tool format and the abrasive material. A handheld format can offer close control, while a powered tool can cover a larger area with less manual effort. An attachment connects an abrasive to a compatible tool, so its fit and intended use matter too. No format is automatically right for every surface.
“Abrasive material determines the cutting surface, while tool format determines how that surface is applied; choose them together to match the task, access, and finish requirement.” This is a practical way to compare abrasive tools for surface preparation without treating a disc, belt, or abrasive grain as a complete solution on its own.
How do common abrasive tool formats differ?
Handheld sheets and sanding blocks suit controlled work on accessible areas and edges. Discs and belts are commonly used with compatible powered equipment and can help cover broader surfaces. Wheels are another distinct format, but their suitability depends on the tool and task. In corners or confined areas, reach and control may matter more than the coverage a larger format offers.
- Sheets and blocks: Offer direct hand control for localized smoothing or edge work.
- Discs: Suit compatible tools and surface work where the contact area is accessible.
- Belts: May suit an appropriate tool and work area, with care taken to maintain control.
These are format-level distinctions, not performance guarantees. Before choosing an abrasive attachment, confirm its intended use and fit in the manufacturer’s documentation.
What should you know about abrasive materials?
Aluminum oxide, silicon carbide, and diamond are different abrasive materials, but the name alone doesn’t establish which one suits a particular job. Selection depends on the abrasive’s construction, the tool it’s used with, the surface, and the task. Check product documentation for stated applications and compatibility rather than assuming a material will behave the same across substrates or formats.
Also consider the abrasive grain and backing. Grain describes the abrasive particles; backing supports them in a particular format. Their properties and intended uses vary by product, so compare manufacturer information with the substrate and finish requirement. For a closer look at selection considerations, read this professional-grade abrasives guide.
If a project involves abrasive blasting, include task-specific safety guidance in your planning. OSHA’s Safety in Abrasive Blasting fact sheet covers hazards and worker protections for that method. Blasting is not interchangeable with handheld or attached abrasive tools.
With the format and material criteria in view, compare professional-grade abrasives from Pro Supply Center with the needs of your construction or flooring project. Use product documentation to guide the final fit.
Compare Abrasive Tools by Surface, Task, and Finish
A useful comparison starts with the substrate and preparation objective, then considers access and finish sensitivity. The same tool format may suit one part of a job but be awkward or difficult to control in another. Use the table as a starting point, not a universal product recommendation. Consult manufacturer instructions to confirm that the abrasive and tool suit the specific surface and task.
| Substrate | Task | Format to compare | Access consideration | Finish sensitivity |
|---|---|---|---|---|
| Tile or stone | Localized edge preparation or surface blending | Handheld sheet or block; compatible attachment where appropriate | Check whether the area is open, near an edge, or confined | Consider the risk of visible marks or damage to the finished face |
| Metal | Coating removal or blending a worked area | Handheld format for close control; compatible powered format for broader access | Account for corners, joints, and nearby surfaces | Decide whether material removal or a more controlled transition is needed |
| Wood | Smoothing or edge preparation | Sheet, block, or compatible powered format | Match the working area to the tool’s reach and controllability | Check how much surface change the next finish can accept |
| Previously coated surface | Coating removal or preparation before another finish | Compare handheld and powered options based on the area and access | Protect adjacent surfaces and work within the accessible zone | Follow the next coating’s preparation directions |
How should surface material change your comparison?
Tile and stone need a different assessment from metal, wood, or a coated surface. The material’s condition, finish, and intended next step all matter. A coating can also change how the underlying substrate responds during preparation. Don’t assume one abrasive grain or format suits every material. For tile work, compare the abrasive’s stated application with the tile surface and task, then use the relevant product documentation to assess the specific application.
How does the required finish affect tool selection?
Aggressive removal and controlled refinement call for different levels of material change. A broad area may make coverage a priority, while an edge or small transition puts control and access higher on the list. Tool type alone doesn’t guarantee a particular finish. Where appropriate, test the proposed setup on a small, inconspicuous area and inspect the result under suitable lighting. If it leaves unwanted marks or fails to meet the preparation requirement, stop and reassess the abrasive, tool, or technique before continuing.
Use these comparisons to narrow the options, not to rank one format above another. The right setup is the one whose documented application, access, and level of control fit the substrate and intended finish. This job-based approach helps make choices among abrasive tools for surface preparation more consistent across construction and flooring tasks.
Choose and Use Abrasive Tools: A Practical Buying Checklist
A sound setup begins with the work, not a product label. Before buying or starting, define the task, identify the surface, compare tool formats, verify fit, and plan for safe use. Each step narrows the options and helps prevent a mismatch between the abrasive, the tool, and the material being prepared.
What should a buyer check before choosing a tool?
Match the format to the project area and the control it requires. A broad, open surface and a narrow edge pose different handling demands. Consult the tool and abrasive manufacturers’ documentation for compatible attachments, operating instructions, limits, and consumable replacement guidance. Plan dust collection and safe handling as part of the setup, not as last-minute additions.
- Define the task: Specify whether you need removal, smoothing, blending, edge work, or another preparation outcome.
- Identify the surface: Record the substrate and its current condition, including any coating or delicate finished areas.
- Compare formats: Weigh coverage against access and the level of control needed for the work area.
- Check fit: Confirm that the abrasive attachment and consumable are intended for the tool, and follow the manufacturer’s operating instructions.
- Prepare safely: Consider how dust will be controlled, how the work area will be managed, and what personal protective equipment the task and product instructions call for.
Plan dust control and protective equipment before starting. Choose controls appropriate to the material and process, and follow the equipment and abrasive manufacturers’ safety instructions. Don’t assume one collection method or protective setup suits every abrasive task. If the work changes, reassess the controls and handling before continuing.
How can a test pass reduce avoidable rework?
Before treating the full surface, test the selected setup on a small, inconspicuous area where practical. Follow the manufacturer’s instructions, then inspect for uneven removal, unwanted scratches, heat, or other visible changes. A test won’t guarantee the same outcome everywhere, but it can show whether the tool, abrasive, or technique needs adjustment before you continue across the surface.
Stop if the surface responds differently than intended. Check that the abrasive is compatible, that the tool is being used as directed, and that the test area represents the material you’ll prepare. Don’t continue simply because the setup seems suitable on paper. Surface variation, edges, coatings, and changes in access can affect how the work proceeds.
Before you buy or begin: define the task, identify the surface, match the format to access and control, verify tool and consumable compatibility, plan dust control and protective equipment, then test and inspect before proceeding.
Use this checklist to narrow your choices among abrasive tools for surface preparation and build a practical setup around the job. For professional-grade abrasives for construction and flooring projects, explore abrasive supplies at Pro Supply Center.
Source Abrasive Supplies for a Surface-Preparation Project
Once you’ve defined the task and setup criteria, compare abrasive supplies with the project requirements. A clear selection note helps keep the search focused: record the substrate, preparation goal, work area, and desired finish. Add any relevant tool or attachment requirements, then use manufacturer guidance to assess which abrasive categories are appropriate. This is more useful than choosing by a broad label such as “sanding” alone.
What information helps narrow an abrasive-supply search?
Keep the project details together while browsing. A flooring or construction task may involve a broad surface, a small edge, or a localized area that needs blending. Each situation changes the balance between coverage, access, and control. Note the current surface condition too, especially if there’s an existing coating or a finish that could be marked during preparation.
- Substrate: Identify the material being worked on, such as tile, stone, metal, wood, or a coated surface.
- Preparation goal: Specify whether the work involves removal, smoothing, edge preparation, or blending.
- Work area: Describe whether it’s a large plane, narrow edge, or confined space.
- Finish requirement: Record what comes next and any preparation directions provided by the coating, adhesive, or finish manufacturer.
- Tool fit: Note the tool format and compatible consumables indicated in manufacturer documentation.
Use these details to compare relevant abrasive categories, then read product information for its stated application and compatibility. Don’t infer performance from a material name or format alone. These selection notes are a practical filter, not a substitute for product-specific directions.
How can Pro Supply Center support the buying decision?
Pro Supply Center offers professional-grade abrasives alongside supplies for construction and flooring projects. Browse its abrasive selection with the job requirements in mind: match the stated application to the substrate and task, check that the format suits the work area, and compare product guidance with the next finish or installation step.
This approach makes the choice more deliberate without relying on unsupported claims about a product’s specifications or results. It also helps distinguish between what the project needs and what a product description happens to emphasize. If the documentation doesn’t align with your selection notes, keep comparing rather than assuming the abrasive is suitable.
A practical selection starts with the surface, task, access, and finish, then checks product guidance for fit. Use those criteria to narrow the options among abrasive tools for surface preparation and select supplies with the project requirements in view.
Browse Pro Supply Center’s abrasive supplies to explore professional-grade options for your surface-preparation project.
Make Your Next Preparation Setup More Deliberate
Make selection a repeatable part of project planning. Keep a brief record of the substrate, preparation objective, tool and abrasive used, and how the surface responded. Those notes can help you compare setups on future construction or flooring work without assuming one combination suits every material. Product instructions still guide each application.
The best Abrasive tools for surface preparation are selected for the requirements of the specific job, with compatibility and safe use considered before work begins. Pro Supply Center offers professional-grade abrasives for construction and flooring projects, giving you a practical place to continue your product search.
Use your project notes to browse with purpose. Browse Pro Supply Center’s abrasive selection and take the next step toward a setup that fits your work.
Frequently Asked Questions
What are abrasive tools used for in surface preparation?
Abrasive tools change a surface through controlled rubbing or grinding, helping prepare it for a later step. Depending on the material and task, that may mean removing residue, dulling a coating, smoothing a rough patch, or refining a small area. An abrasive sheet, for example, can help address a localized mark, while a compatible powered setup may suit a broader work area. Let the intended outcome guide the method.
Can one abrasive tool work on every surface?
No single abrasive tool should be assumed suitable for every surface. Tile, wood, metal, and coated materials can respond differently, and a tool that works on one may scratch, gouge, or otherwise alter another. Consider the surface condition as well as the substrate, then check the abrasive and tool manufacturer’s application guidance. Don’t infer compatibility from the tool’s appearance alone if the instructions don’t clearly identify its intended use.
How do I choose the right abrasive grit for surface preparation?
Choose grit based on the amount of material to remove and the surface condition required afterward. Coarser abrasives generally remove material more readily but can leave a more pronounced scratch pattern; finer abrasives are typically used for less aggressive refinement. These are general distinctions, not a substitute for product directions. Follow the coating or finish manufacturer’s preparation guidance, and test an inconspicuous area before working across a visible surface.
Is an angle grinder suitable for surface preparation?
An angle grinder can suit some preparation tasks, but only when the grinder, abrasive attachment, and material are intended to work together. Check the manufacturer’s instructions for compatible accessories, operating limits, guarding, and handling. A handheld grinder may be difficult to control on a finish-sensitive area, so don’t assume it’s appropriate simply because it can reach the spot. Stop if the work causes unexpected heat, marking, or material removal.
How often should an abrasive disc or sheet be replaced?
Replace an abrasive when the manufacturer’s guidance calls for it or when wear, loading, damage, or reduced cutting action makes it unsuitable for the task. A worn sheet may require more pressure, while a damaged disc can present a safety concern. Inspect consumables before use and during work, and replace them according to product instructions. Don’t extend use by increasing pressure if the abrasive is no longer performing as intended.
What safety precautions matter when using abrasive tools?
Read the operating and safety instructions for both the tool and abrasive before starting. Secure the work as directed, use the specified guards and dust-control measures, and wear personal protective equipment suited to the task and material. Abrasion can create airborne dust and noise, so plan how exposure will be controlled rather than relying on protective equipment alone. Keep others clear of the work area and stop if equipment behaves unusually.
Should I use a powered sander or hand sanding for surface preparation?
Choose a powered sander when the task involves an accessible area where its format and level of control are appropriate. Hand sanding can be a better fit for small details, edges, or areas where close feedback matters. A broad panel and a narrow corner may call for different approaches, even on the same project. Compare the tool instructions with the surface, then test the setup before committing to a full pass.


