

The drain that looks right isn’t automatically the right fit for a tiled shower. Choosing a shower floor drain affects more than appearance: its style and position influence the floor slope and tile layout, while its connection must suit the plumbing and shower-base design. Coordinate these details before installation begins.
Drain terms and configurations can be difficult to compare, especially when you’re working with existing plumbing or planning a new shower assembly. Consider the drain, slope, and waterproofing as connected parts of the same system, rather than making each decision in isolation.
This guide explains how point and linear drains differ, which connection details matter, and how each drain style relates to floor slope and waterproofing. You’ll also learn what to coordinate before purchasing components. Pro Supply Center offers shower drains alongside the PSC Pro Gen II Waterproofing System and PSC Waterproofing Shower Kits for tiled-shower projects.
Key Takeaways
- Understand how the drain carries water from the tiled floor into the plumbing assembly.
- Compare point and linear drain layouts against your shower design and tile plan.
- Use product documentation to compare drain connections with the existing or planned plumbing.
- Coordinate your shower floor drain with the floor slope and waterproofing approach before selecting components.
- Consider how shower drains and waterproofing supplies fit into a coordinated tiled-shower project.
What Does a Shower Floor Drain Do in a Tiled Shower?
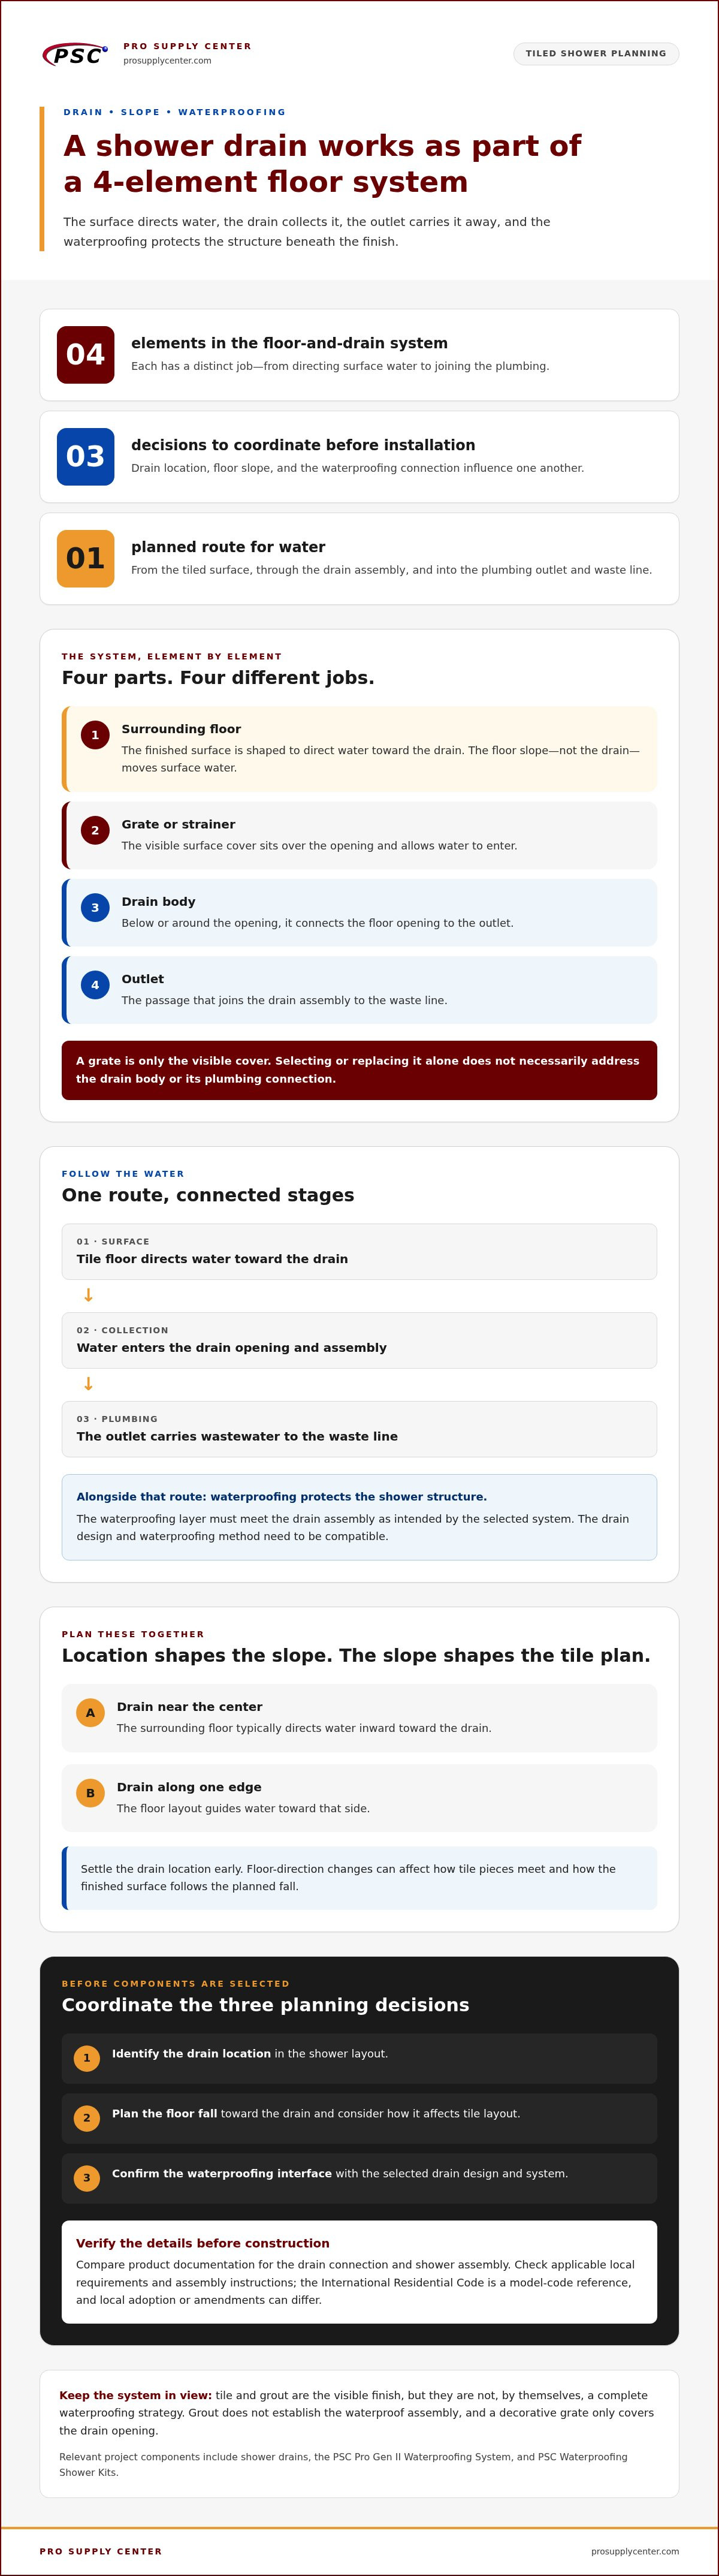
A shower floor drain collects water from the shower floor and carries it into the drainage system. It works with the floor’s shape, the waterproofing layer, and the plumbing connection. The drain doesn’t create the slope that moves water toward it, and it can’t compensate for a floor that leaves water standing away from the opening.
It helps to distinguish the full drain assembly from the part you see. The grate or strainer is the surface cover. Beneath it, the drain body connects the floor opening to an outlet leading to the waste line. The surrounding floor directs surface water toward the opening. Each component has a separate job, and the assembly needs to suit the shower design.
Which parts make up a shower floor drain?
In a tiled shower, the visible grate or strainer covers the drain opening while allowing water to enter. The drain body sits below or around that opening and connects the shower-floor assembly to the outlet. The outlet carries wastewater into the plumbing drain. Some components may be integrated or configured differently depending on the drain design, so review the product’s assembly details.
- Grate or strainer: The visible surface component over the opening.
- Drain body: The part that connects the floor opening to the outlet.
- Outlet: The passage that joins the drain assembly to the waste line.
- Surrounding floor: The finished surface shaped to direct water toward the drain.
These terms aren’t interchangeable. Replacing or selecting only a grate doesn’t necessarily address the drain body or its connection. For a general overview of Shower drainage and installation, consider how the visible fixture fits into the larger shower setup.
How does the drain fit into a tiled shower floor?
The tiled surface is shaped so water runs toward the drain rather than collecting in low spots. Tile and grout provide the visible finish, but they aren’t, by themselves, a complete waterproofing strategy. A separate waterproofing layer protects the shower structure, and its connection to the drain is a critical part of the assembly.
That connection is the drain-to-waterproofing interface. The waterproofing approach and drain design need to work together so the protected floor manages water around the opening as intended. Details differ among assemblies, so don’t assume one drain suits every shower base or waterproofing method.
Think of the shower floor as a coordinated system: the surface directs water, the drain collects it, the outlet carries it away, and the waterproofing protects the structure beneath the finish. A properly selected shower floor drain is one component of that system, not a substitute for a correctly formed floor or compatible waterproofing plan.
How Shower Drain, Floor Slope, and Waterproofing Work Together
Water follows a planned route through a tiled shower. It runs across the tile toward the drain opening, passes through the drain assembly, then enters the plumbing outlet and waste line. Each part handles a different stage. If the floor shape, drain position, or waterproofing connection is poorly coordinated, water may not move or be managed as intended. A shower floor drain is part of a system, not a standalone fixture.
Start with the full shower layout. The chosen drain style and location affect how the floor needs to slope, while the waterproofing method must connect properly to the drain assembly. These decisions influence one another, so selecting components in isolation can create avoidable design conflicts.
Why does floor slope matter around the drain?
A sloped shower floor uses gravity to direct surface water toward the drain. The drain’s position helps determine the floor shape: a drain near the center typically calls for the surrounding floor to direct water inward, while a drain along one edge calls for a layout that guides water toward that side. Confirm the planned slope against applicable local requirements and the shower assembly instructions before construction.
The slope plan also affects tile layout. Changes in floor direction can influence how tile pieces meet and how evenly the finished surface follows the planned fall. Settle the drain location early enough to design the floor around it, rather than treating it as an opening to accommodate at the end. The International Residential Code for shower drains is a useful model-code reference. Local adoption and amendments can differ, so verify which requirements apply to the project.
Where does waterproofing meet the drain?
The drain-to-waterproofing connection is a critical transition: the floor’s protective layer must meet the drain assembly as intended by the selected system. The exact interface depends on the drain design and waterproofing method, so check compatibility during planning. Grout fills joints between tiles, and a decorative grate covers the drain opening, but neither one establishes a complete waterproof shower assembly.
For broader context on how the components fit together, the waterproofing shower kits guide explains the role of a coordinated kit. For system-specific context, review the PSC Pro Gen II Waterproofing System guide. These references can help frame the decisions to make before tile covers the underlying work.
Before choosing components, map the sequence: identify the drain location, plan the floor fall, and determine how the waterproofing layer meets the selected drain. Then compare the product documentation for those parts. Pro Supply Center’s shower drains and waterproofing supplies are relevant components for coordinating a tiled-shower assembly.
Linear or Point Shower Floor Drain: How to Compare the Options
Choose between a point drain and a linear drain by starting with the shower layout, not just a style preference. Each configuration affects drain placement, floor planes, and tile planning. The right shower floor drain is the one that works with the planned shower design and a compatible drain assembly.
| Consideration | Point drain | Linear drain |
|---|---|---|
| Collection layout | A localized opening collects water at one point. | An elongated opening collects water along a line. |
| Floor planning | Floor planes are shaped to direct water toward the chosen point. | The floor plan accounts for the drain’s length and position. |
| Tile planning | Tile layout must work with the planes meeting around the drain. | Tile layout is coordinated with the drain line and planned floor slope. |
| Key fit question | Does the drain location suit the shower footprint and assembly? | Does the drain position suit the shower layout and assembly? |
When might a point drain suit the shower layout?
A point drain is a localized collection point within the shower floor. The surrounding floor planes need to guide water toward it, so its position affects both the slope plan and how tile meets around the opening. Consider the drain position alongside the shower footprint, tile format, and assembly details before settling the layout.
For example, a centrally positioned point drain may require floor planes to fall inward from several directions. That geometry can influence how tile pieces are arranged and cut. The decision isn’t simply about choosing a grate that looks right: the location must work with the floor design and drain body.
What should you consider with a linear shower drain?
A linear drain has an elongated collection opening, and its position shapes how the floor is planned. Depending on the design, the floor may be laid out to fall in a single direction toward the drain. That can change tile planning, but it doesn’t make a linear configuration universally easier or more suitable. Check the layout against the drain assembly and shower design.
Consider where the drain can sit in relation to the shower boundaries, plumbing connection, and tile pattern. Don’t choose a location based only on appearance: the floor and waterproofing plan must also accommodate the assembly. The linear shower drain for tile guide offers focused drain guidance. TCNA resources, including the TCNA Handbook for tile installation standards, provide broader context for tile planning.
Compare both options against the same project factors: drain position, planned floor planes, tile arrangement, plumbing connection, and waterproofing approach. Product documentation helps establish whether a specific assembly fits the intended design. Pro Supply Center’s shower drains are one product category to consider as you coordinate these choices.
How to Check Shower Drain Compatibility Before Installation
Drain compatibility is more than matching an opening to a pipe. The shower base, drain body, outlet, grate, and waterproofing interface all need to suit the planned assembly. Use this pre-purchase sequence to record project details and compare them with the selected product’s documentation before work begins.
- Identify the project and shower assembly. Record whether the work involves new construction, a remodel, or replacing an existing drain. Note the type of shower floor or base and the planned waterproofing approach. Replacement work may need to account for existing conditions, while a new shower allows the drain and floor layout to be coordinated from the start.
- Document the plumbing connection. For an existing shower, record the drain and waste-line connection details before selecting a replacement. For a new layout, treat the planned plumbing connection as a design requirement. Take measurements from the actual project and compare them with the connection information in the drain’s product specifications. Don’t assume two drains are interchangeable because they look similar.
- Choose the drain style and location. Decide whether the layout calls for a point or linear configuration, then note the intended position. Check that the proposed floor plan can direct water toward the drain and that the assembly is designed for the intended shower setup. Keep the slope plan and tile layout in view as you decide.
- Compare assembly components. Review the documentation for the drain body, outlet, grate or strainer, and connection to the waterproofing layer. Confirm that the specified components and connection details match the project’s existing or planned assembly. Use the specific product documentation for dimensions and compatibility information, rather than relying on assumptions about a general drain category.
- Account for finish requirements. Identify the grate appearance and finish needed for the design, then verify those details in the product information. Treat finish as one selection factor, not a substitute for checking the drain’s connection and assembly requirements.
Before tile work starts, review the selected drain and shower-floor plan together. A change in drain location or configuration can affect the floor layout, so resolve that coordination before the finished surface makes access more difficult. Keep relevant product information with the project notes, including the connection details and components required for the assembly.
For a broader look at how drains relate to other shower components, the professional shower hardware guide provides related project context. Use the same component-by-component approach when comparing documentation. Pro Supply Center offers shower drains for tiled shower projects to consider alongside the planned assembly.
Coordinate Your Shower Floor Drain With a Complete Waterproofing Plan
A successful tiled-shower plan treats the drain, floor, tile, plumbing, and waterproofing as connected components. Selecting each separately can leave mismatches to resolve after construction is underway. Before purchasing, align the drain assembly with the shower layout and plumbing connection, then confirm how the selected waterproofing approach meets the drain.
What belongs in a coordinated shower-floor plan?
Bring the major decisions together before finishing the floor. The drain location informs the planned slope; the slope and drain layout affect tile planning; and the waterproofing layer must connect with the drain assembly according to the product requirements.
- Drain assembly: Identify the drain style and review the product documentation for its components and connection details.
- Plumbing: Compare the specified outlet connection with the existing or planned plumbing.
- Floor and tile: Coordinate the drain location with the planned slope and tile layout so the finished surface directs water toward the drain.
- Waterproofing: Confirm how the selected waterproofing method transitions to the drain, using the relevant system and drain instructions.
Sequencing matters. Resolve these choices before tile installation makes underlying components harder to access. If the drain location or assembly changes late, the floor layout and waterproofing connection may also need reconsideration. Keep the product specifications with the project plan so you can compare components as a set, not by appearance alone.
How can Pro Supply Center support product selection?
Pro Supply Center offers shower drains, the PSC Pro Gen II Waterproofing System, and PSC Waterproofing Shower Kits for tiled-shower projects. These components relate to different parts of the assembly, so use the applicable product documentation to guide decisions about connections and system coordination. The complete waterproofing shower kits guide provides broader context on shower-kit components.
As you compare options, keep a simple project record: the shower layout, planned drain location, plumbing connection details, tile plan, and waterproofing approach. Then compare those requirements with the specifications for the drain and waterproofing products you’re considering. This makes it easier to identify compatibility details to resolve before the shower floor is finished.
Match the drain to the layout, plumbing, tile plan, and waterproofing method, and base product-specific decisions on the relevant documentation. Browse shower drains and waterproofing supplies to explore product categories for your tiled-shower project.
Make the Drain Decision Part of Your Project Plan
Before ordering components, turn your shower design into a short coordination record. Note the drain location, plumbing connection, tile layout, and waterproofing approach, then keep the relevant product specifications together. This gives you a clear reference as selections move from planning to purchase and helps prevent a late change to one component from being treated as an isolated adjustment.
Use that record to compare each shower floor drain with the requirements of the complete assembly. If a detail doesn’t align, resolve it before the finished floor limits access. Addressing the issue at this stage helps keep the project focused on compatibility rather than appearance alone.
Pro Supply Center offers shower drains, waterproofing shower kits, and the PSC Pro Gen II Waterproofing System for tiled-shower projects. Explore shower drains and waterproofing supplies as you prepare your component list. With the key details organized, you can move forward with a clearer plan for your selections.
Frequently Asked Questions
Can a shower floor drain cause a sewer smell?
Yes, an odor near a shower floor drain can be related to the drain or plumbing, but smell alone doesn’t identify the source. Possible causes include a problem with the trap’s water seal, debris buildup, or another plumbing issue. Note whether the smell appears after the shower has been unused and whether nearby fixtures are affected. Don’t mask persistent odors with fragrance; have a qualified plumbing professional investigate if the cause isn’t clear.
How often should you clean a shower floor drain?
Cleaning frequency depends on how often the shower is used and how much hair or other debris reaches the drain. Inspect the grate regularly and remove visible buildup with a method suitable for the installed drain. Avoid harsh chemicals or tools that might damage the finish or internal parts. If water still drains slowly after accessible debris is cleared, the obstruction may be farther into the plumbing than the strainer.
What should you do if water is pooling around a shower drain?
First, check whether the water clears shortly after showering or remains in the same spot. Look for visible debris at the grate and note exactly where water collects. Persistent pooling may point to a blockage, an uneven floor, or another issue with the drain or shower assembly. Don’t assume clearing the opening will solve it; if pooling continues, further assessment may be needed before making changes.
Can you replace a shower floor drain without removing tile?
It depends on which part needs replacement, how the drain is secured, and whether the assembly can be accessed without disturbing the surrounding floor. A removable grate or strainer may be changed differently from a drain body connected below the tile. Identify the part and review its attachment before starting. Avoid cutting into the tiled, waterproofed floor unless you understand how the assembly is built and how it can be restored.
Can a shower drain be moved to a different location?
Yes, but moving a drain can involve changes below the finished floor as well as adjustments to the plumbing route and shower layout. For example, shifting a drain from the center toward a wall can affect the floor design, tile arrangement, and waterproofing details. Treat relocation as a change to the full shower assembly, not a simple grate swap. Check project-specific plumbing requirements before settling on the new position.
Are shower floor drain requirements the same everywhere in the United States?
No. Requirements can vary with the jurisdiction, project type, and locally adopted plumbing code, and product instructions may specify details for a particular assembly. A dimension found online shouldn’t automatically be treated as a universal rule. Before finalizing the drain selection, identify the code requirements that apply to the project location and compare them with the chosen product’s documentation.


