

Ceramic tile spacers help maintain consistent grout joints, but choosing the right width depends on the tile edges, layout, and grout-joint requirements. A spacer that seems to fit one tile may not produce even-looking joints across the finished floor. It also helps to distinguish basic spacers from tile-leveling system components: spacers control joint width, while a leveling system helps manage height differences between adjacent tiles.
This guide walks through how to choose a practical joint width and match the spacer type to the task. You’ll learn how cross, T-shaped, and wedge spacers differ from leveling-system components, how to place and check them as you set tile, and when to remove them so they don’t disturb alignment before grouting. A clear plan for spacing and tile-leveling supplies makes it easier to keep rows consistent and installations controlled.
Key Takeaways
- Choose a grout-joint width based on tile-edge consistency, layout, and grout plan, not tile size alone.
- Ceramic tile spacers maintain planned gaps; tile-leveling systems also help manage height differences between neighboring edges.
- Match the spacer design to the layout, and place it consistently at tile intersections or edges.
- Dry-lay and align the first row, then check spacing and tile position as you work to help prevent movement.
- For projects that need help controlling tile-edge height, Pro Supply Center offers ceramic tile leveling systems.
What Do Ceramic Tile Spacers Do for a Tile Installation?
Ceramic tile spacers hold a planned gap between adjacent tiles while they’re being set. Tile spacers are small placement aids that maintain separation between tiles, helping establish consistent grout joints and an orderly layout. The gap leaves room for grout and helps carry the same joint width through rows, columns, and pattern changes.
That joint is part of the installation, not just a visual detail. If gaps vary, grout lines can look uneven and the pattern may drift as work progresses. Tile materials and uses vary, as outlined in this general overview of Tile, so plan the joint around the actual tile and layout rather than relying on a one-size-fits-all choice.
How do spacers affect grout joints and tile layout?
Used consistently, spacers create reference points as you place each tile. In a straight grid, they help keep parallel joints aligned. In a running-bond or other patterned layout, they help maintain planned gaps as rows shift. Check the lines across several tiles, not just the gap beside a spacer. Small placement errors can become more noticeable across a larger area.
The intended joint width must suit the tile edges and layout. Edges may not be perfectly uniform, and a narrow joint can make those variations more visible. Consider edge consistency alongside the pattern and grout plan before choosing a spacer size. Tile dimensions alone don’t determine the right width.
Spacers are guides, not a substitute for the rest of the installation process. They can’t correct an uneven substrate or compensate for an unstable setting bed. Start with a properly prepared surface, follow layout lines, and check tile position as you work. If a tile shifts, correct its placement instead of expecting the spacer to pull surrounding tiles into alignment.
Are tile spacers and leveling clips the same thing?
No. Basic spacers maintain the planned separation between tiles. Leveling clips are components of a tile-leveling system designed to help manage lippage, the height difference between neighboring tile edges. The tools address related but distinct concerns: joint width and tile-edge height.
A consistent joint can still sit beside a tile that is higher than its neighbor, particularly when the tile or setting surface presents alignment challenges. A leveling system may help manage that difference, but it doesn’t replace joint planning, careful placement, or sound substrate preparation. Use spacing tools to maintain gaps, and consider a leveling system when managing adjacent tile-edge heights is also part of the installation plan.
How to Choose Ceramic Tile Spacer Size for Your Tile
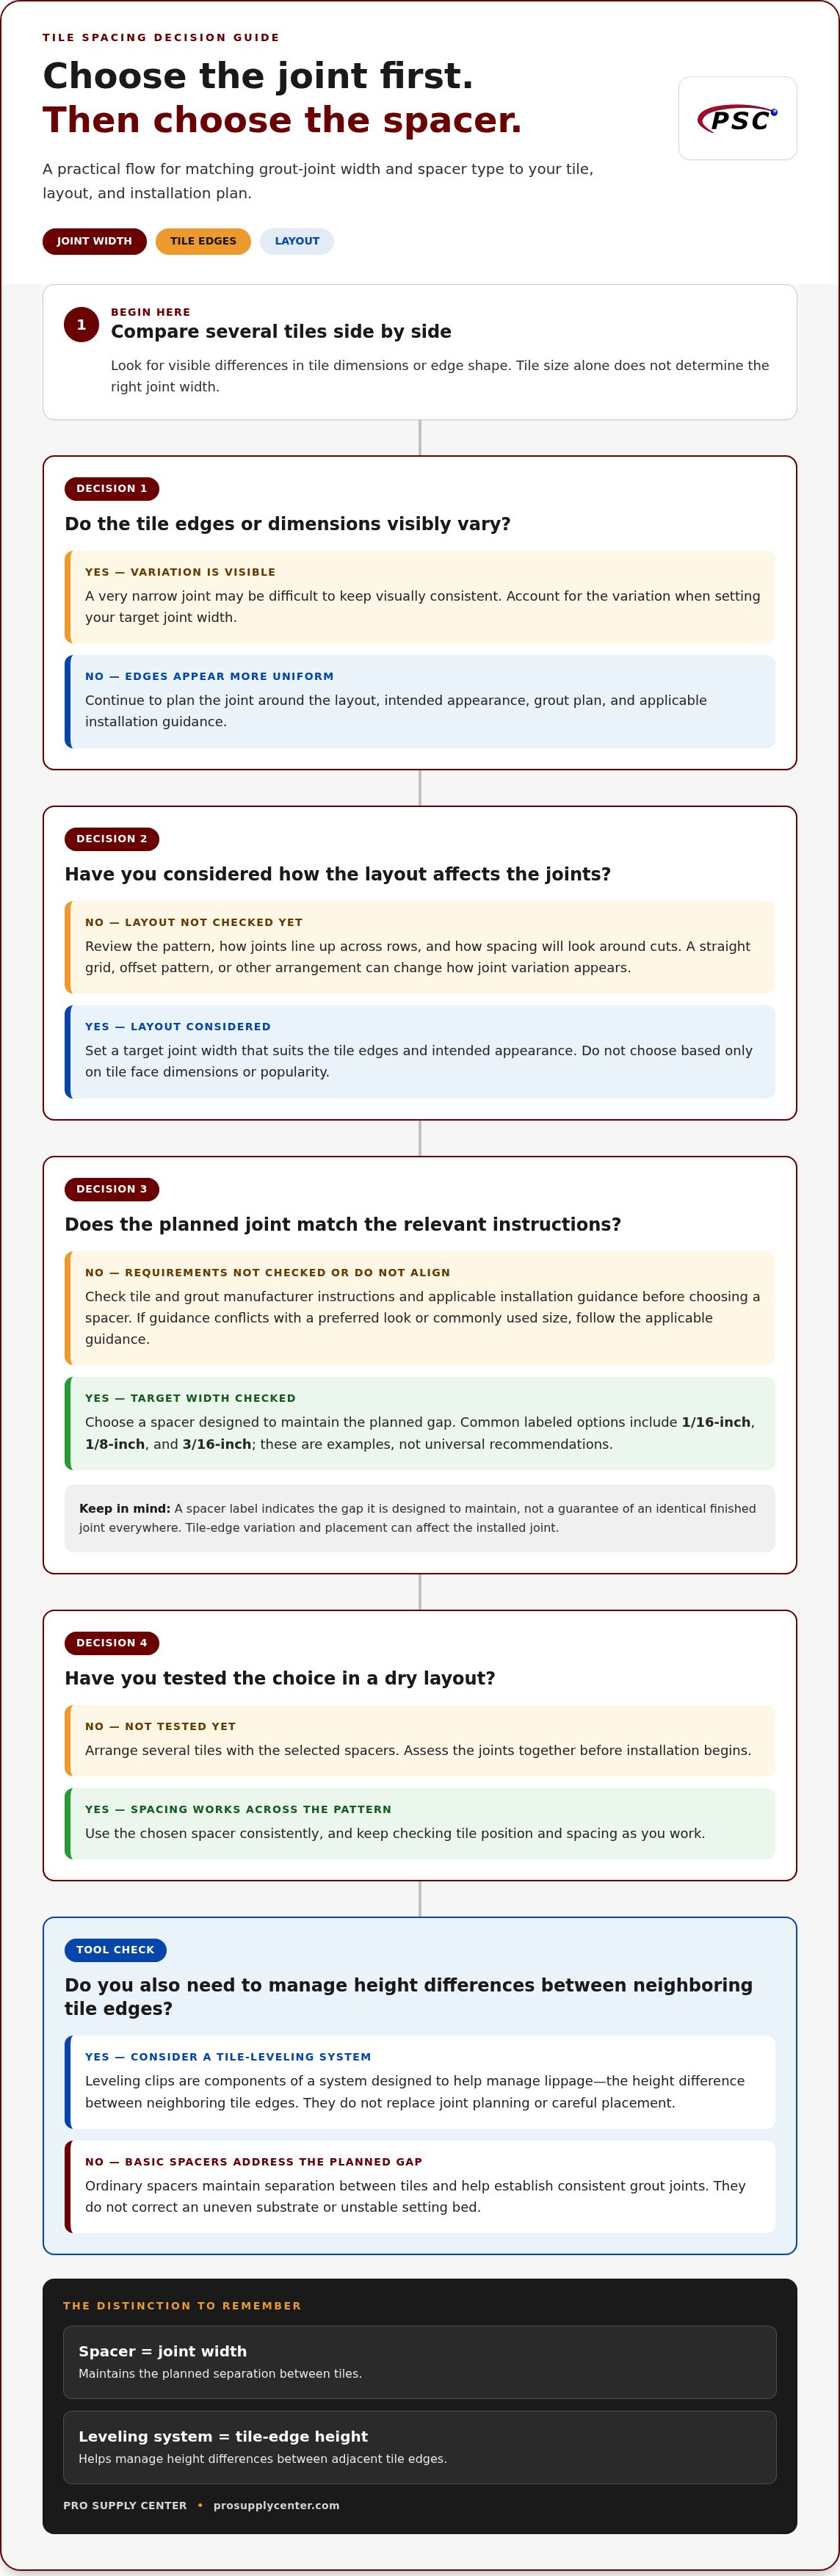
Choose the joint first, then select a spacer that can maintain it across the layout. Spacer size should follow the planned joint and tile conditions, not popularity. A size that appears often in product listings isn’t automatically right for your tile. Edge variation, pattern, and installation guidance all affect the decision.
Use this selection method before setting tile:
- Inspect the tile edges. Compare several pieces side by side and look for visible differences in dimensions or edge shape. More variation may make a very narrow joint difficult to keep visually consistent.
- Review the layout. A straight grid, offset pattern, or other arrangement can change how joint variation appears. Consider the overall look and how joints will line up across rows and around cuts.
- Set the grout-joint plan. Choose a target width that suits the tile’s edge consistency and intended appearance. Don’t select a width based only on the tile’s face dimensions.
- Check the requirements. Compare the planned joint with the tile and grout manufacturers’ instructions and applicable installation guidance before choosing a spacer.
- Test the choice in a dry layout. Arrange several tiles with the selected spacers and assess the joints together. This helps show whether the planned spacing works across the pattern before installation begins.
What should you check before choosing a spacer width?
Look beyond tile size. Compare multiple tiles for visible dimensional variation, and consider the material, surface, edge finish, installation pattern, and appearance you want from the finished joints. Then verify the intended width against relevant manufacturer instructions and installation guidance. If those requirements conflict with a preferred look or a commonly used size, follow the applicable guidance instead of assuming the popular option fits.
How do common spacer sizes translate into grout joints?
Spacer labels generally indicate the gap the spacer is designed to maintain. Common examples include 1/16-inch, 1/8-inch, and 3/16-inch sizes, but these are options, not universal recommendations. The installed joint may also reflect tile-edge variation and placement, so don’t treat a label as a guarantee of an identical finished gap everywhere. Confirm the selected width for the specific tile and installation.
Tile size alone isn’t enough to determine joint width. A large tile with inconsistent edges may need a different plan from a smaller, more uniform tile, even in a similar pattern. Check the selected joint against manufacturer instructions and applicable guidance rather than assuming one minimum width applies to every tile or project.
Once the joint plan is set, choose a spacer suited to maintaining that gap. If the project also needs help managing differences in height between neighboring tile edges, Pro Supply Center offers ceramic tile leveling systems for that distinct function.
Ceramic Tile Spacers vs. Tile-Leveling Clips: Which Tool Fits?
These tools can appear together in product listings, but they solve different problems. Ordinary spacers set the gap between tiles. Tile-leveling systems help manage height differences between neighboring tile edges, commonly called lippage. Choose based on what the installation needs: consistent joint spacing, help controlling tile-edge height, or both.
| Tool | Primary function | Typical components | Decision factors |
|---|---|---|---|
| Basic spacers | Maintain planned gaps between tiles | Individual spacer pieces in a design suited to the layout | Joint-width plan, tile edges, and pattern |
| Tile-leveling system | Help manage height differences between adjacent tile edges | System components such as clips with wedges or caps | Tile format, surface variation, and installation conditions |
A leveling system doesn’t replace spacing decisions. The joint still needs to suit the tile and layout, and compatible system components should be used according to their instructions. Neither basic spacers nor leveling clips can correct an inadequately prepared, unstable, or uneven substrate. Surface preparation and careful placement remain essential.
When are basic tile spacers sufficient?
Basic spacers may be sufficient for a straightforward layout where the main requirement is holding a consistent joint and the tiles can be set and aligned carefully. For example, a simple grid on a properly prepared surface may not call for a separate leveling system. Place the tiles deliberately, check alignment across the work area, and correct movement as you go. Spacers alone don’t promise a lippage-free result.
When should an installer consider a leveling system?
Consider a leveling system when tile format, variation in the tile or surface, and installation conditions make managing adjacent edge heights a priority. Larger-format tiles can make height differences more noticeable, but no single factor decides the need by itself. Assess the tile and substrate, follow product instructions, and maintain the planned joint while setting each piece.
Clips and wedges or caps are system components, not standalone substitutes for basic spacers in every application. They help manage lippage as tiles are positioned, but they don’t flatten a poor substrate or replace careful workmanship. Choose tools according to the installation’s requirements. Pro Supply Center offers ceramic tile leveling systems for projects where that additional function is useful.
In short, use ordinary spacers when joint control is the primary need. Consider a leveling system when tile-edge height differences also need attention. Ceramic tile spacers set the gap; leveling-system components help manage the relationship between neighboring tile edges. Keeping those roles distinct helps you select the right tool without expecting either one to solve problems beyond its function.
How to Place and Remove Ceramic Tile Spacers During Installation
Ceramic tile spacers work best as part of a deliberate setting sequence, not as an afterthought. Dry-lay a small area first to confirm the pattern, cuts, and starting point. Align the first row with your layout lines, then set tiles and place spacers as you go, before the setting material cures. Keep the spacer design and orientation consistent so each joint follows the same plan.
Use this sequence as a practical check:
- Dry-fit the layout. Arrange tiles without setting material to assess the pattern and joint plan. Adjust the starting position if needed to avoid awkward cuts or drifting rows.
- Align the first row. Follow the layout lines and confirm that the tiles sit in the intended position before building from them.
- Set and space each tile. Place the chosen spacers at tile intersections or along edges, as appropriate for their design. Don’t force them into a joint.
- Check as you progress. Compare joint width and tile alignment against nearby tiles and layout lines. Look across adjacent tile faces for lippage instead of relying on spacers to reveal every height difference.
- Correct movement early. If a tile shifts or a gap changes, adjust its position while the setting material is workable, following its installation instructions.
Where and when should spacers be placed?
Place spacers while setting the tiles, before the setting material cures, and position them consistently according to their shape and intended use. Some designs fit at intersections; others sit along tile edges. There isn’t one placement pattern for every design. Step back periodically to check layout lines, compare several joints, and view adjoining tile faces from a low angle to spot height differences.
How should spacers be removed without disturbing tile?
Follow the spacer and setting-material manufacturers’ instructions for removal timing, insertion depth, and whether a spacer is reusable. Timing depends on the specified materials and installation conditions, so don’t rely on a fixed wait time that may not apply to your project. Use the recommended removal method, and avoid twisting or levering against a tile edge if it could shift the tile or cause damage.
Before grouting, check that spacers have been removed where required and that joints are clear for the next installation step, following the grout and setting-material directions. If a spacer resists removal, stop rather than applying force that could disturb the tile. A final check of alignment and joint consistency can catch issues before they’re hidden by grout.
For projects that also need help managing differences in tile-edge height, ceramic tile leveling systems from Pro Supply Center provide that additional function. Use the system according to its instructions alongside a sound layout and careful placement.
Choose the Right Tiling Supplies for a Consistent Finished Surface
A reliable choice starts with the installation, not the product category. First establish the grout joint, then assess the tile and layout, and choose tools for the tasks the surface requires. Ceramic tile spacers help maintain the planned gap. A leveling system has a different role: it helps manage height differences between neighboring tile edges. Some projects call for joint spacing alone; others may benefit from both functions.
Use this final check before selecting tiling accessories:
- Set the joint plan. Choose a grout-joint width that suits the tile, its edge consistency, the pattern, and applicable manufacturer instructions.
- Assess the tile and layout together. Consider tile type, edge variation, surface conditions, and how the pattern will carry through the space.
- Identify the tool’s job. Use spacers to hold the planned gap. Consider a leveling system only if managing tile-edge height differences is also a project need.
- Follow installation directions. Use product instructions and applicable installation guidance to select and use accessories.
This decision path works for a professional installer planning a larger job and for a DIY reader setting tile in a single room. It ties tool choice to installation needs rather than popularity or assumptions about tile size. Neither spacers nor leveling components replace a suitable substrate, accurate layout, or attentive placement.
Match tiling accessories to the installation task
Separate the two goals before choosing: do you need to maintain consistent grout-joint spacing, manage lippage, or address both? Review tile type, layout, surface conditions, and relevant installation instructions together. This helps prevent a common mismatch: selecting a tool for one function and expecting it to solve another. Keep the planned joint consistent even when using a leveling system.
Explore ceramic tile leveling systems
For installations where managing neighboring tile-edge heights is part of the plan, Pro Supply Center offers ceramic tile leveling systems. These systems help with that specific function; they aren’t a universal replacement for basic joint spacers. Use the selected system according to its instructions, alongside proper surface preparation and layout checks. The right accessory supports the work, but it can’t compensate for an unstable substrate or careless setting.
With the joint established, tile conditions assessed, and tools selected for their actual jobs, you can begin installation with a clearer plan. Professional tiling supplies from Pro Supply Center include products for tile installation needs.
Prepare Your Next Tile Installation with Confidence
Before work begins, turn your decisions into a simple jobsite reference. Record the approved joint plan, tile orientation, layout starting point, and any installation directions that affect accessory use. Keeping these details together helps maintain consistency across work areas and makes it easier to notice a change before it carries through the finished surface.
Ceramic tile spacers are one part of a well-planned installation, but the result also depends on steady workmanship and timely checks. Pause to review progress rather than waiting until a full section is set. If something looks off, address it while adjustments are still practical. This measured approach supports cleaner transitions and a more controlled finish.
For your next project, choose supplies to match the installation task and keep manufacturer instructions close at hand. Pro Supply Center offers professional tiling supplies, including ceramic tile leveling systems for projects that call for that function. A clear plan and the right tools can help you start tile work with confidence.
Frequently Asked Questions
What size ceramic tile spacers should I use?
There isn’t one spacer width that suits every tile or installation. Choose based on tile-edge consistency, layout, intended joint, and the tile manufacturer’s instructions. For example, an irregular edge may make a very narrow joint harder to keep looking even. Confirm the planned width against applicable installation guidance, then use that spacer size consistently and check rows as you work.
Can I use the same tile spacers for floor and wall tile?
Possibly, but suitability depends on the spacer design, tile, and installation method, not simply whether the surface is a floor or wall. A spacer maintains a joint; it doesn’t necessarily hold a wall tile in place against gravity. Follow product directions and use appropriate temporary support where the installation requires it. Check that the tile stays in position before the setting material firms up.
Do tile spacers stay in after grouting?
Many conventional spacers are removed before grouting, but the correct procedure depends on the spacer design and setting materials. Follow the manufacturers’ removal directions, including timing, and take care not to shift a tile or chip an edge. Leveling-system components can have different removal procedures from ordinary spacers. Don’t assume they should be removed in the same way; follow the instructions for the specific system.
How many ceramic tile spacers do I need?
The quantity depends on the number and dimensions of the tiles, the layout, and the placement pattern required by the spacer design. Sketch a section of the layout and estimate the spacers needed at each intersection or edge, then apply that estimate to the full area. Include replacements for lost or damaged pieces, and compare the package quantity with your project estimate before starting.
Are tile spacers necessary for every tile installation?
Spacers are a practical way to hold planned joints, but the appropriate approach depends on the tile system and installation method. Some methods may use other guides or components to maintain spacing. Follow the tile and setting-material instructions, and keep the joint plan consistent across the layout. Spacers won’t correct tile-size variation, an uneven substrate, or a tile that has moved during setting.
What is the difference between tile spacers and leveling clips?
Basic spacers maintain separation between adjacent tiles, while leveling clips are components of a system intended to help manage relative tile-edge height. A project may need joint spacing alone or additional lippage management, depending on the tile and installation conditions. Neither tool replaces substrate preparation or careful setting. Treat leveling clips as part of their system and follow its directions rather than using them as ordinary spacers.
Can tile spacers prevent lippage?
Conventional spacers maintain joint width; they don’t independently level tile faces. Lippage can relate to substrate flatness, tile characteristics, layout, and setting technique, so check neighboring edges as you install. A tile-leveling system may help manage relative edge height when suitable for the project, but it can’t correct an unsuitable substrate or guarantee a perfectly flush surface. Prepare the surface and follow the tile and system instructions.


